收款
安全地在线上收款。
制作支付表单或使用预构建的结账页面来开始接收线上付款。
不是开发人员?
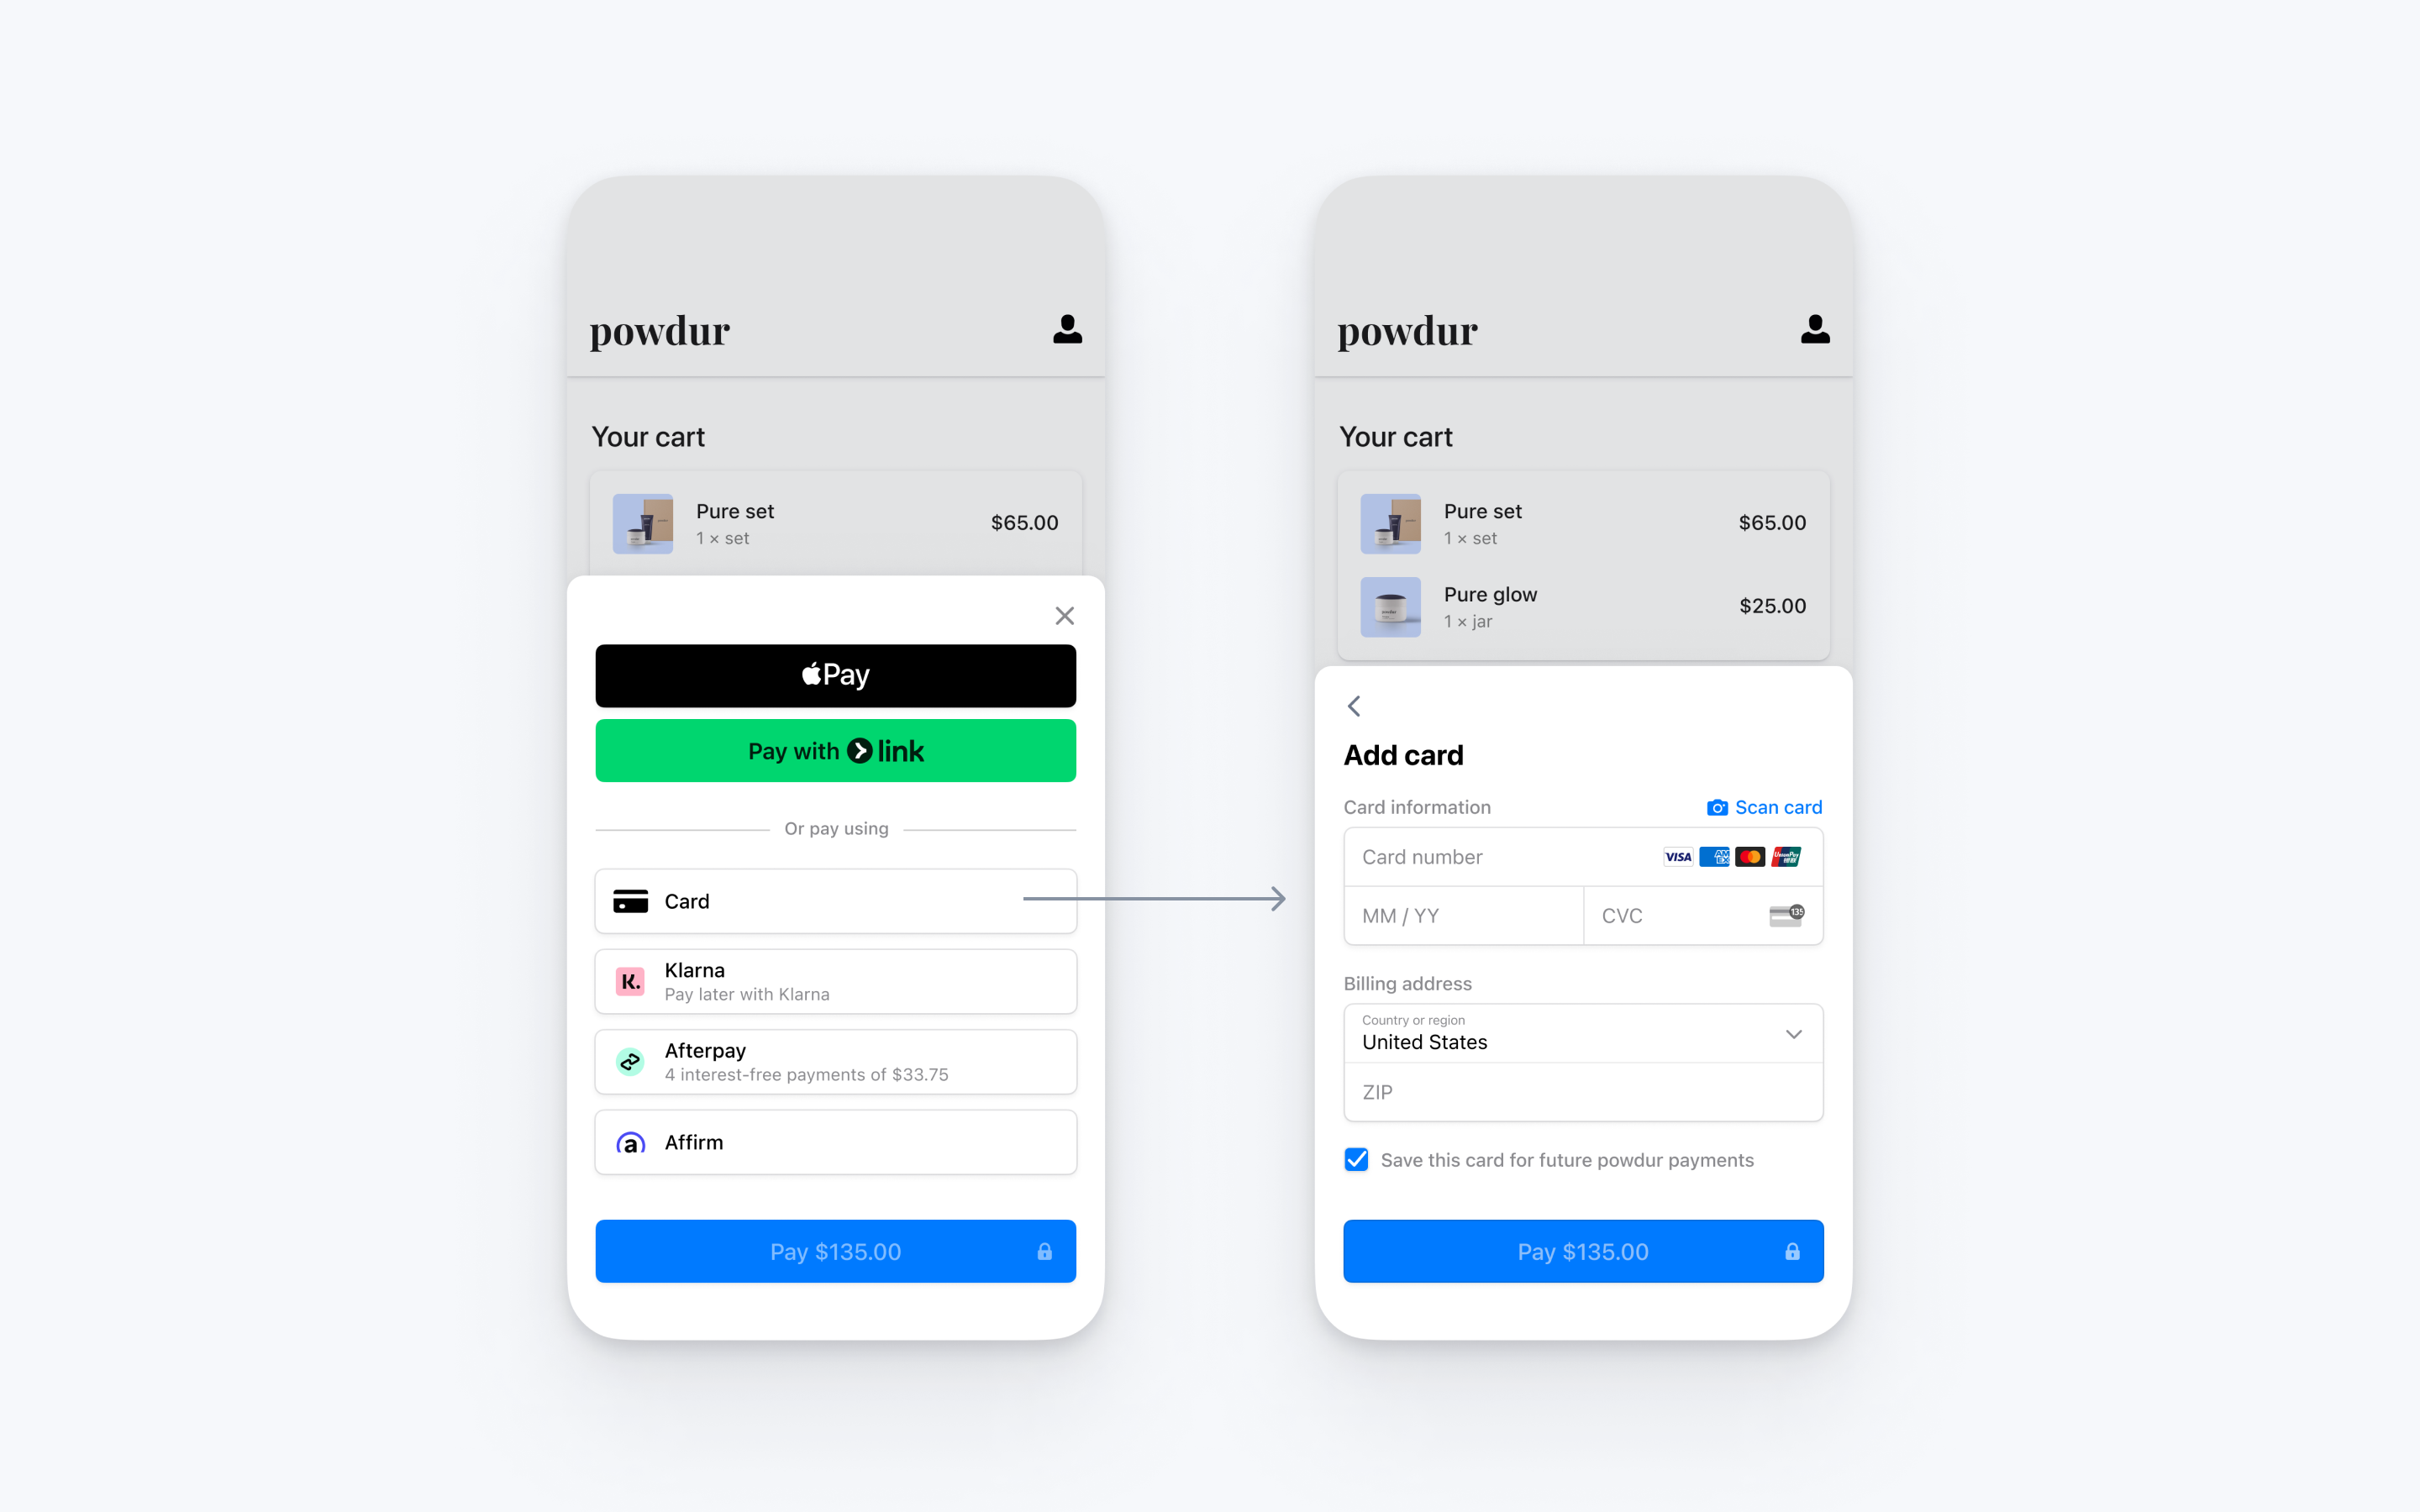
此集成将支付所需的全部步骤(包括收集支付详情和确认支付)整合到一个单一表单中,并显示在您的应用顶部。
设置 Stripe服务器端客户端
首先,您需要有 Stripe 账户。立即注册。
服务器端
该集成要求您的服务器上的端点与 Stripe API 通讯。请用官方库从您的服务器访问 Stripe API:
客户端
React Native SDK 是开源的,有完整的文档。在内部,它利用的是原生 iOS 和 Android SDK。要安装 Stripe 的 React Native SDK,在您的项目目录中运行以下某个指令(取决于您使用的软件包管理器)。
然后,安装一些其他必要的依赖项:
- 对于 iOS,请转到 ios 目录并运行
pod install以确保同时安装了所需的本地依赖项。 - 对于 Android,无需安装其他依赖项。
注意
建议按照官方 TypeScript 指南添加 TypeScript 支持。
Stripe 初始化
要在您的 React Native 应用中初始化 Stripe,使用 StripeProvider 组件包裹您的支付界面,或者使用 initStripe 初始化方法。只需要 publishableKey 中的 API 公钥。下例显示的是用 StripeProvider 组件初始化 Stripe 的方式。
import { useState, useEffect } from 'react';
import { StripeProvider } from '@stripe/stripe-react-native';

function App() {
  const [publishableKey, setPublishableKey] = useState('');

  const fetchPublishableKey = async () => {
    const key = await fetchKey(); // fetch key from your server here
    setPublishableKey(key);
  };

  useEffect(() => {
    fetchPublishableKey();
  }, []);

  return (
    <StripeProvider
      publishableKey={publishableKey}
      merchantIdentifier="merchant.identifier" // required for Apple Pay
      urlScheme="your-url-scheme" // required for 3D Secure and bank redirects
    >
      {/* Your app code here */}
    </StripeProvider>
  );
}
启用支付方式
查看您的支付方式设置,启用您想支持的支付方式。您至少需要启用一个支付方式才能创建 PaymentIntent。
默认情况下,Stripe 支持信用卡和其他常见的支付方式,可以帮助您获得更多客户,但建议您开启与您的业务和客户相关的其他支付方式。查看支付方式支持,了解支持的产品和支付方式,并查看我们的定价页面了解费用。
添加端点服务器端
注意
要在创建 PaymentIntent 之前显示 PaymentSheet,请参阅收集支付详情后再创建 Intent。
该集成使用三个 Stripe API 对象:
PaymentIntent:Stripe 用它来表示您从客户收款的意图,跟踪您的扣款尝试及整个过程中付款状态的变化情况。
(可选)Customer:要为将来的付款设置支付方式,就必须将它绑定到 Customer。当客户在您的公司创建账户时,创建 Customer 对象。如果您的客户以访客身份付款,则可以在付款前创建个 Customer 对象,然后再将它关联到您自己内部的客户账户表示。
(可选)CustomerSession:Customer 对象上的信息为敏感信息,不能直接从应用中检索。CustomerSession 授予 SDK 对 Customer 的临时范围访问权限,并提供其他配置选项。查看完整的 configuration options列表。
注意
如果您从不将银行卡保存到客户,并且不允许回头客重复使用已保存的银行卡,则可以从集成中省略 Customer 和 CustomerSession 对象。
出于安全原因,您的应用无法创建这些对象。相反,在服务器上会添加一个端点,其功能如下:
- 检索 Customer,或新建一个。
- 为 Customer 创建一个 CustomerSession。
- 创建 PaymentIntent,设置好 amount、currency 和 customer。
- 将 Payment Intent 的客户端私钥、CustomerSession 的
client_以及 Customer 的 id 和您的公钥返回到您的应用程序。secret
在结账过程中显示给客户的支付方式也包含在 PaymentIntent 中。您可以让 Stripe 从管理平台设置中提取支付方式,也可以手动列出它们。无论选择哪种方式,都要知道在 PaymentIntent 中传递的货币会过滤显示给客户的支付方式。例如,如果您在 PaymentIntent 中传递 eur,并且在管理平台中启用了 OXXO,则不会向客户显示 OXXO,因为 OXXO 不支持 eur 支付。
除非您的集成需要基于代码的选项来提供支付方式,否则 Stripe 建议使用自动选项。这是因为 Stripe 会评估货币、支付方式限制和其他参数,以确定支持的支付方式列表。优先显示可提高转化率且与货币和客户所在地最相关的支付方式。
收集付款详情客户端
显示移动端 Payment Element 前,您的结账页面应:
- 显示购买的产品和总金额
- 收集所需的配送信息
- 包含一个结账按钮来展示 Stripe 的 UI
在您的应用的结账表单内,向上一步中创建的后端端点发送网络请求,从 useStripe hook 调用 initPaymentSheet。
export default function CheckoutScreen() {
  const { initPaymentSheet, presentPaymentSheet } = useStripe();
  const [loading, setLoading] = useState(false);

  const fetchPaymentSheetParams = async () => {
    const response = await fetch(`${API_URL}/payment-sheet`, {
      method: 'POST',
      headers: {
        'Content-Type': 'application/json',
      },
    });
    const { paymentIntent, ephemeralKey, customer } = await response.json();

    return {
      paymentIntent,
      ephemeralKey,
      customer,
    };
  };

  const initializePaymentSheet = async () => {
    const {
      paymentIntent,
      ephemeralKey,
      customer,
    } = await fetchPaymentSheetParams();

    const { error } = await initPaymentSheet({
      merchantDisplayName: "Example, Inc.",
      customerId: customer,
      customerEphemeralKeySecret: ephemeralKey,
      paymentIntentClientSecret: paymentIntent,
      // Set `allowsDelayedPaymentMethods` to true if your business can handle payment
      //methods that complete payment after a delay, like SEPA Debit and Sofort.
      allowsDelayedPaymentMethods: true,
      defaultBillingDetails: {
        name: 'Jane Doe',
      }
    });
    if (!error) {
      setLoading(true);
    }
  };

  const openPaymentSheet = async () => {
    // see below
  };

  useEffect(() => {
    initializePaymentSheet();
  }, []);

  return (
    <Screen>
      <Button
        variant="primary"
        disabled={!loading}
        title="Checkout"
        onPress={openPaymentSheet}
      />
    </Screen>
  );
}
当客户点击 Checkout 按钮时,调用 presentPaymentSheet() 来打开表单。客户完成付款后,表单关闭,通过一个可选的 StripeError<PaymentSheetError> 解析 promise。
export default function CheckoutScreen() {
  // continued from above

  const openPaymentSheet = async () => {
    const { error } = await presentPaymentSheet();

    if (error) {
      Alert.alert(`Error code: ${error.code}`, error.message);
    } else {
      Alert.alert('Success', 'Your order is confirmed!');
    }
  };

  return (
    <Screen>
      <Button
        variant="primary"
        disabled={!loading}
        title="Checkout"
        onPress={openPaymentSheet}
      />
    </Screen>
  );
}
如果发生错误,则通知用户他们已完成(例如,显示订单确认界面)。
将 allowsDelayedPaymentMethods 设置为 true,以允许延迟通知型支付方式,例如美国银行账户。对于这些支付方式,只有当 PaymentSheet 完成后才能知道最终的付款状态是成功还是失败。如果您支持这些类型的支付方式,请告知客户他们的订单已被确认,并且仅在付款成功时履行订单(例如,为他们安排发货)。
设置返回页面(仅限 iOS)客户端
当客户退出您的应用时(例如,在 Safari 浏览器或其银行应用程序中进行验证),为他们提供一种方式,以便他们自动返回到您的应用程序。很多支付方式类型_要求_提供一个返回 URL。如果您不提供这样一个 URL,我们就无法向您的用户显示需要返回 URL 的支付方式,即使您已启用了这些支付方式。
要提供返回 URL,请执行以下操作:
注意
如果您在使用 Expo,则在 app. 文件中设置您的协议。
import { useEffect, useCallback } from 'react';
import { Linking } from 'react-native';
import { useStripe } from '@stripe/stripe-react-native';

export default function MyApp() {
  const { handleURLCallback } = useStripe();

  const handleDeepLink = useCallback(
    async (url: string | null) => {
      if (url) {
        const stripeHandled = await handleURLCallback(url);
        if (stripeHandled) {
          // This was a Stripe URL - you can return or add extra handling here as you see fit
        } else {
          // This was NOT a Stripe URL – handle as you normally would
        }
      }
    },
    [handleURLCallback]
  );

  useEffect(() => {
    const getUrlAsync = async () => {
      const initialUrl = await Linking.getInitialURL();
      handleDeepLink(initialUrl);
    };

    getUrlAsync();

    const deepLinkListener = Linking.addEventListener(
      'url',
      (event: { url: string }) => {
        handleDeepLink(event.url);
      }
    );

    return () => deepLinkListener.remove();
  }, [handleDeepLink]);

  return (
    <View>
      <AwesomeAppComponent />
    </View>
  );
}
此外,调用 initPaymentSheet 方式时设置 returnURL:
await initPaymentSheet({
  ...
  returnURL: 'your-app://stripe-redirect',
  ...
});
处理付款后事件
付款完成时,Stripe 会发送一个 payment_intent.succeeded 事件。使用 管理平台 Webhook 工具、或按照 Webhook 指南来接收这些事件并运行操作,例如,向客户发送订单确认邮件、在数据库中记录订单,或启动配送流程。
侦听这些事件,而不是等待客户端回调。在客户端,客户可能会在执行回调之前关闭浏览器窗口或退出应用程序,并且恶意客户端可能会操纵响应。设置您的集成来侦听异步事件,这样才能用单一集成用用接受不同类型的支付方式。
除了处理 payment_ 事件外,建议在使用 Payment Element 收款时也处理其他的这些事件:
| 事件 | 描述 | 操作 |
|---|---|---|
| payment_intent.succeeded | 客户成功完成付款时发送。 | 向客户发送订单确认通知,并履行他们的订单。 |
| payment_intent.processing | 当客户成功发起付款但并未完成时发送。当客户发起银行借记时,通常会发送此事件。之后将会出现 payment_ 或 payment_ 事件。 | 向客户发送订单确认,告知他们的付款正等待处理。对于数字商品,您可能想先履行订单,然后再等付款完成。 |
| payment_intent.payment_failed | 在客户尝试付款但付款失败时发送。 | 如果一笔付款从 processing 变为 payment_,则让客户再尝试一次。 |
启用银行卡扫描客户端
注意
Apple iOS 应用程序审核流程要求启用卡片扫描功能。Android 应用程序审核流程不要求启用卡片扫描功能,但我们建议启用。
iOS
若要在 iOS 上启用卡片扫描支持,请在应用程序的 Info. 中设置 NSCameraUsageDescription(隐私 - 相机使用说明),并提供访问相机的原因(例如,“用于扫描卡片”)。
Optional Android
若要启用银行卡扫描支持,需在 Google Pay & Wallet Console 中请求 Google Pay API 的生产访问权限。
- 如果您已启用 Google Pay,银行卡扫描功能会在符合条件的设备上自动在我们的用户界面中提供。想了解更多符合条件的设备,请参见Google Pay API 限制
- 重要提示:银行卡扫描功能仅在与 Google Pay & Wallet Console 中注册的签名密钥相同的构建中显示。使用不同签名密钥进行测试或调试的构建(例如通过Firebase App Tester 分发的构建)不会显示扫描银行卡选项。要在预发布构建中测试银行卡扫描功能,您必须采取以下措施之一:
- 使用生产签名密钥对您的测试构建进行签名
- 将您的测试签名密钥指纹添加到 Google Pay & Wallet Console
可选启用 Link
在您的支付方式设置中启用 Link,以允许客户使用 Link 的一键快速结账按钮安全地保存并重复使用他们的支付信息。
将客户的邮件地址传递到 Mobile Payment Element
Link 利用客户的邮件地址对客户进行验证。Stripe 建议预填充尽可能多的信息,以简化结账流程。
要预先填充客户的姓名、邮件地址和电话号码,请将包含客户信息的 defaultBillingDetails 提供给 initPaymentSheet。
await initPaymentSheet({
  ...
  defaultBillingDetails: {
    name: 'Jenny Rosen',
    email: 'jenny.rosen@example.com',
    phone: '888-888-8888',
  },
});
可选启用 Apple Pay
注册 Apple Merchant ID
可通过在 Apple 开发人员网站注册新的标识符来获取 Apple 商家 ID。
在表单中填写描述和标识符。描述内容仅供您自己记录之用,之后可随时更改。Stripe 建议用您的应用的名称作为标识符(例如,merchant.)。
创建新的 Apple Pay 证书
为您的应用创建证书,以加密支付数据。
转到管理平台中的 iOS 证书设置,点击添加新应用程序,然后按照说明进行操作。
下载证书签名请求 (CSR) 文件,来从 Apple 获取安全证书,以便使用 Apple Pay。
必须用一个 CSR 文件发布具体的一个证书。如果您切换您的 Apple Merchant ID,则必须前往管理平台的 iOS 证书设置中获取一个新的 CSR 和证书。
集成 Xcode
将 Apple Pay 功能添加到您的应用程序。在 Xcode 中,打开您的项目设置,点击签名和功能选项卡,然后添加 Apple Pay 功能。此时,系统可能会提示您登入您的开发人员账户。选择您之前创建的商家 ID,您的应用程序就可以接受 Apple Pay 了。
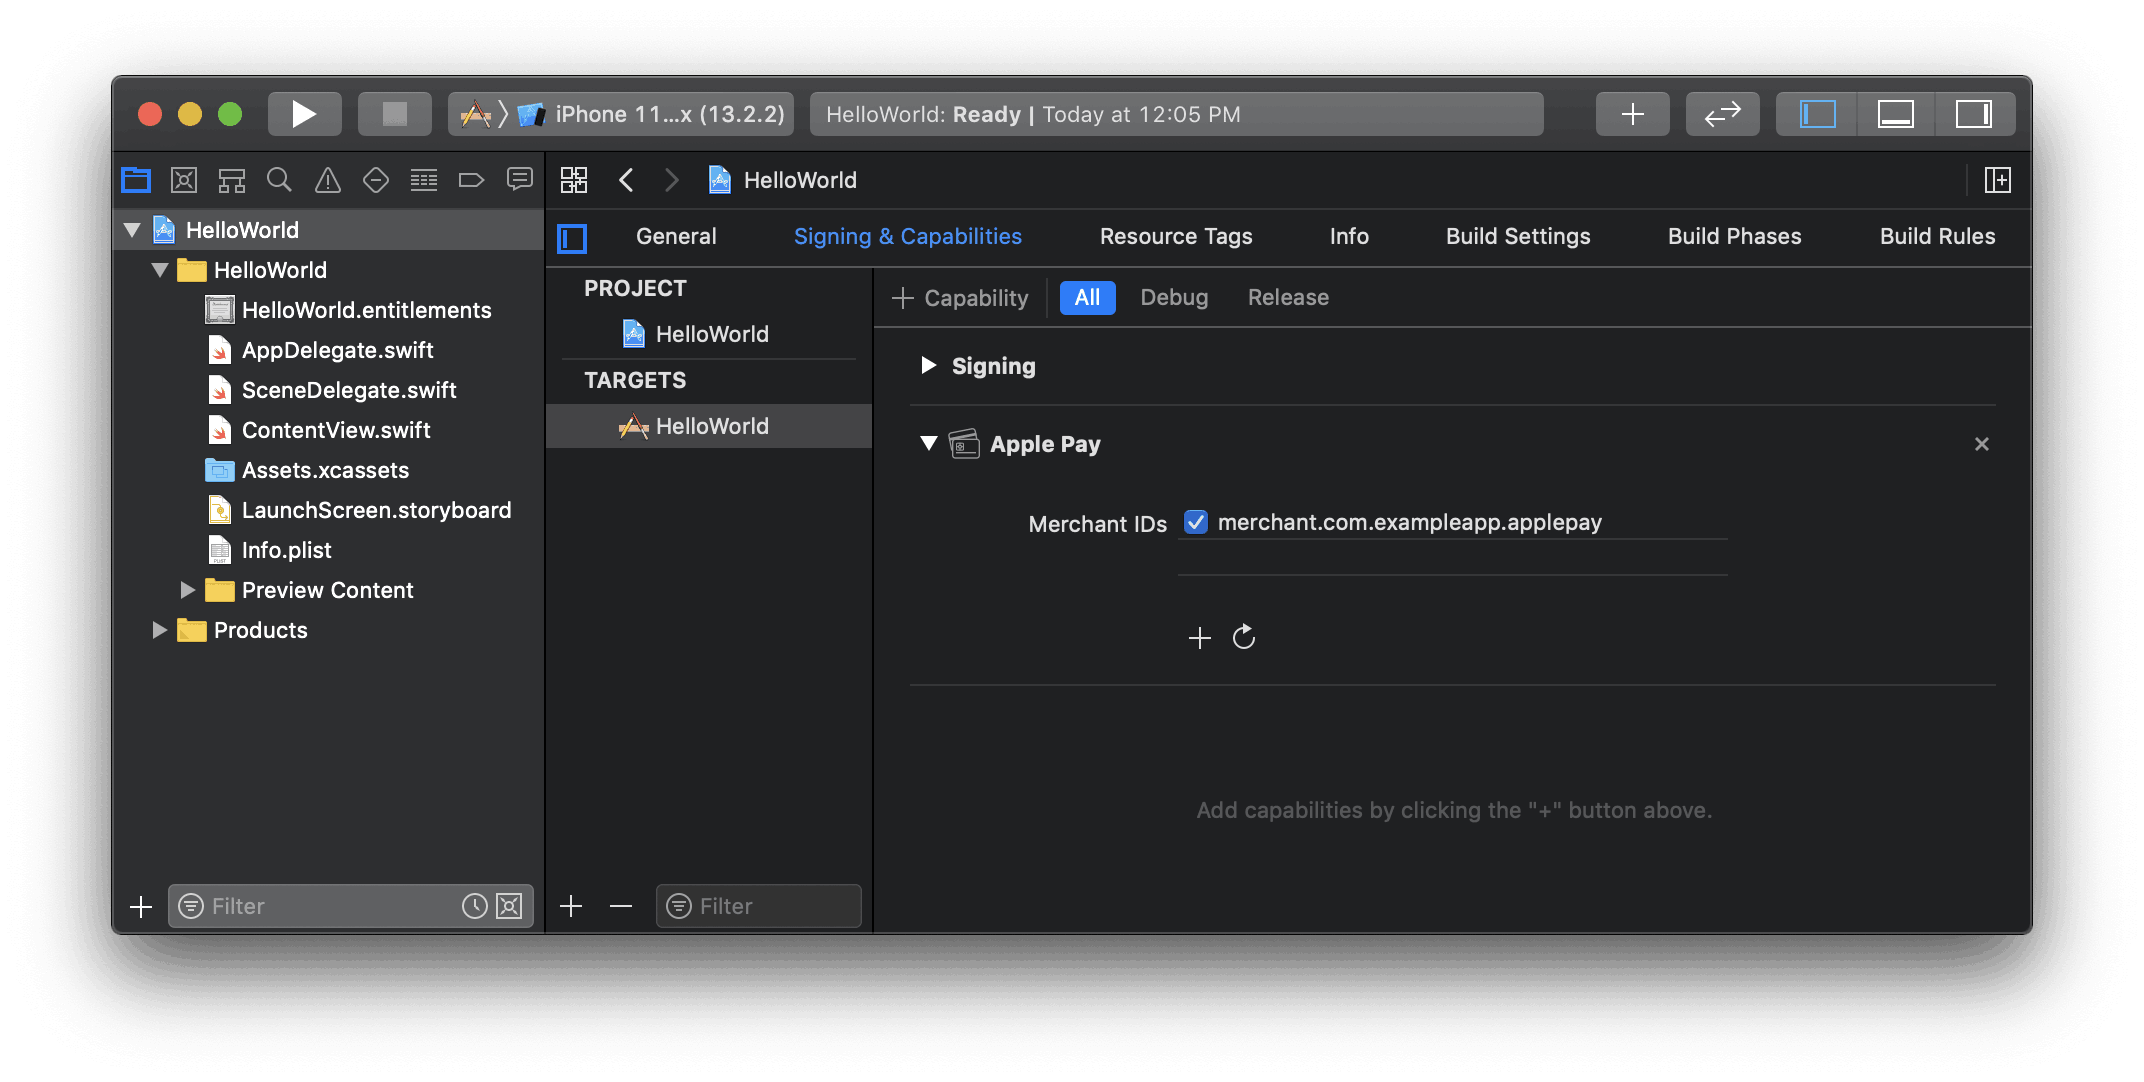
在 Xcode 中启用 Apple Pay 功能
添加 Apple Pay
订单跟踪
在 iOS 16 或更高版本中添加订单跟踪信息时,请配置一个 setOrderTracking 回调函数。Stripe 会在支付完成后调用您实施的程序,但该操作在 iOS 关闭 Apple Pay 表单之前进行。
在您实施的 setOrderTracking 回调函数的程序中,从您的服务器获取已完成订单的订单详情,并将该详情传递给提供的 completion 函数。
要了解有关订单跟踪的更多信息,请参阅 Apple 钱包订单文档。
await initPaymentSheet({
  // ...
  applePay: {
    // ...
    setOrderTracking: async complete => {
      const apiEndpoint =
        Platform.OS === 'ios'
          ? 'http://localhost:4242'
          : 'http://10.0.2.2:4567';
      const response = await fetch(
        `${apiEndpoint}/retrieve-order?orderId=${orderId}`,
        {
          method: 'GET',
          headers: {
            'Content-Type': 'application/json',
          },
        },
      );
      if (response.status === 200) {
        const orderDetails = await response.json();
        // orderDetails should include orderIdentifier, orderTypeIdentifier,
        // authenticationToken and webServiceUrl
        complete(orderDetails);
      }
    },
  },
});
可选启用 Google Pay
设置您的集成
要使用 Google Pay,先将以下内容添加到您的 AndroidManifest.xml 的 <application>标签,来启用 Google Pay API:
<application>
  ...
  <meta-data
    android:name="com.google.android.gms.wallet.api.enabled"
    android:value="true" />
</application>
更多详情,请参见 Google Pay 针对 Android 设备编写的设置 Google Pay API 指南。
添加 Google Pay
初始化 PaymentSheet 时,将 merchantCountryCode 设置为您的业务所在的国家/地区的代码 并将 googlePay 设置为 true。
您还可以通过传递 testEnv 参数来使用测试环境。您只能在实物 Android 设备上测试 Google Pay。遵循 React Native 文档中的说明,在真实设备上测试您的应用。
const { error, paymentOption } = await initPaymentSheet({
  // ...
  googlePay: {
    merchantCountryCode: 'US',
    testEnv: true, // use test environment
  },
});
可选自定义表单客户端
所有自定义操作均用 initPaymentSheet 来配置。
外观
用 Appearance API 自定义颜色、字体等,使其匹配您的应用程序的外观样式。
商家显示名称
通过设置 merchantDisplayName 来指定向客户显示的商业名称。默认情况下,使用的是您的应用的名称。
await initPaymentSheet({
  // ...
  merchantDisplayName: 'Example Inc.',
});
暗色模式
默认情况下,PaymentSheet 自动适应用户的整个系统的外观设置(明暗模式)。您可以通过在 iOS 上将 style 属性设置为 alwaysLight 或 alwaysDark 来更改。
await initPaymentSheet({
  // ...
  style: 'alwaysDark',
});
在您 Android 应用上,设置亮色或暗色模式:
// force dark
AppCompatDelegate.setDefaultNightMode(AppCompatDelegate.MODE_NIGHT_YES)
// force light
AppCompatDelegate.setDefaultNightMode(AppCompatDelegate.MODE_NIGHT_NO)
默认账单详情
要为 PaymentSheet 中收集的账单详情设置默认值,请配置 defaultBillingDetails 属性。PaymentSheet 会用您提供的值预先填充其字段。
await initPaymentSheet({
  // ...
  defaultBillingDetails: {
      email: 'foo@bar.com',
      address: {
        country: 'US',
      },
  },
});
收集账单详情
用 billingDetailsCollectionConfiguration 指定您希望如何在 PaymentSheet 中收集账单详情。
可以收集客户的姓名、邮件地址、电话号码和地址。
如果您不打算收集支付方式需要的值,则必须进行以下操作:
- 将
PaymentSheet未收集的值附到defaultBillingDetails属性。 - 将
billingDetailsCollectionConfiguration.设置为attachDefaultsToPaymentMethod true。
await initPaymentSheet({
  // ...
  defaultBillingDetails: {
    email: 'foo@bar.com',
  }
  billingDetailsCollectionConfiguration: {
    name: PaymentSheet.CollectionMode.ALWAYS,
    email: PaymentSheet.CollectionMode.NEVER,
    address: PaymentSheet.AddressCollectionMode.FULL,
    attachDefaultsToPaymentMethod: true
  },
});
注意
请咨询律师,了解与收集信息有关的法律。仅在需要收集号码来完成交易时,才收集手机号码。
可选处理用户的退出动作
PaymentSheet 在本地存储一些信息,以记住用户是否在某个应用程序内使用了 Link。要清除 PaymentSheet 的内部状态,在用户登出时调用 resetPaymentSheetCustomer() 方法。
export default function CheckoutScreen() {
  // continued from above
  const { initPaymentSheet, presentPaymentSheet, resetPaymentSheetCustomer } = useStripe();

  const logout = async () => {
    await resetPaymentSheetCustomer();
  };

  return (
    <Screen>
      <Button
        title="Checkout"
        onPress={openPaymentSheet}
      />
      <Button
        title="Checkout"
        onPress={logout}
      />
    </Screen>
  );
}
可选在您的用户界面完成付款
您可以在出示支付表单时仅收集支付方式详情,然后再在您的应用的用户界面上调用 confirm 方法来完成付款。如果您使用自定义购买按钮,或在收集了付款详情后需要额外的步骤,这会非常有用。

注意
可在我们的 GitHub 上查看示例集成。
- 首先,调用
initPaymentSheet并传递customFlow: true。initPaymentSheet通过一个初始支付选项解析,该选项包含显示客户的支付方式的图片和标签。用这些详情更新您的用户界面。
const {
  initPaymentSheet,
  presentPaymentSheet,
  confirmPaymentSheetPayment,
} = useStripe()

const { error, paymentOption } = await initPaymentSheet({
  customerId: customer,
  customerEphemeralKeySecret: ephemeralKey,
  paymentIntentClientSecret: paymentIntent,
  customFlow: true,
  merchantDisplayName: 'Example Inc.',
});
// Update your UI with paymentOption
- 用
presentPaymentSheet收集支付详情。客户完成后,表单自行关闭,并解析 promise。用选择的支付方式详情更新您的用户界面。
const { error, paymentOption } = await presentPaymentSheet();
- 用
confirmPaymentSheetPayment确认付款。这会通付款结果来解析。
const { error } = await confirmPaymentSheetPayment();

if (error) {
  Alert.alert(`Error code: ${error.code}`, error.message);
} else {
  Alert.alert(
    'Success',
    'Your order is confirmed!'
  );
}
将 allowsDelayedPaymentMethods 设置为 true,以允许延迟通知型支付方式,例如美国银行账户。对于这些支付方式,只有当 PaymentSheet 完成后才能知道最终的付款状态是成功还是失败。如果您支持这些类型的支付方式,请告知客户他们的订单已被确认,并且仅在付款成功时履行订单(例如,为他们安排发货)。