# Create an embeddable buy button
Use Payment Links to create an embeddable buy button for your website.
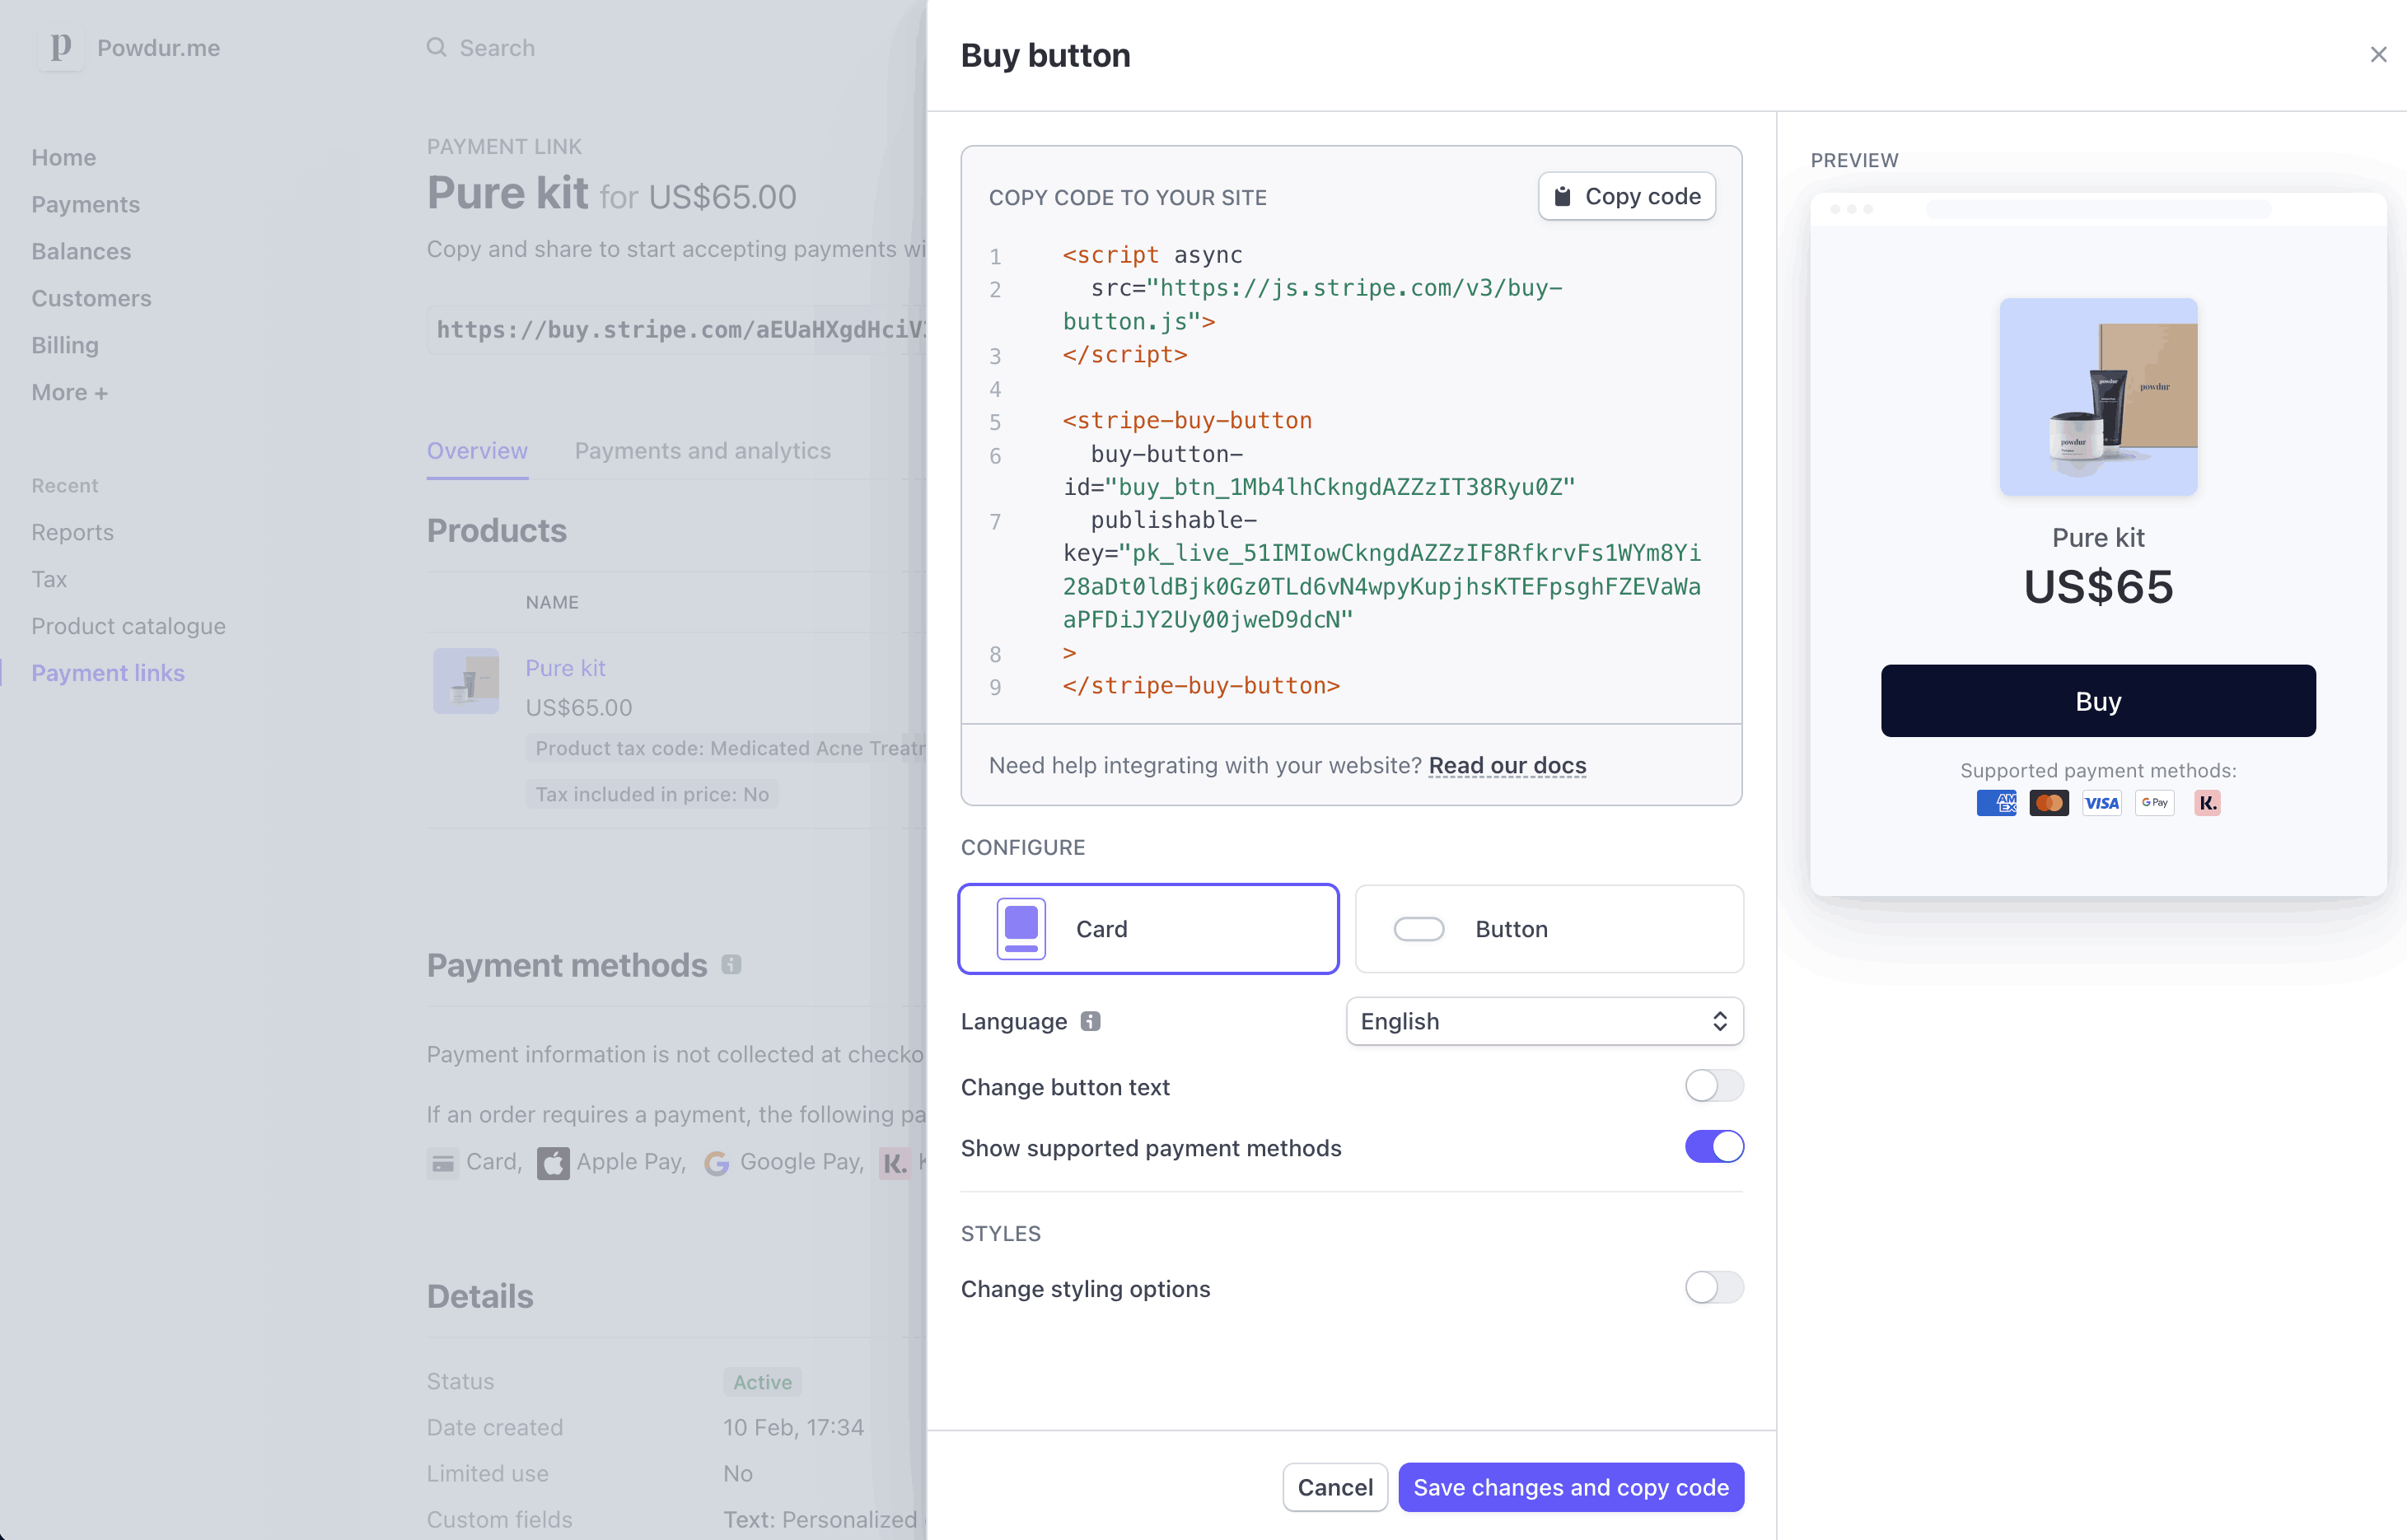
Create an embeddable buy button to sell a product, subscription, or accept a payment on your website. Start by selecting an existing link from the [Payment Links list view](https://dashboard.stripe.com/payment-links) or by [creating a new link](https://dashboard.stripe.com/payment-links/create) where you can decide which products to sell and customize the checkout UI. After you create your link, click **Buy button** to configure the buy button design and generate the code that you can copy and paste into your website.
## Customize the button
By default, your buy button uses the same branding and call to action configured for your payment link. You can:
- Choose between a simple button and a card widget.
- Set brand colors, shapes, and fonts to match your website.
- Set the language of the button and payment page to match your website’s language.
- Customize your button’s call to action.

Customize the buy button
## Embed the button
Stripe provides an embed code composed of a `
```
#### React
```html
```
```jsx
import * as React from 'react';
function BuyButtonComponent() {
// Paste the stripe-buy-button snippet in your React component
return (
);
}
export default BuyButtonComponent;
```
## Attributes to customize checkout
| Parameter | Description | Syntax |
| -------------------------------- | ---------------------------------------------------------------------------------------------------------------------------------------------------------------------------------------------------------------------------------------------------------------------------------------------------------------------------------------------------------------------------------------------------------------------------------------------------- | ----------------------------------------------------------------------------------------------------------------------------------------------------------------------------------------------------------------------- |
| `client-reference-id` | Use `client-reference-id` to attach a unique string of your choice to the Checkout Session. The string can be a customer ID or a cart ID (or similar) that you use to reconcile the Session with your internal systems. If you pass this parameter to your ``, it’s sent in the [checkout.session.completed webhook](https://docs.stripe.com/api/events/types.md#event_types-checkout.session.completed) upon payment completion. | The `client-reference-id` can contain alphanumeric characters, dashes, or underscores, and be any value up to 200 characters. Invalid values are silently dropped, but your payment page continues to work as expected. |
| `customer-email` | Use `customer-email` to prefill the email address on the payment page. When the property is set, the buy button passes it to the Checkout Session’s `customer_email` attribute. The customer can’t edit the email address on the payment page. | The `customer-email` must be a valid email. Invalid values are silently dropped, but your payment pages continues to work as expected. |
| `customer-session-client-secret` | Use `customer-session-client-secret` to pass an existing [Customer](https://docs.stripe.com/api/customers.md) object. See the section below for more information. | The `customer-session-client-secret` value must be generated from the [client_secret](https://docs.stripe.com/api/customer_sessions/object.md#customer_session_object-client_secret). |
> #### Compare Customers v1 and Accounts v2 references
>
> If your Connect platform uses [customer-configured Accounts](https://docs.stripe.com/api/v2/core/accounts/create.md#v2_create_accounts-configuration-customer), use our [guide](https://docs.stripe.com/connect/use-accounts-as-customers.md) to replace `Customer` and event references in your code with the equivalent Accounts v2 API references.
## Pass an existing customer
You can provide an existing [Customer](https://docs.stripe.com/api/customers.md) object to `Checkout Sessions` created from the buy button. Create a `CustomerSession` for a customer you’ve already authenticated server-side, and return the [client_secret](https://docs.stripe.com/api/customer_sessions/object.md#customer_session_object-client_secret) to the client.
```curl
curl https://api.stripe.com/v1/customer_sessions \
-u "<>:" \
-d customer="{{CUSTOMER_ID}}" \
-d "components[buy_button][enabled]"=true
```
```cli
stripe customer_sessions create \
--customer="{{CUSTOMER_ID}}" \
-d "components[buy_button][enabled]"=true
```
```ruby
# Set your secret key. Remember to switch to your live secret key in production.
# See your keys here: https://dashboard.stripe.com/apikeys
client = Stripe::StripeClient.new("<>")
customer_session = client.v1.customer_sessions.create({
customer: '{{CUSTOMER_ID}}',
components: {buy_button: {enabled: true}},
})
```
```python
# Set your secret key. Remember to switch to your live secret key in production.
# See your keys here: https://dashboard.stripe.com/apikeys
client = StripeClient("<>")
# For SDK versions 12.4.0 or lower, remove '.v1' from the following line.
customer_session = client.v1.customer_sessions.create({
"customer": "{{CUSTOMER_ID}}",
"components": {"buy_button": {"enabled": True}},
})
```
```php
// Set your secret key. Remember to switch to your live secret key in production.
// See your keys here: https://dashboard.stripe.com/apikeys
$stripe = new \Stripe\StripeClient('<>');
$customerSession = $stripe->customerSessions->create([
'customer' => '{{CUSTOMER_ID}}',
'components' => ['buy_button' => ['enabled' => true]],
]);
```
```java
// Set your secret key. Remember to switch to your live secret key in production.
// See your keys here: https://dashboard.stripe.com/apikeys
StripeClient client = new StripeClient("<>");
CustomerSessionCreateParams params =
CustomerSessionCreateParams.builder()
.setCustomer("{{CUSTOMER_ID}}")
.setComponents(
CustomerSessionCreateParams.Components.builder()
.setBuyButton(
CustomerSessionCreateParams.Components.BuyButton.builder()
.setEnabled(true)
.build()
)
.build()
)
.build();
// For SDK versions 29.4.0 or lower, remove '.v1()' from the following line.
CustomerSession customerSession = client.v1().customerSessions().create(params);
```
```node
// Set your secret key. Remember to switch to your live secret key in production.
// See your keys here: https://dashboard.stripe.com/apikeys
const stripe = require('stripe')('<>');
const customerSession = await stripe.customerSessions.create({
customer: '{{CUSTOMER_ID}}',
components: {
buy_button: {
enabled: true,
},
},
});
```
```go
// Set your secret key. Remember to switch to your live secret key in production.
// See your keys here: https://dashboard.stripe.com/apikeys
sc := stripe.NewClient("<>")
params := &stripe.CustomerSessionCreateParams{
Customer: stripe.String("{{CUSTOMER_ID}}"),
Components: &stripe.CustomerSessionCreateComponentsParams{
BuyButton: &stripe.CustomerSessionCreateComponentsBuyButtonParams{
Enabled: stripe.Bool(true),
},
},
}
result, err := sc.V1CustomerSessions.Create(context.TODO(), params)
```
```dotnet
// Set your secret key. Remember to switch to your live secret key in production.
// See your keys here: https://dashboard.stripe.com/apikeys
var options = new CustomerSessionCreateOptions
{
Customer = "{{CUSTOMER_ID}}",
Components = new CustomerSessionComponentsOptions
{
BuyButton = new CustomerSessionComponentsBuyButtonOptions { Enabled = true },
},
};
var client = new StripeClient("<>");
var service = client.V1.CustomerSessions;
CustomerSession customerSession = service.Create(options);
```
Set the `customer-session-client-secret` attribute on the `` web component to the [client_secret](https://docs.stripe.com/api/customer_sessions/object.md#customer_session_object-client_secret) from the Customer Session.
You must provide the [client_secret](https://docs.stripe.com/api/customer_sessions/object.md#customer_session_object-client_secret) within 30 minutes. After providing the client secret, you have an additional 30 minutes until the `Customer Session` expires. Any resulting `Checkout Sessions` created from the buy button will fail. Don’t cache the client secret, instead generate a new one every time you render each buy button.
#### HTML
```html
```
#### React
```jsx
import * as React from 'react';
function BuyButtonComponent() {
return (
);
}
export default BuyButtonComponent;
```
## Content Security Policy
If you’ve deployed a [Content Security Policy](https://developer.mozilla.org/en-US/docs/Web/HTTP/CSP), the policy directives that the buy button requires are:
- frame-src, https://js.stripe.com
- script-src, https://js.stripe.com
## Limitations
Rendering the buy button requires a website domain. To test the buy button locally, run a local HTTP server to host your website’s `index.html` file over the localhost domain. To run a local HTTP server, use Python’s [SimpleHTTPServer](https://developer.mozilla.org/en-US/docs/Learn/Common_questions/set_up_a_local_testing_server#running_a_simple_local_http_server) or the [http-server](https://www.npmjs.com/package/http-server) npm module.
## Track payments
After your customer makes a payment using a payment link, you can see it in the [payments overview](https://dashboard.stripe.com/payments) in the Dashboard.
If you’re new to Stripe, you’ll receive an email after your first payment. To receive emails for all successful payments, update your notification preferences in your [Personal details](https://dashboard.stripe.com/settings/user) settings.
Stripe creates a new [guest customer](https://docs.stripe.com/payments/checkout/guest-customers.md) for one-time payments and a new [Customer](https://docs.stripe.com/api/customers.md) object when selling a subscription or [saving a payment method for future use](https://docs.stripe.com/payment-links/customize.md#save-payment-details-for-future-use).
Learn more about handling [payment links post-payment](https://docs.stripe.com/payment-links/post-payment.md), like how to configure post-payment behavior for a buy button or payment link.