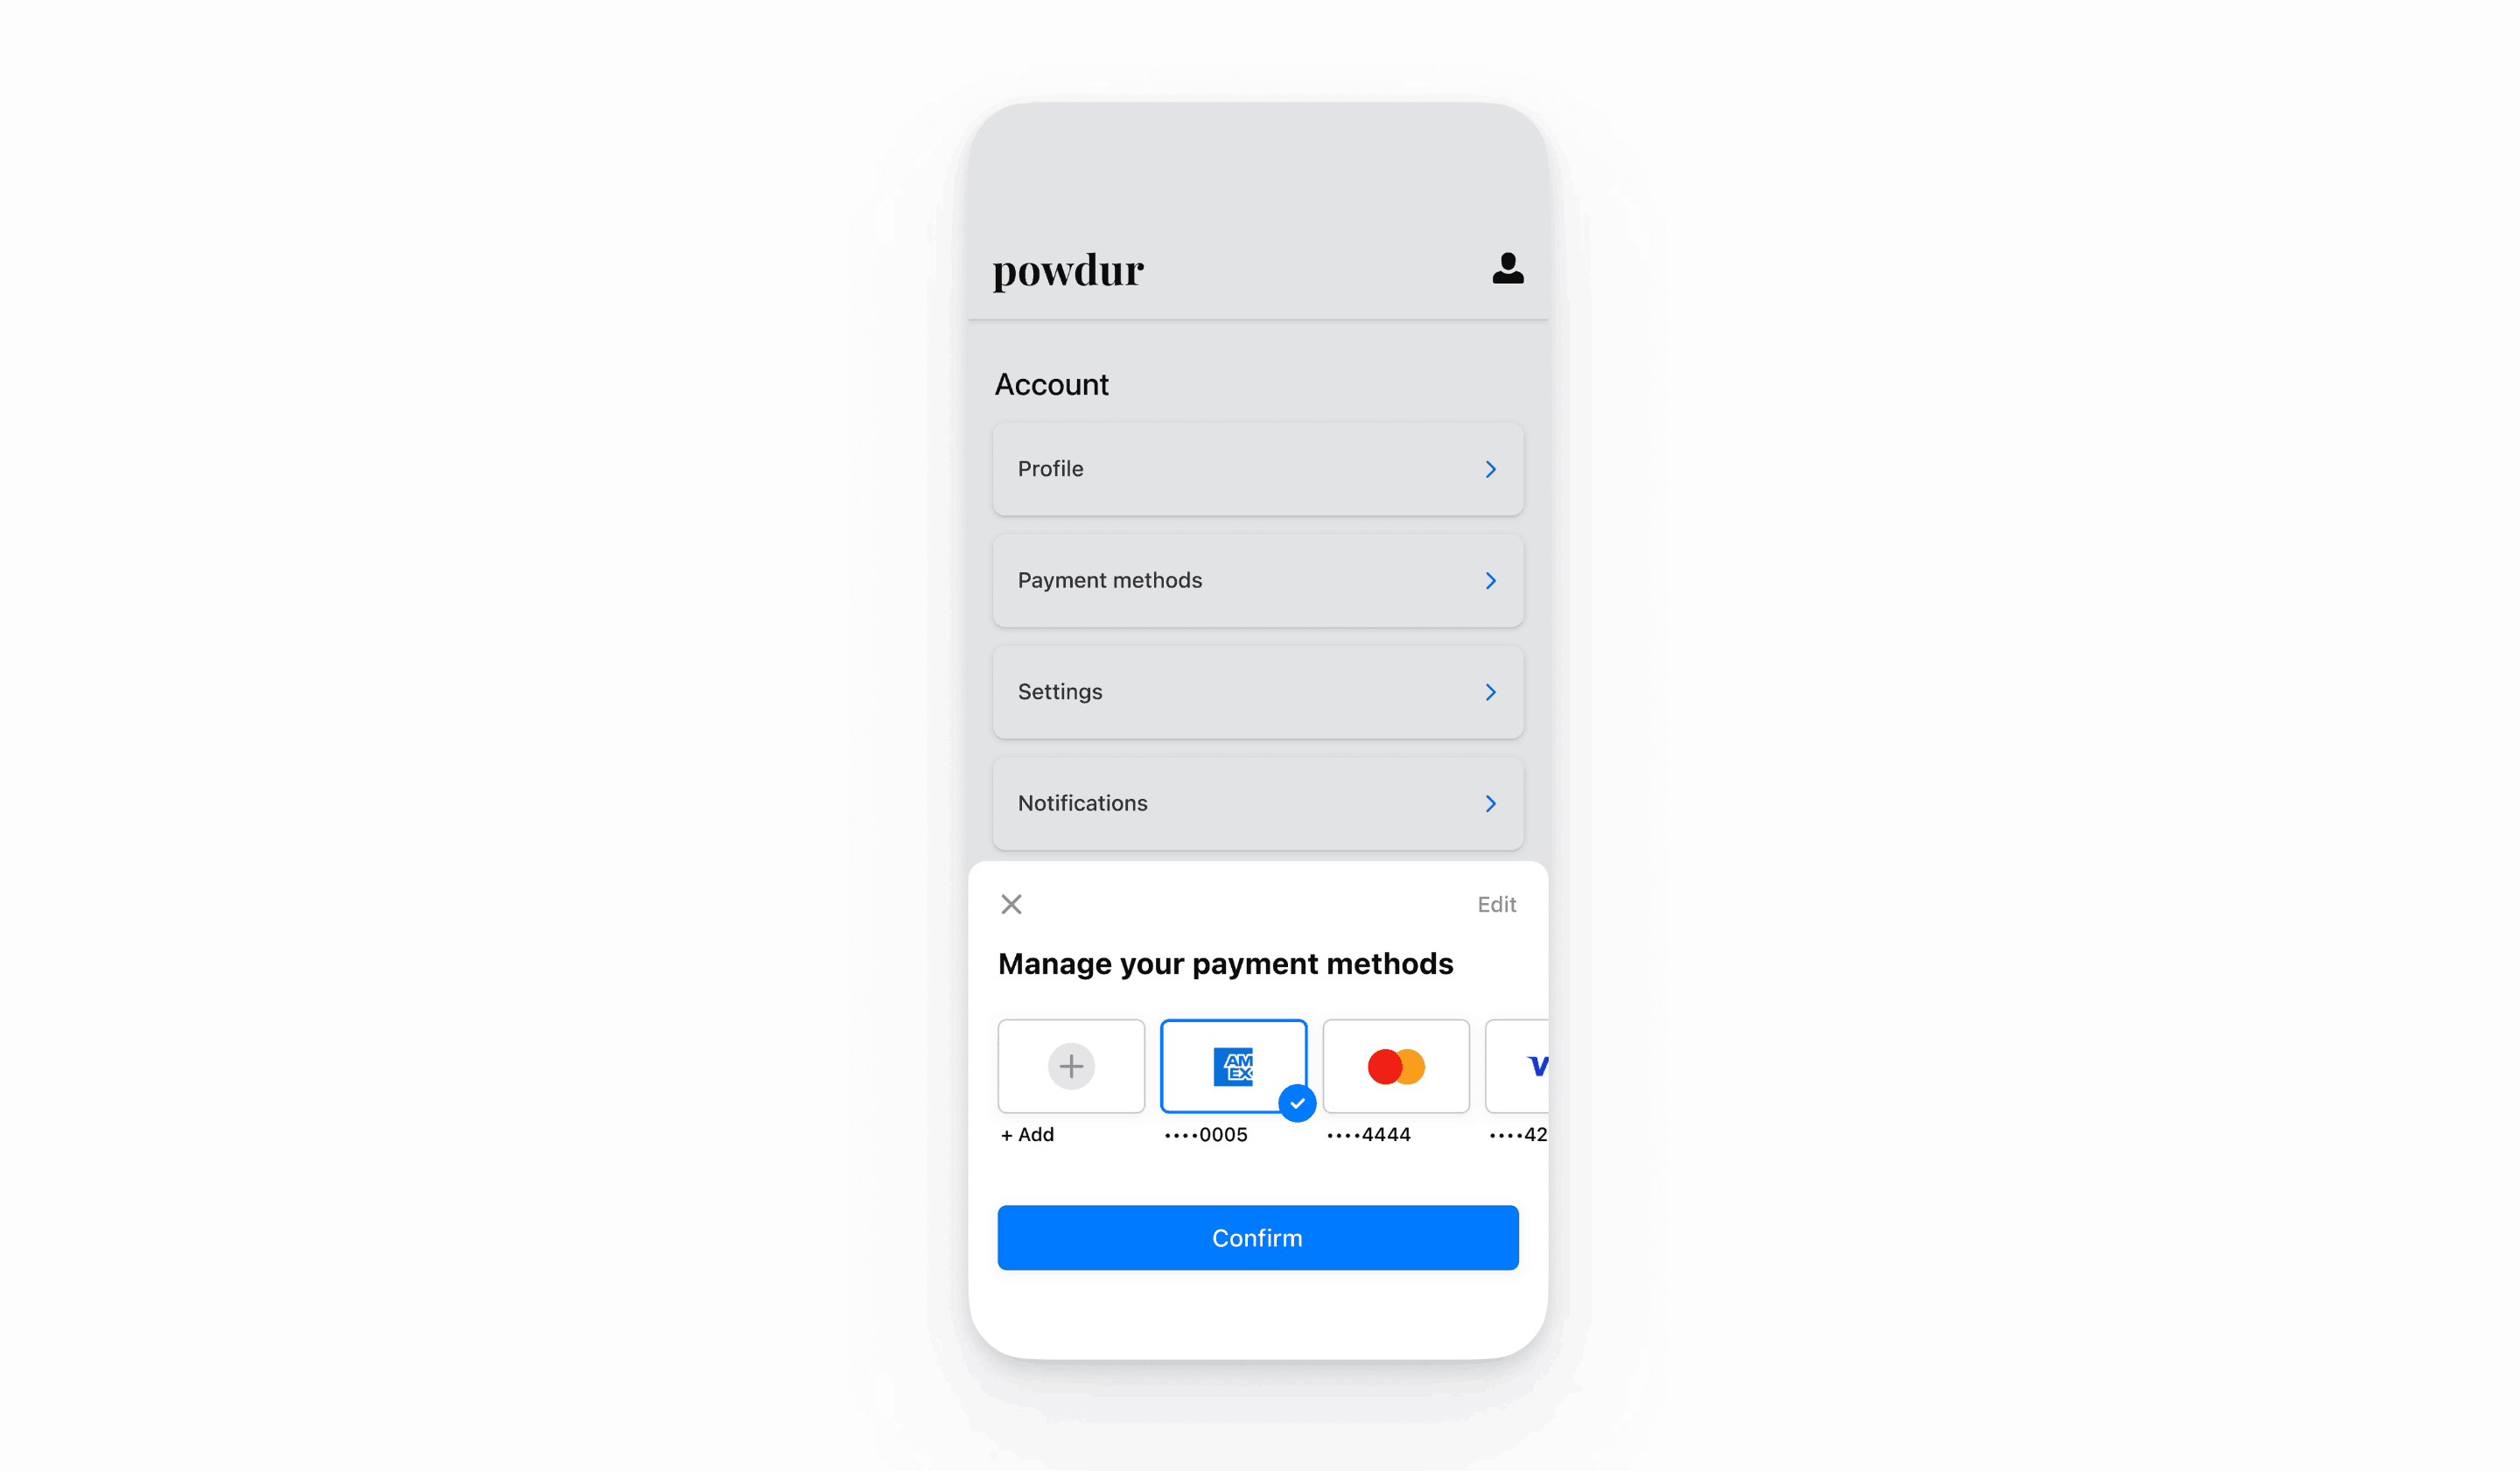
設定で支払い方法を管理する
支払い方法設定シートを使用して、顧客がアプリの設定ページで支払い方法を管理できるようにします。
メモ
支払い方法設定シートは、アプリの設定ページで使用するためのものです。チェックアウトと支払いには、アプリ内支払い を使用してください。は、支払い方法の保存と表示にも対応しており、支払い方法設定シートよりも多くの支払い方法をサポートしています。
メモ
コードでは、このコンポーネントは歴史的な理由からCustomerSheet として参照されます。ドキュメント全体を通して、コード例でCustomerSheet と記載されている場合、これは支払い方法設定シートを指します。
支払い方法設定シートは、顧客が保存した支払い方法を管理できるようにする組み込み済みの UI コンポーネントです。決済フローの外側で支払い方法設定シートの UI を使用することができ、外観とスタイルはアプリの外観と美観に合わせてカスタマイズ可能です。顧客は支払い方法の追加と削除ができ、顧客オブジェクトに保存され、デバイスにローカルに保存されたデフォルトの支払い方法を設定できます。アプリ内支払いと支払い方法設定シートの両方を使用して、顧客に保存された支払い方法の一貫したエンドツーエンドのソリューションを提供します。

CustomerSession オブジェクトは、SDK に Customer への一時的なアクセス権を付与し、追加の設定オプションを提供します。これらの設定オプションを使用して、CustomerSheet の動作をカスタマイズすることができます。CustomerSession に公開されている機能の一覧は、API ドキュメントに掲載されています。
Stripe を設定する
まず、Stripe アカウントが必要です。今すぐ登録してください。
SDK をインストールするには、app/build.gradle ファイルの dependencies ブロックに stripe-android を追加します。
メモ
SDK の最新リリースおよび過去バージョンの詳細については、GitHub の Releases ページをご覧ください。新しいリリースの公開時に通知を受け取るには、リポジトリのリリースを確認してください。
Stripe の公開可能キーを使用して SDK を設定し、 Application サブクラスなどで、Stripe API へのリクエストを実行できるようにします。
決済手段を有効にする
支払い方法の設定を表示して、サポートする支払い方法を有効にします。SetupIntent を作成するには、少なくとも 1 つは支払い方法を有効にする必要があります。
多くの顧客から決済を受け付けられるよう、Stripe では、カードやその他一般的な決済手段がデフォルトで有効になっていますが、ビジネスや顧客に適した追加の決済手段を有効にすることをお勧めします。プロダクトと決済手段のサポートについては決済手段のサポートを、手数料については料金体系ページをご覧ください。
メモ
支払い方法設定シートは、現時点ではクレジットカードとアメリカの銀行口座にのみ対応しています。
Customer エンドポイントを追加するサーバー側
サーバー側で、CustomerSession の client secret を取得するエンドポイントと、新しい決済手段を Customer に保存する SetupIntent を作成するエンドポイントの 2 つのエンドポイントを作成します。
- Customer ID と CustomerSession の client secret を返すエンドポイントを作成します。
メモ
レガシーの顧客の一時キーを使用した実装では、保存された決済手段の allow_ 値が unspecified になります。Customer Sessions の使用時に保存した決済手段に加えて、これらの決済手段を表示するには、payment_ を ["unspecified", "always"] に設定します。詳細については、CustomerSessions をご覧ください。
- Customer ID を指定して設定された SetupIntent を返すエンドポイントを作成します。
今後の支払いで、顧客が決済フローでオンセッション時にのみ決済手段を使用する場合、usage パラメーターを on_session に設定して、オーソリ率を改善します。
顧客セッションプロバイダーを作成するクライアント側
CustomerSessionProvider は、CustomerSession オブジェクトを通じて CustomerSheet を Stripe と通信できるようにします。クライアント側で CustomerSessionProvider を作成します。これにより、サーバーで CustomerSession client secret と SetupIntent client secret を作成できるようになります。
import com.stripe.android.customersheet.CustomerSheet
import com.stripe.android.customersheet.ExperimentalCustomerSheetApi

@OptIn(ExperimentalCustomerSheetApi::class)
class MyCustomerSessionProvider : CustomerSheet.CustomerSessionProvider() {
    val myBackend = // ....

    override suspend fun providesCustomerSessionClientSecret(): Result<CustomerSheet.CustomerSessionClientSecret> {
        return myBackend.getCustomerSessionClientSecret().fold(
            onSuccess = { response ->
                Result.success(
                    CustomerSessionClientSecret.create(
                        customerId = response.customerId,
                        clientSecret = response.customerSessionClientSecret,
                    )
                )
            },
            onFailure = { exception ->
                Result.failure(exception)
            }
        )
    }

    override suspend fun provideSetupIntentClientSecret(customerId: String): Result<String> {
        return myBackend.getSetupIntentClientSecret(customerId).fold(
            onSuccess = { response ->
                Result.success(response.setupIntentClientSecret)
            },
            onFailure = { exception ->
                Result.failure(exception)
            }
        )
    }
}
import android.app.Application
import androidx.lifecycle.AndroidViewModel

class CheckoutViewModel(
    application: Application
) : AndroidViewModel(application) {
    val customerSessionProvider = MyCustomerSessionProvider()
}
画面を設定する
次に、CustomerSheet クラスとCustomerSessionProvider を使用して支払い方法設定シートを初期化し、CustomerSheet.Configuration を使用してconfigure を呼び出します。present およびretrievePaymentOptionSelection を呼び出す前に、必ずconfigure を呼び出してください。
import android.os.Bundle
import androidx.activity.ComponentActivity
import androidx.activity.compose.setContent
import androidx.activity.viewModels
import com.stripe.android.customersheet.CustomerSheet
import com.stripe.android.customersheet.ExperimentalCustomerSheetApi
import com.stripe.android.customersheet.rememberCustomerSheet

@OptIn(ExperimentalCustomerSheetApi::class)
class CheckoutActivity : ComponentActivity() {
    private val viewModel by viewModels<CheckoutViewModel>()

    override fun onCreate(savedInstanceState: Bundle?) {
        super.onCreate(savedInstanceState)
        val configuration = CustomerSheet.Configuration.builder(merchantDisplayName = "{{YOUR BUSINESS NAME}}")
            .build()

        setContent {
            val customerSheet = rememberCustomerSheet(
                customerSessionProvider = viewModel.customerSessionProvider,
                callback = viewModel::handleResult // Implemented in next step
            )

            LaunchedEffect(customerSheet) {
                customerSheet.configure(configuration = configuration)
            }
        }
    }
}
画面を表示する
CustomerSheet を使用して支払い方法設定シートを提示します。顧客がシートを終了すると、CustomerSheet は完了ブロックを呼び出し、CustomerSheetResult を渡します。
import android.os.Bundle
import androidx.activity.ComponentActivity
import androidx.activity.compose.setContent
import androidx.activity.viewModels
import androidx.compose.foundation.Image
import androidx.compose.foundation.layout.Arrangement
import androidx.compose.foundation.layout.Row
import androidx.compose.foundation.layout.fillMaxWidth
import androidx.compose.foundation.layout.height
import androidx.compose.material.Text
import androidx.compose.material.TextButton
import androidx.compose.runtime.collectAsState
import androidx.compose.runtime.getValue
import androidx.compose.ui.Alignment
import androidx.compose.ui.Modifier
import androidx.compose.ui.unit.dp
import com.stripe.android.customersheet.CustomerSheet
import com.stripe.android.customersheet.ExperimentalCustomerSheetApi
import com.stripe.android.customersheet.rememberCustomerSheet
import com.stripe.android.uicore.image.rememberDrawablePainter

@OptIn(ExperimentalCustomerSheetApi::class)
class CheckoutActivity : ComponentActivity() {
    private val viewModel by viewModels<CheckoutViewModel>()

    override fun onCreate(savedInstanceState: Bundle?) {
        super.onCreate(savedInstanceState)
        val configuration = CustomerSheet.Configuration.builder(merchantDisplayName = "{{YOUR BUSINESS NAME}}")
            .headerTextForSelectionScreen("Manage your payment method")
            .build()

        setContent {
            val customerSheet = rememberCustomerSheet(
                customerSessionProvider = viewModel.customerSessionProvider,
                callback = viewModel::handleResult
            )

            LaunchedEffect(customerSheet) {
                customerSheet.configure(configuration = configuration)
                viewModel.handleResult(customerSheet.retrievePaymentOptionSelection())
            }

            val paymentOption by viewModel.paymentOption.collectAsState()

            Row(
                modifier = Modifier.fillMaxWidth(),
                verticalAlignment = Alignment.CenterVertically,
                horizontalArrangement = Arrangement.SpaceBetween,
            ) {
                val icon = paymentOption?.icon()

                if (icon != null) {
                    Image(
                        painter = rememberDrawablePainter(
                            drawable = icon
                        ),
                        contentDescription = "Payment Method Icon",
                        modifier = Modifier.height(32.dp)
                    )
                }
                TextButton(
                    onClick = {
                        customerSheet.present()
                    }
                ) {
                    Text(
                        text = paymentOption?.label ?: "Select"
                    )
                }
            }
        }
    }
}
import android.app.Application
import androidx.lifecycle.AndroidViewModel
import com.stripe.android.customersheet.ExperimentalCustomerSheetApi
import com.stripe.android.paymentsheet.model.PaymentOption
import kotlinx.coroutines.flow.MutableStateFlow
import kotlinx.coroutines.flow.StateFlow
import kotlinx.coroutines.flow.update

@OptIn(ExperimentalCustomerSheetApi::class)
class CheckoutViewModel(
    application: Application
) : AndroidViewModel(application) {
    val customerSessionProvider = // ...

    private val _paymentOption = MutableStateFlow<PaymentOption?>(null)
    val paymentOption: StateFlow<PaymentOption?> = _paymentOption

    fun handleResult(result: CustomerSheetResult) {
        when (result) {
            is CustomerSheetResult.Selected -> {
                // Configure your UI based on the payment option
                _paymentOption.update {
                    result.selection?.paymentOption
                }
            }
            is CustomerSheetResult.Canceled -> {
                // Configure your UI based on the payment option
                _paymentOption.update {
                    result.selection?.paymentOption
                }
            }
            is CustomerSheetResult.Failed -> {
                // Show the error in your UI
            }
        }
    }
}
- 顧客が支払い方法を選択する場合、その結果は、
CustomerSheetResult.になります。関連付けられる値は、選択されたSelected PaymentOptionSelectionになるか、ユーザーが過去に選択した支払い方法を削除した場合は null になります。支払い方法の詳細は、PaymentOptionSelectionのpaymentMethod値で確認できます。 - 顧客が画面をキャンセルした場合、その結果は
CustomerSheetResult.になります。関連付けられる値は、顧客の元のCanceled PaymentOptionSelectionであるか、顧客が以前に決済手段を選択していない場合や、最初に選択した決済手段を削除している場合は null になります。 - エラーが発生した場合、その結果は
CustomerSheetResult.になります。Failed
オプションGoogle Pay を有効にする
実装方法を設定する
Google Pay を使用するには、まず以下を AndroidManifest.xml の <application> に追加し、Google Pay API を有効化します。
<application>
  ...
  <meta-data
    android:name="com.google.android.gms.wallet.api.enabled"
    android:value="true" />
</application>
詳細は、Google Pay の Android 向け Google Pay API を設定する を参照してください。
Google Pay を追加する
連携に Google Pay を追加するには、CustomerSheet.Configuration を CustomerSheet.Configuration.Builder で初期化する際に、googlePayEnabled に true を渡します。
オプションACH 決済を有効にする
ACH デビット決済を有効にするには、アプリの依存関係として Financial Connections を指定します。
Stripe Android SDK はオープンソースであり、詳細なドキュメントが提供されています。
SDK をインストールするには、app/build.gradle ファイルの dependencies ブロックに financial-connections を追加します。
メモ
SDK の最新リリースおよび過去バージョンの詳細については、GitHub の Releases ページをご覧ください。新しいリリースの公開時に通知を受け取るには、リポジトリのリリースを確認してください。
オプション選択した支払い方法を取得する
支払い方法設定シートを表示せずにデフォルトの支払い方法を取得するには、CustomerSheet でretrievePaymentOptionSelection() を呼び出します。
class CheckoutActivity : ComponentActivity() {
    private val viewModel by viewModels<CheckoutViewModel>()
    override fun onCreate(savedInstanceState: Bundle?) {
        super.onCreate(savedInstance)
        val configuration = ...
        setContent {
            val customerSheet = ...

            LaunchedEffect(Unit) {
                customerSheet.configure(configuration = configuration)
                val result = customerSheet.retrievePaymentOptionSelection()
                viewModel.handleResult(result)
            }

            ...
        }
    }
}
オプション画面をカスタマイズする
デザイン
Appearance API を使用して、アプリのデザインに合わせて色、フォント、その他のデザインの属性をカスタマイズします。
メモ
retrievePaymentMethods は、保存された決済手段を除外して表示しないようにできますが、追加可能な決済手段のタイプには影響しません。
デフォルトの請求詳細
Customer sheet で収集される請求詳細のデフォルト値を設定するには、defaultBillingDetails プロパティを設定します。CustomerSheet の各フィールドに、指定した値が事前に読み込まれます。
val configuration = CustomerSheet.Configuration.Builder()
    .defaultBillingDetails(
       PaymentSheet.BillingDetails(
         address = PaymentSheet.Address(
           country = "US",
         ),
         email = "foo@bar.com"
      )
    )
    .build()
請求詳細の収集
billingDetailsCollectionConfiguration を使用して、決済画面で請求詳細を収集する方法を指定します。
顧客の名前、メールアドレス、電話番号、住所を収集できます。
CustomerSheet によって収集されない値を関連付けるには、defaultBillingDetails プロパティに値を追加し、billingDetailsCollectionConfiguration. を true に設定します。決済手段が必要とする値を収集する予定がない場合は、必ずこの手順を実行してください。
val configuration = CustomerSheet.Configuration.Builder()
    .defaultBillingDetails(
       PaymentSheet.BillingDetails(
           email = "foo@bar.com"
       )
    )
    .billingDetailsCollectionConfiguration(
        PaymentSheet.BillingDetailsCollectionConfiguration(
            name = PaymentSheet.BillingDetailsCollectionConfiguration.AddressCollectionMode.Always,
            email = PaymentSheet.BillingDetailsCollectionConfiguration.AddressCollectionMode.Never,
            address = PaymentSheet.BillingDetailsCollectionConfiguration.AddressCollectionMode.Full,
            attachDefaultsToPaymentMethod = true,
        )
    )
    .build()
メモ
情報の収集に適用される法律については、法務チームに相談してください。電話番号は、取引に必要な場合にのみ収集してください。