# Manage payment methods in settings
Use the Payment Method Settings Sheet to let your customers manage their payment methods in your app settings page.
> The Payment Method Settings Sheet is intended for use on an app settings page. For checkout and payments, use the[In-app Payments](https://docs.stripe.com/payments/mobile.md), which also has built-in support for saving and displaying payment methods and supports more payment methods than the Payment Method Settings Sheet.
> In code, this component is referenced as `CustomerSheet` for historical reasons. Throughout the documentation, when you see`CustomerSheet` in code examples, this refers to the Payment Method Settings Sheet.
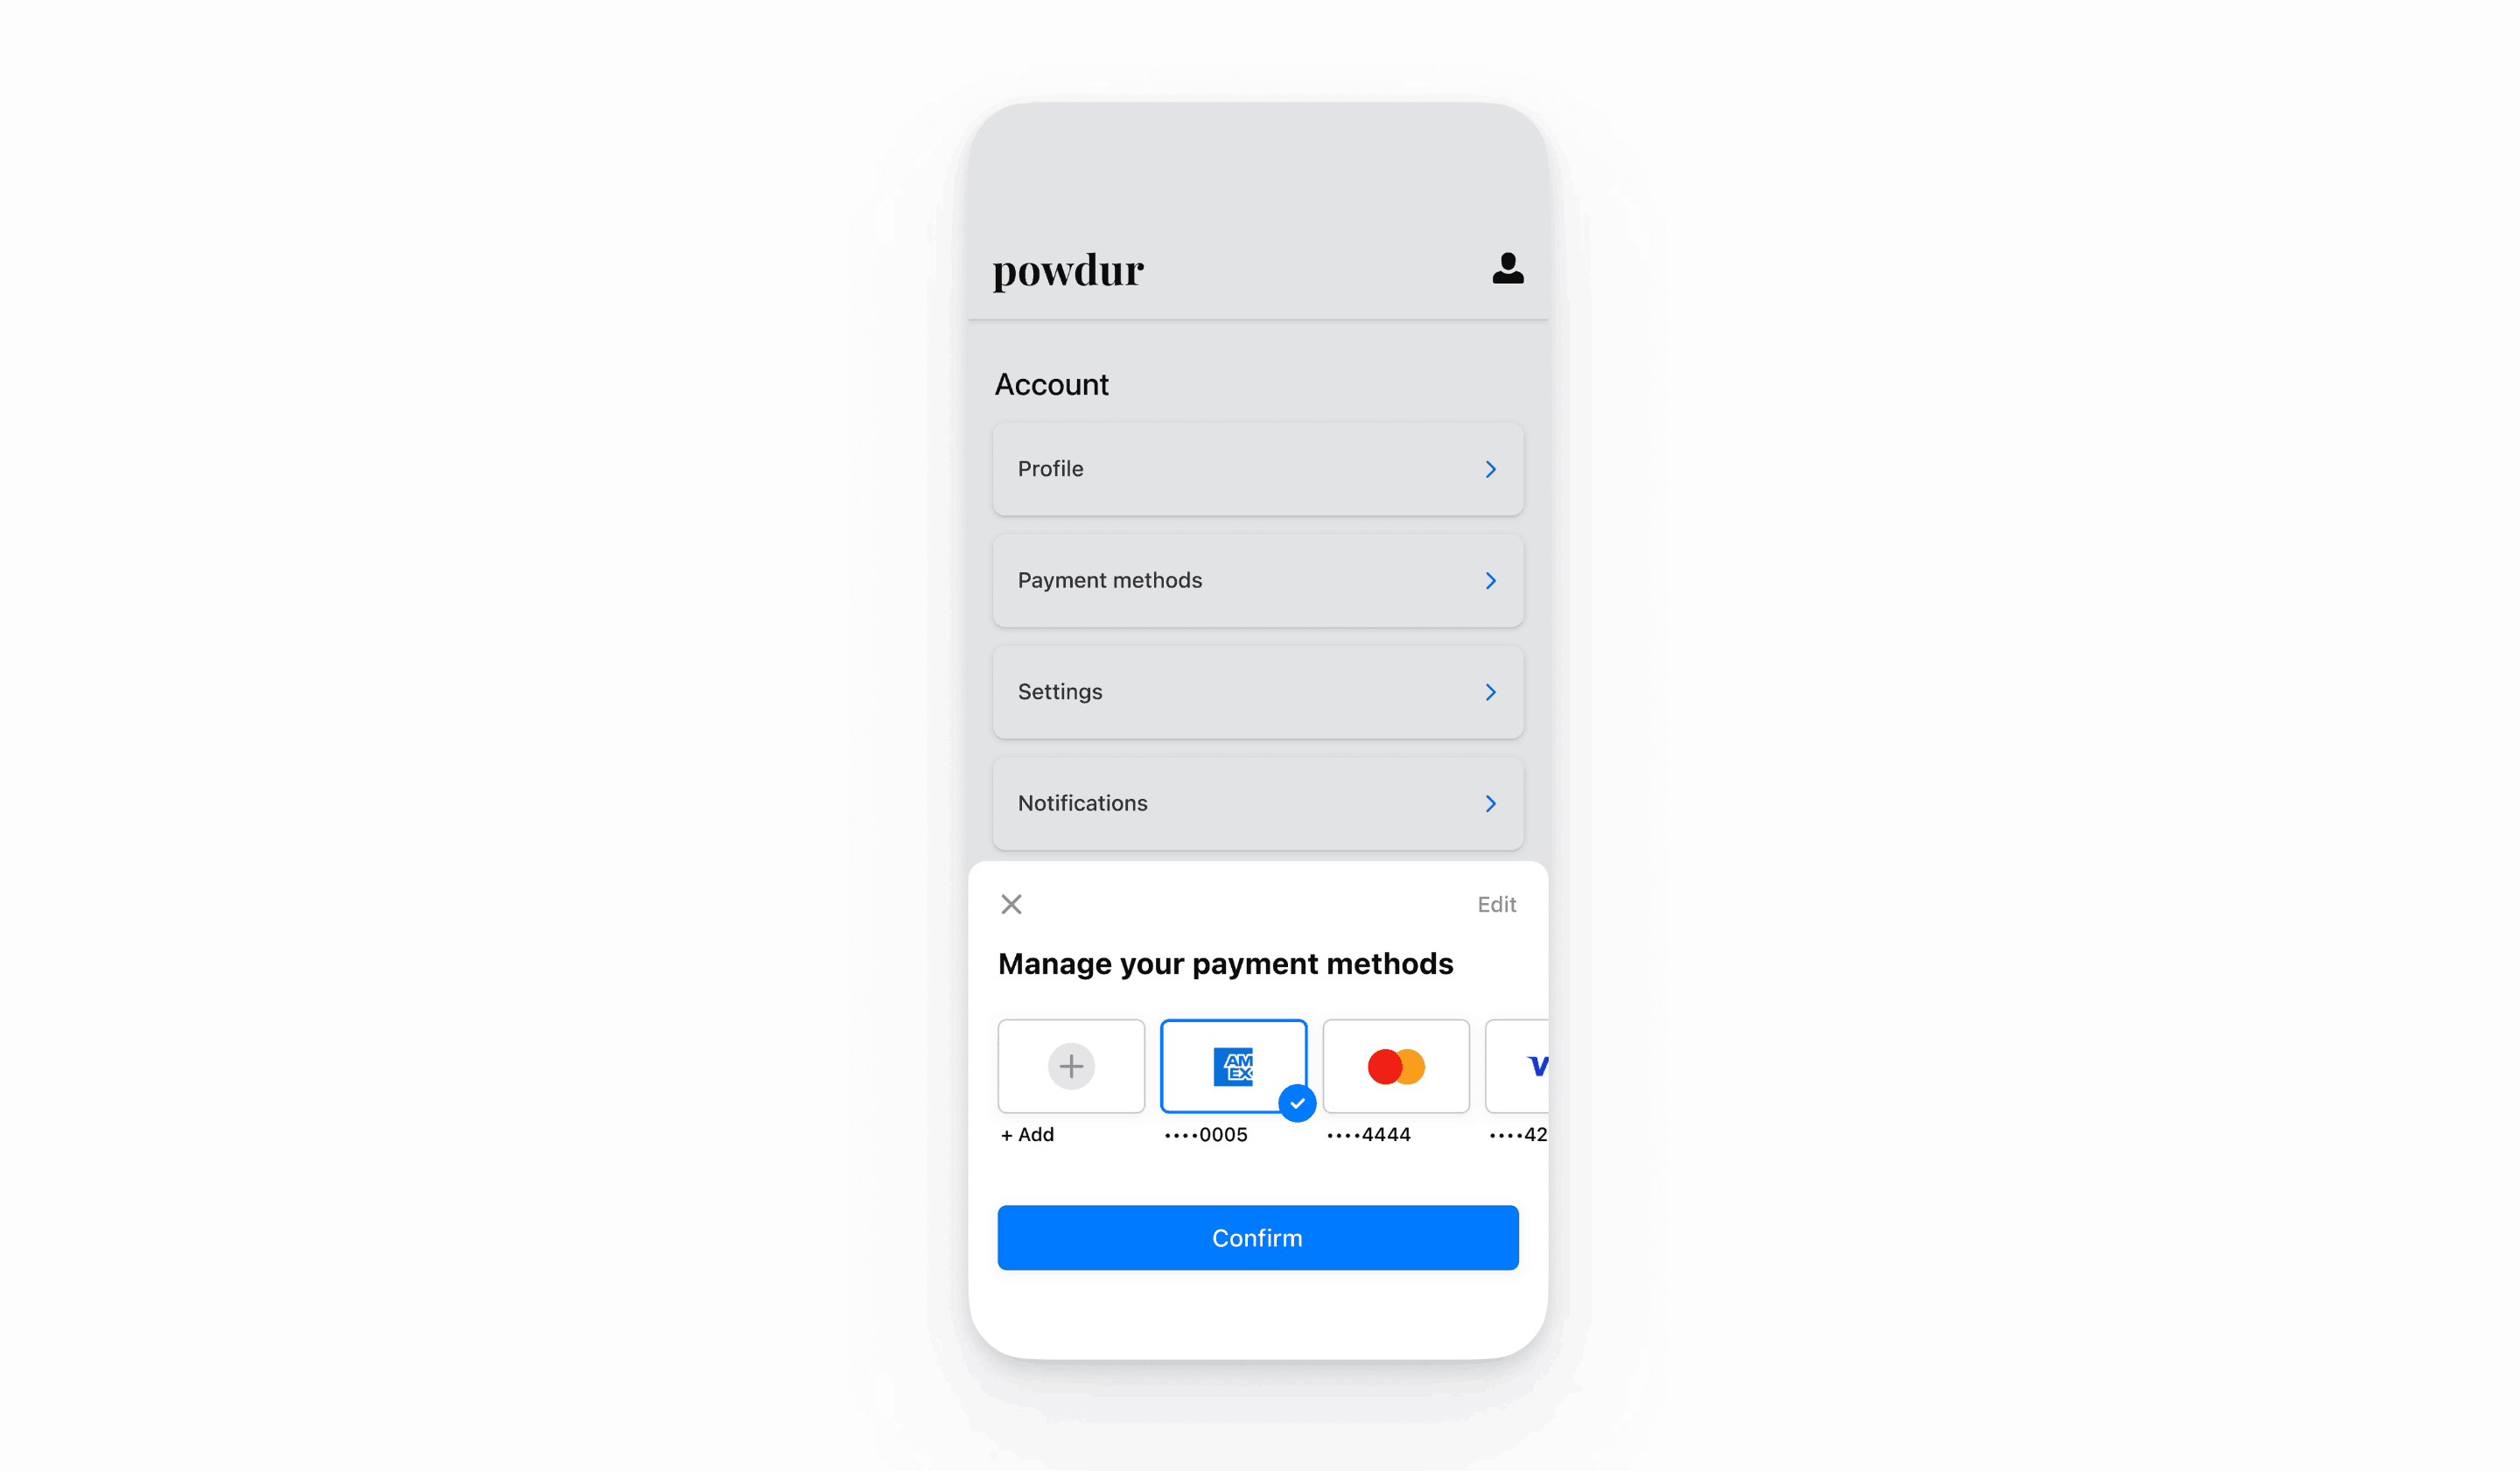
The Payment Method Settings Sheet is a prebuilt UI component that lets your customers manage their saved payment methods. You can use the Payment Method Settings Sheet UI outside of a checkout flow, and the appearance and styling is customisable to match the appearance and aesthetic of your app. Customers can add and remove payment methods, which get saved to the `Customer` object, and can set their default payment method stored locally on the device. Use both In-app Payments and the Payment Method Settings Sheet to provide customers a consistent end-to-end solution for saved payment methods.
> #### Accounts v2 API support
>
> The Payment Method Settings Sheet doesn’t support *customer-configured Accounts* (Account configurations represent role-based functionality that you can enable for accounts, such as merchant, customer, or recipient). It only supports `Customer` objects.
## Set up Stripe
First, you need a Stripe account. [Register now](https://dashboard.stripe.com/register).
The [React Native SDK](https://github.com/stripe/stripe-react-native) is open source and fully documented. Internally, it uses the [native iOS](https://github.com/stripe/stripe-ios) and [Android](https://github.com/stripe/stripe-android) SDKs. To install Stripe’s React Native SDK, run one of the following commands in your project’s directory (depending on which package manager you use):
#### yarn
```bash
yarn add @stripe/stripe-react-native
```
#### npm
```bash
npm install @stripe/stripe-react-native
```
Next, install some other necessary dependencies:
- For iOS, go to the **ios** directory and run `pod install` to ensure that you also install the required native dependencies.
- For Android, there are no more dependencies to install.
> We recommend following the [official TypeScript guide](https://reactnative.dev/docs/typescript#adding-typescript-to-an-existing-project) to add TypeScript support.
### Stripe initialisation
To initialise Stripe in your React Native app, either wrap your payment screen with the `StripeProvider` component, or use the `initStripe` initialisation method. Only the API [publishable key](https://docs.stripe.com/keys.md#obtain-api-keys) in `publishableKey` is required. The following example shows how to initialise Stripe using the `StripeProvider` component.
```jsx
import { useState, useEffect } from 'react';
import { StripeProvider } from '@stripe/stripe-react-native';
function App() {
const [publishableKey, setPublishableKey] = useState('');
const fetchPublishableKey = async () => {
const key = await fetchKey(); // fetch key from your server here
setPublishableKey(key);
};
useEffect(() => {
fetchPublishableKey();
}, []);
return (
{/* Your app code here */}
);
}
```
> Use your API [test keys](https://docs.stripe.com/keys.md#obtain-api-keys) while you test and develop, and your [live mode](https://docs.stripe.com/keys.md#test-live-modes) keys when you publish your app.
## Enable payment methods
View your [payment methods settings](https://dashboard.stripe.com/settings/payment_methods) and enable the payment methods you want to support. You need at least one payment method enabled to create a *SetupIntent* (The Setup Intents API lets you build dynamic flows for collecting payment method details for future payments. It tracks the lifecycle of a payment setup flow and can trigger additional authentication steps if required by law or by the payment method).
By default, Stripe enables cards and other prevalent payment methods that can help you reach more customers, but we recommend turning on additional payment methods that are relevant for your business and customers. See [Payment method support](https://docs.stripe.com/payments/payment-methods/payment-method-support.md) for product and payment method support, and our [pricing page](https://stripe.com/pricing/local-payment-methods) for fees.
> CustomerSheet only supports cards and US bank accounts.
## Add customer endpoints [Server-side]
Create two endpoints on your server: one for fetching a CustomerSession client secret, and one to create a [SetupIntent](https://docs.stripe.com/api/setup_intents.md) for saving a new payment method to the [Customer](https://docs.stripe.com/api/customers.md).
1. Create an endpoint to return a [Customer](https://docs.stripe.com/api/customers.md) ID and a [CustomerSession](https://docs.stripe.com/api/customer_sessions.md) client secret.
#### curl
```bash
# Create a Customer (skip this and get the existing Customer ID if this is a returning customer)
curl https://api.stripe.com/v1/customers \
-u <>: \
-X "POST"
curl https://api.stripe.com/v1/customer_sessions \
-u <>: \
-X "POST" \
-d "customer"="{{CUSTOMER_ID}}" \
-d "components[customer_sheet][enabled]"=true \
-d "components[customer_sheet][features][payment_method_remove]"=enabled
```
> Integrations with legacy customer ephemeral keys results in saved payment methods having an `allow_redisplay` value of `unspecified`. To display these payment methods in addition to payment methods saved while using Customer Sessions, set `payment_method_allow_redisplay_filters` to `["unspecified", "always"]`. For more information, see [CustomerSessions](https://docs.stripe.com/api/customer_sessions.md).
1. Create an endpoint to return a [SetupIntent](https://docs.stripe.com/api/setup_intents.md) configured with the [Customer](https://docs.stripe.com/api/customers.md) ID.
#### curl
```bash
# Create a Customer (skip this and get the existing Customer ID if this is a returning customer)
curl https://api.stripe.com/v1/customers \
-u <>: \
-X "POST"
curl https://api.stripe.com/v1/setup_intents \
-u <>: \
-d "customer"="{{CUSTOMER_ID}}" \
```
If you only plan to use the payment method for future payments when your customer is present during the checkout flow, set the [usage](https://docs.stripe.com/api/setup_intents/object.md#setup_intent_object-usage) parameter to *on\_session* (A payment is described as on-session if it occurs while the customer is actively in your checkout flow and able to authenticate the payment method) to improve authorisation rates.
## Initialise the sheet
Create a `ClientSecretProvider` object that implements two methods. `CustomerSheet` needs it to communicate with Stripe using `CustomerSession` objects and the endpoints you created earlier.
```jsx
import {ClientSecretProvider, CustomerSessionClientSecret} from '@stripe/stripe-react-native';
const clientSecretProvider: ClientSecretProvider = {
// Must return an object with customerId and clientSecret
async provideCustomerSessionClientSecret(): Promise {
const result = await MyBackend.createCustomerSession();
return {
customerId: result.customer,
clientSecret: result.customerSessionClientSecret,
};
},
// Must return a string
async provideSetupIntentClientSecret(): Promise {
const result = await MyBackend.createSetupIntent();
return result.setupIntent;
}
};
```
Next, configure the Payment Method Settings Sheet using the `CustomerSheet` class, by providing your desired settings to `CustomerSheet.initialize`.
```jsx
import {CustomerSheet} from '@stripe/stripe-react-native';
const {error} = await CustomerSheet.initialize({
// You must provide intentConfiguration and clientSecretProvider
intentConfiguration: {
paymentMethodTypes: ['card'],
},
clientSecretProvider: clientSecretProvider,
headerTextForSelectionScreen: 'Manage your payment method',
returnURL: 'my-return-url://',
});
```
## Present the sheet
#### Functional
Present the Payment Method Settings Sheet using `CustomerSheet`. When the customer dismisses the sheet, the promise resolves with a `CustomerSheetResult`.
#### Using functions directly
```jsx
import {CustomerSheet} from '@stripe/stripe-react-native';
const {error, paymentOption, paymentMethod} = await CustomerSheet.present();
if (error) {
if (error.code === CustomerSheetError.Canceled) {
// Customer dismissed the sheet without changing their payment option
} else {
// Show the error in your UI
}
} else {
if (paymentOption) {
// Configure your UI based on the payment option
MyBackend.setDefaultPaymentMethod(paymentMethod.id);
}
if (paymentMethod) {
console.log(JSON.stringify(paymentMethod, null, 2));
}
}
```
- If the customer selects a payment method, the result contains a `paymentOption`. The associated value is the selected [PaymentOption](https://stripe.dev/stripe-react-native/api-reference/interfaces/PaymentSheet.PaymentOption.html) or `nil` if the customer deleted the previously-selected payment method. You can find the full payment method details in the `paymentMethod` property.
- If the customer cancels the sheet, the result contains an `error` with the `error.code === CustomerSheetError.Canceled`. The selected payment method doesn’t change.
- If an error occurs, the details are included in `error`.
Learn more about how to [enable Apple Pay](https://docs.stripe.com/payments/accept-a-payment.md?payment-ui=mobile&platform=ios#ios-apple-pay).
#### Component
Create a state variable to control presentation of the Payment Method Settings Sheet (`CustomerSheet`).
```jsx
import {CustomerSheet, ClientSecretProvider, CustomerSessionClientSecret} from '@stripe/stripe-react-native';
export default function MyScreen() {
const [customerSheetVisible, setCustomerSheetVisible] = React.useState(false);
const clientSecretProvider: ClientSecretProvider = {
async provideCustomerSessionClientSecret(): Promise {
const result = await MyBackend.createCustomerSession();
return {
customerId: result.customer,
clientSecret: result.customerSessionClientSecret,
};
},
async provideSetupIntentClientSecret(): Promise {
const result = await MyBackend.createSetupIntent();
return result.setupIntent;
}
};
return (
);
}
```
Add the `CustomerSheet.Component` to your view hierarchy.
```jsx
import { CustomerSheet } from '@stripe/stripe-react-native';
export default function MyScreen() {
const [customerSheetVisible, setCustomerSheetVisible] = React.useState(false);
const clientSecretProvider = /* defined above */;
return (
)
}
```
Use the `onResult` callback to render the selected payment method in your UI:
```jsx
import {CustomerSheet} from '@stripe/stripe-react-native';
export default function MyScreen() {
const [customerSheetVisible, setCustomerSheetVisible] = React.useState(false);
const clientSecretProvider = /* defined above */;
return (
);
}
```
- If the customer selects a payment method, the result contains a `paymentOption`. The associated value is the selected [PaymentOption](https://stripe.dev/stripe-react-native/api-reference/interfaces/PaymentSheet.PaymentOption.html) or `nil` if the customer deleted the previously-selected payment method. You can find the full payment method details in the `paymentMethod` property.
- If the customer cancels the sheet, the result contains an `error` with the `error.code === CustomerSheetError.Canceled`. The selected payment method doesn’t change.
- If an error occurs, the details are included in `error`.
Learn more about how to [enable Apple Pay](https://docs.stripe.com/payments/accept-a-payment.md?payment-ui=mobile&platform=ios#ios-apple-pay).
## Optional: Enable ACH payments
To enable ACH debit payments, enable `US Bank Account` as a payment method in the settings section of the [Dashboard](https://dashboard.stripe.com/settings/payment_methods).
## Optional: Fetch the selected payment method
To fetch the default payment method without presenting the Payment Method Settings Sheet, call `CustomerSheet.retrievePaymentOptionSelection()` after initialising the sheet.
```jsx
// Call CustomerSheet.initialize()
...
const {
error,
paymentOption,
paymentMethod,
} = await CustomerSheet.retrievePaymentOptionSelection();
```
## Optional: Customise the sheet
### Appearance
Customise the colours, fonts and other appearance attributes to match the look and feel of your app by using the [appearance API](https://docs.stripe.com/elements/appearance-api/mobile.md?platform=react-native).
### Default billing details
To set default values for billing details collected in the Payment Method Settings Sheet, configure the`defaultBillingDetails` property. The Payment Method Settings Sheet pre-populates its fields with the values that you provide.
```jsx
await CustomerSheet.initialize({
// ...
defaultBillingDetails: {
email: 'foo@bar.com',
address: {
country: 'US',
},
},
});
```
### Billing details collection
Use `billingDetailsCollectionConfiguration` to specify how you want to collect billing details in the Payment Method Settings Sheet.
You can collect your customer’s name, email address, phone number, and address.
If you don’t intend to collect the values that the payment method requires, you must do the following:
1. Attach the values that aren’t collected by the Payment Method Settings Sheet to the `defaultBillingDetails` property.
1. Set `billingDetailsCollectionConfiguration.attachDefaultsToPaymentMethod` to `true`.
```jsx
await CustomerSheet.initialize({
// ...
defaultBillingDetails: {
email: 'foo@bar.com',
},
billingDetailsCollectionConfiguration: {
name: PaymentSheet.CollectionMode.ALWAYS,
email: PaymentSheet.CollectionMode.NEVER,
address: PaymentSheet.AddressCollectionMode.FULL,
attachDefaultsToPaymentMethod: true
},
});
```
> Consult your legal adviser regarding laws that apply to collecting information. Only collect a phone number if you need it for a transaction.