# Configurer une intégration de la rampe d'accès embarquée
Comment personnaliser entièrement la rampe d'accès intégrable.
Ce guide est une version étendue du guide de [démarrage rapide intégré à la rampe d’accès](https://docs.stripe.com/crypto/onramp/embedded-quickstart.md). Apprenez à ajouter d’autres fonctionnalités, telles que :
- Installer le SDK à l’aide d’une balise de script ou d’un gestionnaire de package
- Personnaliser l’apparence de la rampe d’accès
- Configurez l’interface utilisateur de la rampe d’accès dans les vues Web mobiles
- Gérez le support client et la fraude
- Obtenir des estimations de conversion de cryptomonnaies
## Before you begin
1. La rampe d’accès intégrée n’est disponible qu’au sein de l’UE et aux États-Unis (à l’exception d’Hawaï).
1. L’API Onramp est en version bêta publique. Vous devez [soumettre la demande de rampe d’accès](https://docs.stripe.com/crypto/onramp.md#submit-your-application) avant de commencer le développement dans un environnement de test.
1. [Après avoir accédé à l’API Onramp](https://dashboard.stripe.com/crypto-onramp/onboarding), utilisez le [Dashboard](https://dashboard.stripe.com/apikeys) pour récupérer votre clé secrète et publier [API keys](https://docs.stripe.com/keys.md#obtain-api-keys).
## Installez le SDK et la bibliothèque client [côté client] [côté serveur]
### Côté client
Incluez les scripts suivants à l’aide de balises de script dans `` élément de votre HTML. Ces scripts doivent toujours être chargés directement à partir des domaines de Stripe (https://js.stripe.com ethttps://crypto-js.stripe.com) pour la compatibilité et *conformité PCI* (Any party involved in processing, transmitting, or storing credit card data must comply with the rules specified in the Payment Card Industry (PCI) Data Security Standards. PCI compliance is a shared responsibility and applies to both Stripe and your business).
N’incluez pas les scripts dans un ensemble et n’hébergez pas vous-même une copie, car votre intégration pourrait être interrompue sans avertissement.
```html
Onramp
```
### JS SDK
Utilisez le paquet npm pour charger le SDK JS de la rampe d’accès en tant que module ES. Le paquet inclut les définitions de type TypeScript.
```
npm install --save @stripe/stripe-js @stripe/crypto
```
### Installation alternative du SDK
Alternativement, vous pouvez installer le SDK client [module ES crypto de Stripe](https://www.npmjs.com/@stripe/crypto) à l’aide d’une balise de script ou d’un gestionnaire de paquets. Le SDK encapsule la fonction globale `StripeOnramp` fournie par le script crypto de Stripe en tant que module ES.
1. Chargez manuellement le script. Incluez les scripts suivants à l’aide de balises de script dans l’``élément de votre HTML. Ces scripts doivent toujours être chargés directement depuis les domaines de Stripe, *https://js.stripe.com* et *https://crypto-js.stripe.com*, pour des raisons de compatibilité et de *conformité PCI* (Any party involved in processing, transmitting, or storing credit card data must comply with the rules specified in the Payment Card Industry (PCI) Data Security Standards. PCI compliance is a shared responsibility and applies to both Stripe and your business). N’incluez pas les scripts dans un paquet et n’en hébergez pas de copie vous-même. Dans le cas contraire, votre intégration pourrait cesser de fonctionner sans avertissement.
```html
Onramp
```
1. Définissez la [clé API publiable](https://dashboard.stripe.com/test/apikeys) pour permettre à Stripe de récupérer l’objet `OnrampSession` créé par votre back-end. Par exemple :
```javascript
const stripeOnramp = StripeOnramp('<>');
```
1. Pour installer le module via le gestionnaire de paquets, installez d’abord le [module ES Stripe.js](https://github.com/stripe/stripe-js) et le [module ES crypto de Stripe](https://www.npmjs.com/package/@stripe/crypto) depuis le [registre public npm](https://www.npmjs.com/). Le paquet inclut les définitions de type TypeScript.
```bash
npm install @stripe/stripe-js @stripe/crypto
```
1. Importez le module et définissez la [clé API publiable](https://dashboard.stripe.com/test/apikeys) pour permettre à Stripe de récupérer l’objet `OnrampSession` créé par votre back-end. La fonction renvoie un objet `Promise` qui se résout avec un nouvel objet `StripeOnramp` une fois les scripts chargés.
```javascript
import {loadStripeOnramp} from '@stripe/crypto';
const stripeOnramp = await loadStripeOnramp('<>');
```
### Côté serveur
Nos bibliothèques officielles ne prennent pas en charge les endpoints API, car l’API Onramp est en version bêta publique. Par conséquent, nos exemples utilisent curl pour les interactions backend.
## Créer une session de rampe d’accès aux cryptomonnaies [côté serveur]
Sur le serveur, exposez un nouveau enpoint API (par exemple,`myserver.com/mint-onramp-session`) qui passe un appel à l’enpoint de Stripe `POST /v1/cryptomonnaie/onramp_sessions`. Il s’agit d’une session de rampe d’accès avec Stripe que vous pouvez utiliser avec de nouveaux clients ou des clients existants. Vous devez créer une session par client.
[Créer une session de rampe d’accès aux cryptomonnaies](https://docs.stripe.com/api/crypto/onramp_sessions/create.md) en exécutant la commande curl suivante dans votre terminal :
```bash
curl -X POST https://api.stripe.com/v1/crypto/onramp_sessions \
-u <>: \
-d "wallet_addresses[ethereum]"="0xB00F0759DbeeF5E543Cc3E3B07A6442F5f3928a2"
# add as many parameters as you'd like
```
Vous recevez une réponse semblable à ce qui suit :
```json
{
"id": "cos_0MYfrA589O8KAxCGEDdIVYy3",
"object": "crypto.onramp_session",
"client_secret": "cos_0MYfrA589O8KAxCGEDdIVYy3_secret_rnpnWaxQbYQOvp6nVMvEeczx300NRU4hErZ",
"created": 1675732824,
"livemode": false,
"status": "initialized",
"transaction_details": {
"destination_currency": null,
"destination_amount": null,
"destination_network": null,
"fees": null,
"lock_wallet_address": false,
"source_currency": null,
"source_amount": null,
"destination_currencies": [
"btc",
"eth",
"sol",
"usdc"
],
"destination_networks": [
"bitcoin",
"ethereum",
"solana"
],
"transaction_id": null,
"wallet_address": null,
"wallet_addresses": {
"bitcoin": null,
"ethereum": "0xB00F0759DbeeF5E543Cc3E3B07A6442F5f3928a2",
"polygon": null,
"solana": null
}
}
}
```
### Erreurs
Cet endpoint renvoie des codes d’erreur si Stripe ne peut pas créer de sessions d’accès. Pour savoir pourquoi cela peut se produire, consultez [Gérer la prise en charge client et les fraudes](https://docs.stripe.com/crypto/onramp/embedded.md#support-and-fraud). Nous vous recommandons de rendre le composant de rampe d’accès conditionnel lorsqu’un client obtient un état HTTP `200` lors de la création d’une session, en fournissant une interface utilisateur de secours capable de gérer les erreurs de création de session.
Pour obtenir la liste complète des paramètres que vous pouvez transmettre lors de la création d’une session, reportez-vous à la section [API Onramp](https://docs.stripe.com/api/crypto/onramp_sessions/create.md).
### États
Chaque session de rampe d’accès passe par les états suivants :
- `initialisée` : l’application a récemment créé la session de rampe d’accès côté serveur, mais le client ne l’a pas encore utilisée. Les sessions restent dans cet état jusqu’à ce que le client s’inscrive et se prépare à payer.
- `rejected` : Stripe a refusé le client pour une raison quelconque (échec KYC, problèmes liés au filtrage des sanctions, contrôles anti-fraude).
- `requires_paiement` : le client a terminé son onboarding ou sa connexion et accède à la page de paiement. S’il tente d’effectuer le paiement et échoue, il reste dans cet état.
- `fulfillment_processing` : le client a finalisé son paiement. Nous n’avons pas encore envoyé la cryptomonnaie qu’il a achetée.
- `fulfillment_complete` : le client a été en mesure de finaliser le paiement de la cryptomonnaie et nous avons confirmé l’envoi.
## Optional: Personnaliser l’apparence de la rampe d’accès
Vous pouvez personnaliser l’apparence de la rampe d’accès.
### Modifier l’image de marque
Utilisez les paramètres [de personnalisation de l’image de marque](https://docs.stripe.com/payments/checkout/customization/appearance.md#branding) pour télécharger votre logo et les couleurs de votre marque qui s’appliquent automatiquement aux sessions de rampe d’accès créées avec votre clé API de votre plateforme.
### Activer le mode sombre
Pour activer le mode sombre, incluez une structure d’apparence dans l’appel de création de session :
```js
const onrampSession = stripeOnramp.createSession({
clientSecret: clientSecret,
appearance: {
theme: 'dark'
},
});
```
Si vous ne spécifiez pas l’apparence, la rampe d’accès adopte par défaut un thème clair. Vous pouvez également modifier le thème après l’affichage de la rampe d’accès en appelant :
```js
onrampSession.setAppearance({
theme: newTheme
});
```
## Optional: Pré-remplir les paramètres
Vous pouvez pré-remplir certains paramètres de la session de rampe d’accès.
### Préremplir les paramètres de transaction
Par exemple, une Dapp ou un wallet peut déjà sauvegarder les données d’un client `wallet_addresses`. Vous pouvez réaliser cela lors de la création de la session :
```bash
curl -X POST https://api.stripe.com/v1/crypto/onramp_sessions \
-u <>: \
-d "wallet_addresses[ethereum]"="0xB00F0759DbeeF5E543Cc3E3B07A6442F5f3928a2" \
-d "source_currency"="usd" \
-d "destination_currency"="eth" \
-d "destination_network"="ethereum" \
-d "destination_amount"="0.1234"
```
Vous recevez une réponse telle que :
```json
{
"id": "cos_0MYvnp589O8KAxCGwmWATYfA",
"object": "crypto.onramp_session",
"client_secret": "cos_0MYvnp589O8KAxCGwmWATYfA_secret_LhqXJi2lvbMCYhVHfrHGfUfX6009qtZPtV7",
"created": 1675794121,
"livemode": false,
"status": "initialized",
"transaction_details": {
"destination_currency": "eth",
"destination_amount": "0.123400000000000000",
"destination_network": "ethereum",
"fees": null,
"lock_wallet_address": false,
"source_currency": "usd",
"source_amount": null,
"destination_currencies": [
"btc",
"eth",
"sol",
"usdc",
"xlm"
],
"destination_networks": [
"bitcoin",
"ethereum",
"solana",
"stellar"
],
"transaction_id": null,
"wallet_address": null,
"wallet_addresses": {
"bitcoin": null,
"ethereum": "0xB00F0759DbeeF5E543Cc3E3B07A6442F5f3928a2",
"polygon": null,
"solana": null,
"stellar": null,
"destination_tags": null
}
}
}
```
Nous autorisons le préremplissage des paramètres suivants :
- `wallet_addresses` : adresse de portefeuille suggérée pour l’envoi de cryptomonnaie (la sélection par défaut sur l’écran du portefeuille)
- `lock_wallet_address` : indique si l’adresse de portefeuille suggérée doit être verrouillée ou non
- `source_currency` : devise fiduciaire de la transaction (`usd` et `eur` uniquement pour le moment)
- `source_amount` : montant en devise fiduciaire à utiliser pour l’achat de cryptomonnaies (cet attribut et le montant de destination s’excluent mutuellement)
- `destination_network` : réseau de cryptomonnaies par défaut pour cette rampe d’accès (par exemple, `ethereum`)
- `destination_currency` : cryptomonnaie par défaut pour cette session de rampe d’accès (par exemple, `eth`)
- `destination_amount` : montant en cryptomonnaie à acheter (cet attribut et le montant source s’excluent mutuellement)
- `destination_currencies` : un tableau de cryptomonnaies auxquelles vous souhaitez vous limiter (par exemple, `[eth, usdc]`)
- `destination_networks` : un tableau des réseaux de cryptomonnaies auxquels vous souhaitez vous limiter (par exemple, `[ethereum, polygon]`).
Pour en savoir plus sur les exigences spécifiques et leur impact sur les clients dans l’interface utilisateur de la rampe d’accès, consultez la rubrique [documentation de l’API Onramp](https://docs.stripe.com/api/crypto/onramp_sessions.md).
### Préremplir les informations client
Pour réduire les frictions avec les clients et augmenter le taux de conversion, vous pouvez préremplir certaines des informations KYC requises pour le client si vous les avez déjà collectées dans votre application.
Tout au long du flux, les clients doivent fournir :
- E-mail
- Prénom
- Nom
- Date de naissance
- SSN
- Adresse du domicile (pays, ligne 1 de l’adresse, ligne 2 de l’adresse, ville, État, code postal)
L’API Onramp permet de préremplir tous ces champs, à l’exception du numéro de sécurité sociale. Pour préremplir ces informations, vous pouvez les fournir à l’aide du paramètre `customer_information` dans l’API de création OnrampSession.
Exemple de requête :
```bash
curl -X POST https://api.stripe.com/v1/crypto/onramp_sessions \
-u <>: \
-d "customer_information[email]"="john@doe.com" \
-d "customer_information[first_name]"="John" \
-d "customer_information[last_name]"="Doe" \
-d "customer_information[dob][year]"=1990 \
-d "customer_information[dob][month]"=7 \
-d "customer_information[dob][day]"=4 \
-d "customer_information[address][country]"="US" \
-d "customer_information[address][line1]"="354 Oyster Point Blvd" \
-d "customer_information[address][line2]"="Apt 1A" \
-d "customer_information[address][city]"="South San Francisco" \
-d "customer_information[address][state]"="CA" \
-d "customer_information[address][postal_code]"="94080"
```
Exemple de réponse :
```json
{
"id": "cos_1MbuUeAEFtmWU4EVBFZS0gce",
"object": "crypto.onramp_session",
"client_secret": "cos_1MbuUeAEFtmWU4EVBFZS0gce_secret_zPsPPytwNU6mMKh1Bmz7ymXGi00ILwwyGeG",
"created": 1676504072,
"livemode": false,
"status": "initialized",
"transaction_details": {
"destination_currency": null,
"destination_amount": null,
"destination_network": null,
"fees": null,
"lock_wallet_address": false,
"source_currency": null,
"source_amount": null,
"destination_currencies": [
"btc",
"eth",
"sol",
"usdc",
"xlm"
],
"destination_networks": [
"bitcoin",
"ethereum",
"solana",
"polygon",
"stellar"
],
"transaction_id": null,
"wallet_address": null,
"wallet_addresses": null
}
}
```
Nous autorisons le préremplissage des paramètres suivants :
- `client_information.email` — Chaîne de caractères libre pour l’e-mail du client
- `customer_information.first_name`—Chaîne de caractères libre pour le prénom du client
- `customer_information.last_name`—Chaîne de caractères libre pour le nom de famille du client
- `client_information.dob.year`—Chaîne de caractères entière de l’année de naissance du client
- `client_information.dob.month`—Chaîne de caractères entière du mois de naissance du client
- `client_information.dob.day`—Chaîne de caractères entière du jour de naissance du client
- `client_information.adress.country`—Chaîne de caractères composée des deux lettres correspondant au code pays du pays de résidence du client.
- `customer_information.address.line1`—Chaîne de caractères libre pour la ligne d’adresse du client
- `client_information.adresse.ligne2` — Chaîne de caractères libre pour la deuxième ligne d’adresse du client
- `customer_information.address.city`—Chaîne de caractères libre pour la ville du client
- `customer_information.address.state` : chaîne du code d’État à deux lettres pour les États des États-Unis (le nom complet de l’État fonctionne également), par exemple « CA » ou « California »
- `customer_information.address.postal_code`—Chaîne de caractères libre pour le code postal du client
Tous les champs sont facultatifs et vous pouvez fournir n’importe quel sous-ensemble d’entre eux pour le pré-remplissage. Toutefois, si vous fournissez la date de naissance, vous devez également fournir les trois valeurs pour les champs suivants : `année`, `mois`, et `jour`.
## Afficher l'interface utilisateur de la rampe d'accès [côté client]
#### JavaScript
Importez les bundles StripeJS et OnrampJS :
```html
Crypto Onramp
```
Utilisez le *client\_secret* (A client secret is used with your publishable key to authenticate a request for a single object. Each client secret is unique to the object it's associated with) issu de votre appel côté serveur de l’étape précédente pour initier et monter la session de rampe d’accès :
```javascript
const stripeOnramp = StripeOnramp("<>");
initialize();
// Initialize the onramp element with a client secret
function initialize() {
// IMPORTANT: replace the following with your logic of how to mint/retrieve the client secret
const clientSecret = "cos_1Lb6vsAY1pjOSNXVWF3nUtkV_secret_8fuPvTzBaxj3XRh14C6tqvdl600rpW7hG4G";
const onrampSession = stripeOnramp.createSession({clientSecret});
onrampSession
.mount("#onramp-element");
}
```
#### React
Pour utiliser la rampe d’accès dans React, définissez deux composants :`CryptoElements` et `OnrampElement`. `CryptoElements` est un fournisseur [React Context](https://reactjs.org/docs/context.html) pour une instance `StripeOnramp` initialisée. Le composant `OnrampElement` restitue l’interface utilisateur de la rampe d’accès à l’aide du *client\_secret* (A client secret is used with your publishable key to authenticate a request for a single object. Each client secret is unique to the object it's associated with) issu de l’appel côté serveur de l’étape précédente.
```jsx
import {loadStripeOnramp} from '@stripe/crypto';
import {CryptoElements, OnrampElement} from './StripeCryptoElements';
const stripeOnrampPromise = loadStripeOnramp("<>");
export default () => {
// IMPORTANT: replace with your logic of how to mint/retrieve client secret
const clientSecret = "cos_1Lb6vsAY1pjOSNXVWF3nUtkV_secret_8fuPvTzBaxj3XRh14C6tqvdl600rpW7hG4G";
return (
);
}
```
```jsx
import React, { ReactNode } from 'react';
// ReactContext to simplify access of StripeOnramp object
const CryptoElementsContext = React.createContext(null);
export const CryptoElements = ({
stripeOnramp,
children,
}) => {
const [ctx, setContext] = React.useState(() => ({ onramp: null }));
React.useEffect(() => {
let isMounted = true;
Promise.resolve(stripeOnramp).then((onramp) => {
if (onramp && isMounted) {
setContext((ctx) => (ctx.onramp ? ctx : { onramp }));
}
});
return () => {
isMounted = false;
};
}, [stripeOnramp]);
return (
{children}
);
};
// React hook to get StripeOnramp from context
export const useStripeOnramp = () => {
const context = React.useContext(CryptoElementsContext);
return context?.onramp;
};
// React element to render Onramp UI
export const OnrampElement = ({
clientSecret,
appearance,
...props
}) => {
const stripeOnramp = useStripeOnramp();
const onrampElementRef = React.useRef(null);
React.useEffect(() => {
const containerRef = onrampElementRef.current;
if (containerRef) {
containerRef.innerHTML = '';
if (clientSecret && stripeOnramp) {
stripeOnramp
.createSession({
clientSecret,
appearance,
})
.mount(containerRef);
}
}
}, [clientSecret, stripeOnramp]);
return ;
};
```
Après l’exécution du script, la rampe d’accès restitue le dialogue qui suit :
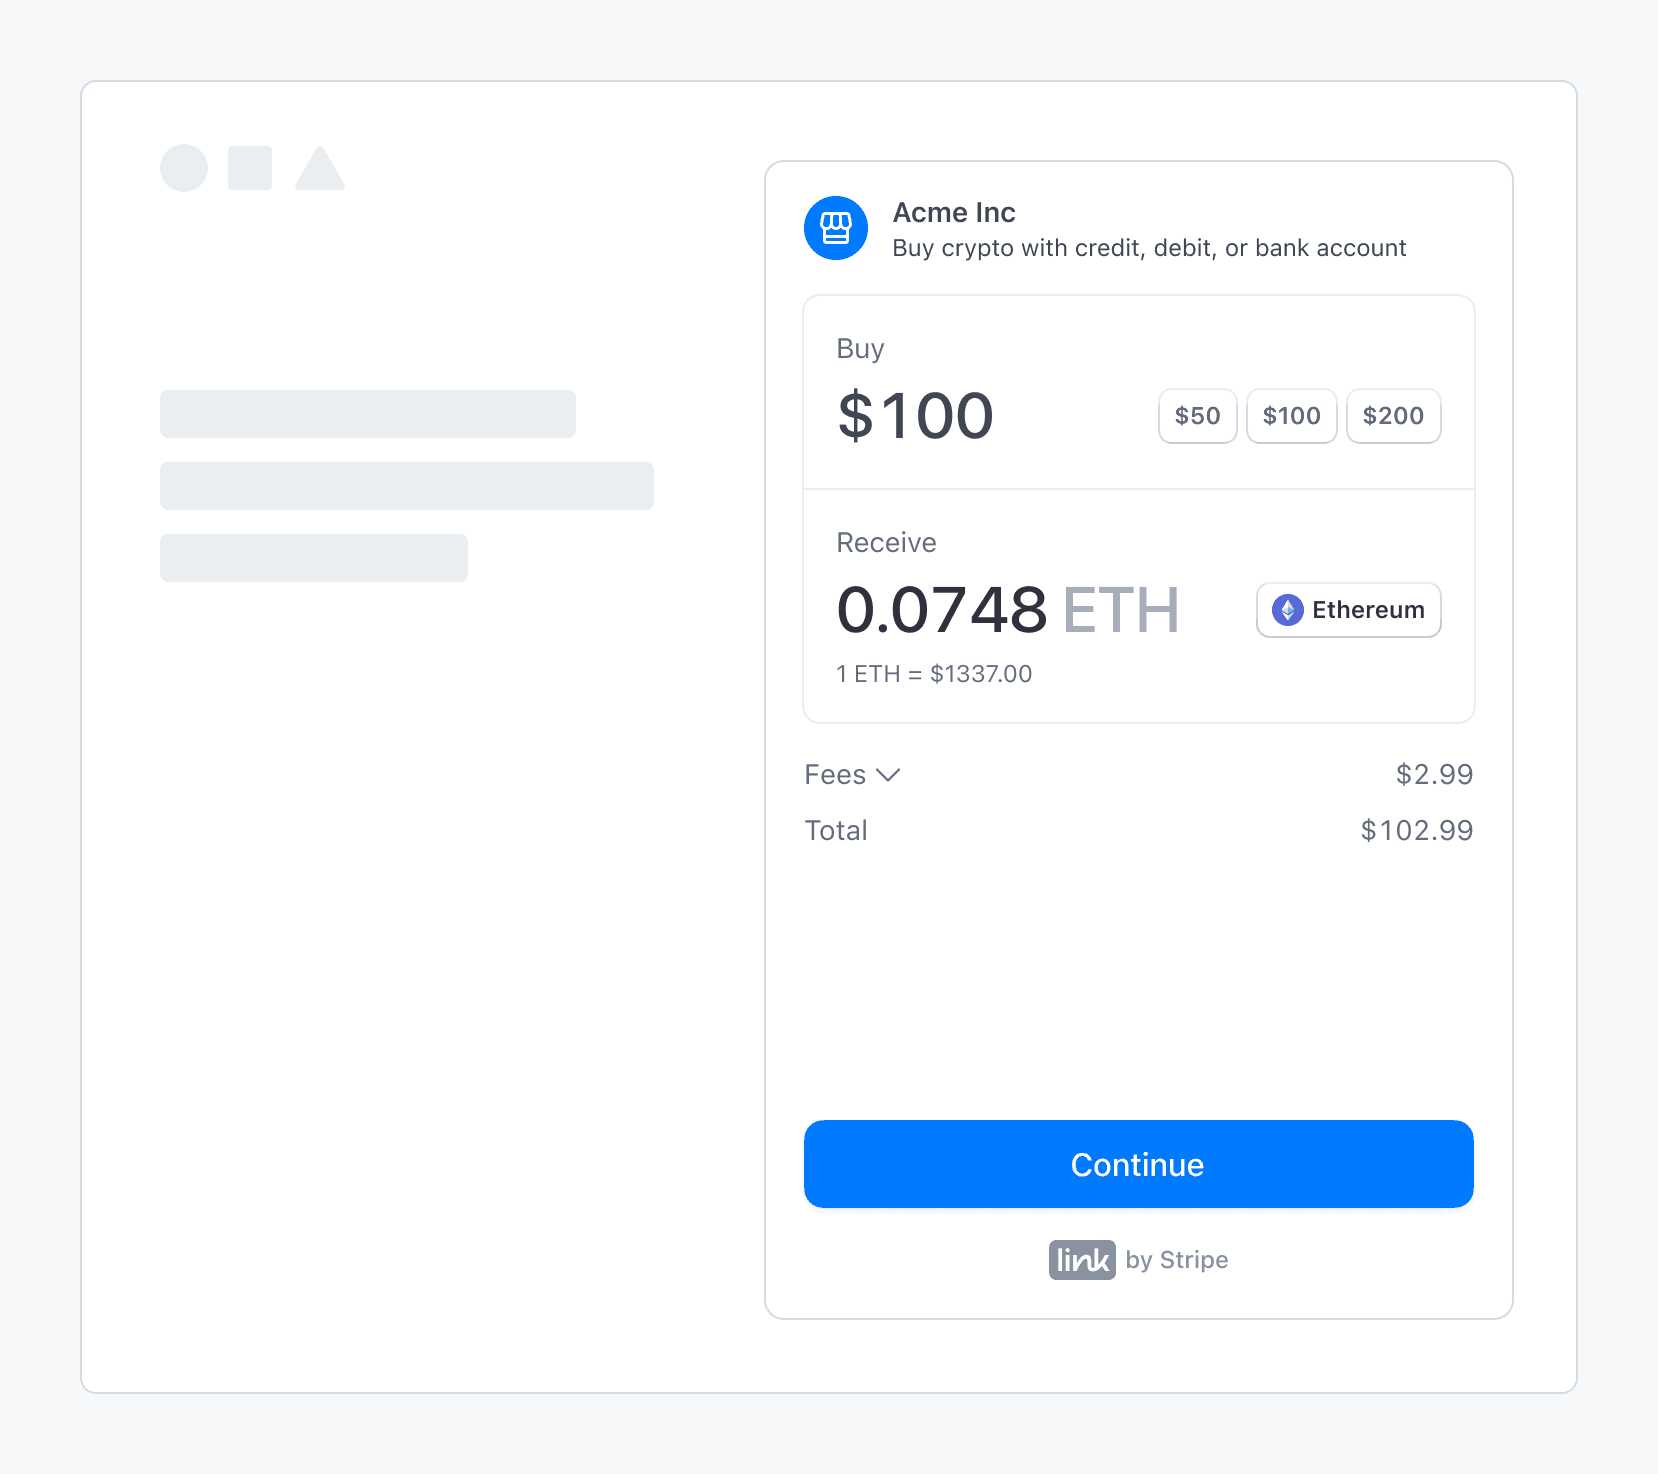
Intégration de la rampe d’accès à la cryptomonnaie de Stripe dans une application tierce
### Valeurs d’environnement de test
> Les montants des transactions des environnements de test sont remplacés par nos limites prédéterminées.
Utilisez les valeurs suivantes pour effectuer une transaction de rampe d’accès dans un *environnement de test* (A sandbox is an isolated test environment that allows you to test Stripe functionality in your account without affecting your live integration. Use sandboxes to safely experiment with new features and changes) :
- Sur l’écran OTP, utilisez `000000` comme code de vérification.
- Sur l’écran des informations personnelles, utilisez `000000000` pour le numéro de sécurité sociale et `address_full_match` pour la ligne d’adresse 1.
- Sur l’écran des données de paiement, utilisez le numéro de carte de test `4242424242424242`.
## Consulter l'utilisation de l'intégration
Après avoir lancé la rampe d’accès, vous pouvez consulter des rapports sur l’utilisation personnalisés dans le [Dashboard Stripe](https://dashboard.stripe.com/crypto-onramp/reports). Vous pouvez également revenir à la [page d’inscription](https://dashboard.stripe.com/crypto-onramp/onboarding) pour mettre à jour les domaines dans lesquels vous prévoyez d’héberger la rampe d’accès et consulter l’état des tâches d’inscription.
## Optional: Configurer la rampe d’accès pour une utilisation mobile
Intégrez la rampe d’accès à la cryptomonnaie à l’interface utilisateur de Stripe dans les vues Web mobiles et les navigateurs en créant une session, en hébergeant l’interface utilisateur, en finalisant l’achat et en redirigeant les clients vers l’application mobile.
### Créer une session
Comme pour les autres intégrations, vous devez implémenter un endpoint de serveur pour [créer une nouvelle session de rampe d’accès](https://docs.stripe.com/crypto/onramp/embedded.md#create-onramp-session) à chaque visite d’utilisateur. L’endpoint renvoie une `client_secret` qui peut charger l’interface utilisateur de la rampe d’accès ou afficher une erreur si la rampe d’accès n’est pas disponible.
### Héberger l’interface utilisateur de la rampe d’accès
Créez une route front-end (*par exemple, www.my-web3-wallet.com/onramp/*) pour héberger l’interface utilisateur de la rampe d’accès. Votre */onramp/* pointe vers un fichier onramp.html.
```html
Crypto Onramp
```
Où onramp.js consomme la `client_secret` depuis l’URL et monte l’interface utilisateur de la rampe d’accès :
```js
const stripeOnramp = StripeOnramp(<>);
initialize();
// initialize onramp element with client secret
function initialize() {
const url = window.location.href.replace(/\/$/, '');
const clientSecret = url.substring(url.lastIndexOf('/') + 1);
const onrampSession = stripeOnramp.createSession({
clientSecret,
// other client side options that customize the look and feel
});
onrampSession
.addEventListener('onramp_session_updated', handleSessionUpdate)
.mount("#onramp-element");
}
function handleSessionUpdate(event) {
const session = event.payload.session;
if (session.status === 'fulfillment_complete' || session.status === 'rejected') {
// redirect back to mobile app through universal link
window.location.assign('/onramp_success/' + session.id);
}
}
```
Configurer les liens universels vers les liens profonds `/onramp_success` à votre application mobile. Envisagez de prévoir une solution de repli ou de `onramp_success` pour inviter les clients à revenir manuellement à votre application.
### Finaliser l’achat
Comme pour une intégration standard, le client front-end contrôle toute l’interface utilisateur de la rampe d’accès. L’interface utilisateur s’adapte à la taille de l’écran. À mesure que l’état de la session change et que nous recueillons plus de `transaction_details`, l’objet `CryptoOnrampSession` se met à jour en conséquence. Nous générons des webhooks et des événements front-end pour chaque transition d’état. En utilisant des écouteurs d’événements front-end, vous pouvez rediriger les utilisateurs vers le flux de votre application lorsque la `OnrampSession` est terminée.
### Rediriger vers l’application mobile
À l’aide d’un lien profond ou d’un commutateur manuel, les clients peuvent reprendre leur flux dans votre application mobile. Votre application mobile peut utiliser votre backend pour continuer à interroger l’état `CryptoOnrampSession`.
Par exemple, si un client recharge son solde lors de la configuration initiale, vous pouvez le rediriger vers votre application dès que la session passe à `fulfillment_processing`. Vous pouvez autoriser les clients à explorer le reste de votre application tout en interrogeant l’état `OnrampSession`, en arrière-plan.
## Optional: Configurer les devis de conversion
L’ API [Onramp Quotes](https://docs.stripe.com/api/crypto/onramp_quotes.md) vous permet de récupérer des devis estimés pour les conversions sur la rampe d’accès en diverses cryptomonnaies, sur différents réseaux. Vous pouvez spécifier un montant source ou destination fixe et limiter les cotations à un sous-ensemble de devises ou de réseaux de destination. Cette API vous permet d’afficher les cotations dans l’interface utilisateur de votre produit avant de diriger le client vers le widget Onramp. Si la cotation expire avant que le client ne visite le widget Onramp, celui-ci pourrait voir une cotation légèrement différente dans le widget Onramp.
### Obtenir un devis de conversion
Utilisez l’[`endpoint GET /v1/crypto/onramp/quotes`](https://docs.stripe.com/api/crypto/onramp_quotes/retrieve.md) pour obtenir un devis de conversion. Le tableau suivant récapitule tous les paramètres disponibles pour cet endpoint :
| Paramètre | Type | Par défaut | Détails |
| ------------------------ | -------------------------- | --------------------------------------------------------- | ---------------------------------------------------------------------------------------------------------------------------------------------------------------------------------------------------------------------------------------------------------------------------------------------------------------------------------------------------------------------------------- |
| `source_currency` | String (facultatif) | `usd` | Le code de devise [ISO-4217](https://www.iso.org/iso-4217-currency-codes.html). Nous ne prenons actuellement en charge que `usd` et `eur`. |
| `source_amount` | String (facultatif) | `100.00` | Une représentation textuelle du montant en monnaie fiduciaire que vous devez convertir. Si `source_amount` est défini, `destination_amount` doit être null (ils sont mutuellement exclusifs, car vous ne pouvez définir un montant fixe que pour une seule des deux extrémités de la transaction). |
| `destination_amount` | String (facultatif) | `null` | Une représentation textuelle du montant de `destination_currency` à acheter. Si `destination_amount` est défini, `source_amount` doit être null. Lorsque vous spécifiez ce champ, vous devez également définir une seule valeur pour `destination_currencies` et une seule valeur pour `destination_networks` (afin que nous sachions pour quelle cryptomonnaie établir le devis). |
| `destination_currencies` | Array (facultatif) | `null`
- `['usdc', 'ethereum']` | La liste des cryptomonnaies pour lesquelles vous souhaitez générer des devis. Si ce champ est laissé `null`, nous récupérons les devis pour toutes les `destination_currencies` prises en charge par les `destination_networks`.
- Devises : `btc`, `eth`, `sol`, `matic`, `usdc`, `xlm` |
| `destination_networks` | Array (facultatif) | `null`
- `['polygon', 'bitcoin', 'solana', 'ethereum']` | La liste des réseaux de cryptomonnaies pour lesquels vous souhaitez générer des devis. Si ce champ est laissé `null`, nous récupérons les devis pour les `destination_currencies` sur tous les réseaux.
- Réseaux : `bitcoin`, `ethereum`, `solana`, `polygon` , `stellar` |
### Exemples de requêtes de devis
Pour récupérer toutes les paires devise-réseau de destination avec un montant source par défaut de 100 USD, exécutez la commande suivante :
```bash
curl -G https://api.stripe.com/v1/crypto/onramp/quotes \
-u <>:
```
Vous recevez une réponse semblable à ce qui suit :
```json
{
"id": "cd35838481497f403988360cc0ff5ce5c5ce7451ce8938f86d379dff7157d33d",
"rate_fetched_at": 1674265380.6883376,
"destination_network_quotes": {
"ethereum": [
{
"id": "7eb9ccb7c1bffadf3773ca1f56ba3a352fe4a226328e72142925a80e7242b70c",
"destination_currency": "eth",
"destination_amount": "0.060232255577506866",
"destination_network": "ethereum",
"fees": {
"network_fee_monetary": "1.41",
"transaction_fee_monetary": "3.03"
},
"source_total_amount": "104.44"
},
{
"id": "398de047128b6dff1abbc41519811db68dd8bcb69939b87c4a4621b1740a1c5b",
"destination_currency": "usdc",
"destination_amount": "100.00",
"destination_network": "ethereum",
"fees": {
"network_fee_monetary": "5.63",
"transaction_fee_monetary": "3.07"
},
"source_total_amount": "108.70"
}
],
...
},
"livemode": true,
"source_currency": "usd",
"source_amount": "100.00"
}
```
Pour récupérer toutes les paires devise-réseau de destination avec un montant source de 200 USD, exécutez la commande suivante :
```bash
curl -G https://api.stripe.com/v1/crypto/onramp/quotes \
-u <>: \
-d "source_amount"="200"
```
Vous recevez une réponse semblable à ce qui suit :
```json
{
"id": "2e5818944df6a2325c7e9c1e72d27174b9bedfc8e64ace47c081370a5b982a7b",
"rate_fetched_at": 1674265506.3408287,
"destination_network_quotes": {
"ethereum": [
{
"id": "d160a80828eabb6b6d4aeafac585eee62d95425c7fb7577866ab04b9a786df00",
"destination_currency": "eth",
"destination_amount": "0.253568242640499553",
"destination_network": "ethereum",
"fees": {
"network_fee_monetary": "1.45",
"transaction_fee_monetary": "12.71"
},
"source_total_amount": "214.20"
},
{
"id": "53f864cb28a42f11e1d9d5aff7e43ac96b056406f74cbf618399c6fa40f3d275",
"destination_currency": "usdc",
"destination_amount": "200.00",
"destination_network": "ethereum",
"fees": {
"network_fee_monetary": "5.80",
"transaction_fee_monetary": "12.76"
},
"source_total_amount": "218.56"
}
],
...
},
"livemode": true,
"source_currency": "usd",
"source_amount": "200.00"
}
```
Pour récupérer des devis pour ETH et SOL sur les réseaux Ethereum et Solana, exécutez la commande suivante (ce qui donnera ETH sur Ethereum et SOL sur Solana). Lorsque vous spécifiez `destination_currencies` et `destination_networks`, chaque paire devise-réseau valide dans leur produit croisé renvoie un devis. La valeur par défaut pour `destination_currencies` est toutes les devises, et la valeur par défaut pour `destination_networks` est tous les réseaux.
```bash
curl -G https://api.stripe.com/v1/crypto/onramp/quotes \
-u <>: \
-d "source_amount"="200" \
-d "destination_currencies[]"="eth" \
-d "destination_currencies[]"="sol" \
-d "destination_networks[]"="ethereum" \
-d "destination_networks[]"="solana"
```
Vous recevez une réponse semblable à ce qui suit :
```json
{
"id": "c9ab6fd14f87290ef94b583f0dd346de8e197321e029776c12b7790cd83fb78c",
"rate_fetched_at": 1674265576.8238478,
"destination_network_quotes": {
"bitcoin": [],
"ethereum": [
{
"id": "97bbd7b9f8bc1a029264cdc28b47b636e989f8bcab96a80a3bded2094131e311",
"destination_currency": "eth",
"destination_amount": "0.253433817682353791",
"destination_network": "ethereum",
"fees": {
"network_fee_monetary": "1.46",
"transaction_fee_monetary": "12.71"
},
"source_total_amount": "214.17"
}
],
"polygon": [],
"solana": [
{
"id": "79f00923b96543aa69d140172c7cefd0e73a2ed089d8935e63dcf21028698e23",
"destination_currency": "sol",
"destination_amount": "16.767237943",
"destination_network": "solana",
"fees": {
"network_fee_monetary": "0.01",
"transaction_fee_monetary": "12.70"
},
"source_total_amount": "212.71"
}
]
},
"livemode": true,
"source_currency": "usd",
"source_amount": "200.00"
}
```
Pour récupérer des devis pour l’USDC sur Ethereum et Solana, exécutez la commande suivante :
```bash
curl -G https://api.stripe.com/v1/crypto/onramp/quotes \
-u <>: \
-d "source_amount"="200" \
-d "destination_currencies[]"="usdc" \
-d "destination_networks[]"="ethereum" \
-d "destination_networks[]"="solana"
```
Vous recevez une réponse semblable à ce qui suit :
```json
{
"id": "8727e8de9a22915aea079973028054e31d362a328758a5953cee6ba1b6f22569",
"rate_fetched_at": 1674268717.432479,
"destination_network_quotes": {
"bitcoin": [],
"ethereum": [
{
"id": "603f29933c921d59b169572cf2d61da7d88f2a6973da0d6fcb686b3dec3de223",
"destination_currency": "usdc",
"destination_amount": "200.00",
"destination_network": "ethereum",
"fees": {
"network_fee_monetary": "5.88",
"transaction_fee_monetary": "12.76"
},
"source_total_amount": "218.64"
}
],
"polygon": [],
"solana": [
{
"id": "38b8388072e6272e7a0c0d5ee1161d3d747362a574f54fe76f1554ff60e3a007",
"destination_currency": "usdc",
"destination_amount": "200.00",
"destination_network": "solana",
"fees": {
"network_fee_monetary": "0.01",
"transaction_fee_monetary": "12.70"
},
"source_total_amount": "212.71"
}
]
},
"livemode": true,
"source_currency": "usd",
"source_amount": "200.00"
}
```
Pour récupérer un devis pour une seule paire devise-réseau de destination (ETH sur Ethereum) avec `destination_amount` spécifié, exécutez la commande suivante :
```bash
curl -G https://api.stripe.com/v1/crypto/onramp/quotes \
-u <>: \
-d "destination_amount"="0.42" \
-d "destination_currencies[]"="eth" \
-d "destination_networks[]"="ethereum"
```
Vous recevez une réponse semblable à ce qui suit :
```json
{
"id": "74f73859a8836293ce4f1e6757dc258c9f1016deea7b075faba8b5755d163168",
"rate_fetched_at": 1674268804.6989243,
"destination_network_quotes": {
"bitcoin": null,
"ethereum": [
{
"id": "f1adad5680b081031b03b89c174d25ce6b609416fc82f976423e95a089a10334",
"destination_currency": "eth",
"destination_amount": "0.420000000000000000",
"destination_network": "ethereum",
"fees": {
"network_fee_monetary": "1.45",
"transaction_fee_monetary": "21.06"
},
"source_total_amount": "719.53"
}
],
"polygon": null,
"solana": null
},
"livemode": true,
"source_currency": "usd",
"source_amount": "697.02"
}
```
## Optional: Supervisez les événements de webhook
Nous envoyons un webhook `crypto.onramp_session.updated` chaque fois que l’état d’une session de rampe d’accès change après sa création. Nous n’envoyons pas d’événement lors de la création d’une nouvelle session. Configurez les [webhooks](https://docs.stripe.com/webhooks.md) dans le Dashboard.
Le webhook utilise la documentation `CryptoOnrampSession` :
```json
{
"id": "evt_123",
"object": "event",
"data": {
"object": {
"id": "cos_0MYvv9589O8KAxCGPm84FhVR",
"object": "crypto.onramp_session",
"client_secret": "cos_0MYvv9589O8KAxCGPm84FhVR_secret_IGBYKVlTlnJL8UGxji48pKxBO00deNcBuVc",
"created": 1675794575,
"livemode": false,
"status": "initialized",
"transaction_details": {
"destination_currency": "eth",
"destination_amount": null,
"destination_network": "ethereum",
"fees": null,
"lock_wallet_address": false,
"source_currency": "usd",
"source_amount": null,
"destination_currencies": [
"eth"
],
"destination_networks": [
"ethereum"
],
"transaction_id": null,
"wallet_address": null,
"wallet_addresses": {
"bitcoin": null,
"ethereum": "0xB00F0759DbeeF5E543Cc3E3B07A6442F5f3928a2",
"polygon": null,
"solana": null,
"stellar": null,
"destination_tags": null
}
}
}
}
}
```
### Événements front-end
Vous pouvez vous abonner aux événements front-end suivants :
```js
// when the onramp UI is rendered
{
type: 'onramp_ui_loaded',
payload: {session: OnrampSession},
}
// when the onramp session object is updated
{
type: 'onramp_session_updated',
payload: {session: OnrampSession},
}
// for modal overlay render mode only
{
type: 'onramp_ui_modal_opened',
payload: {session: OnrampSession},
}
{
type: 'onramp_ui_modal_closed',
payload: {session: OnrampSession},
}
```
Comme indiqué ci-dessus, vous pouvez vous abonner ou vous désabonner à des événements à des fonctions standard `addEventListener/removeEventListener` sur OnrampSession. Vous pouvez utiliser `'*'` pour correspondre à tous les événements.
## Optional: Gérez le support client et la fraude
Stripe applique des restrictions sur la rampe d’accès intégrée afin d’assurer le support client et de prévenir les attaques frauduleuses.
### Vérifier l’utilité du support client
Transmettre `customer_ip_address` lors de la création de la session afin que nous puissions vérifier de manière préventive la limitation susmentionnée.
L’endpoint renvoie le code `HTTP 400` avec la valeur `code=crypto_onramp_unsupportable_client`, si le client se trouve dans une zone géographique que nous ne pouvons pas prendre en charge (sur la base du paramètre `client_ip_address`) Dans ce cas, vous souhaiterez peut-être masquer l’option de rampe d’accès pour les clients. Sinon, notre interface utilisateur d’accès s’affiche dans un état `disabled`.
Voici un exemple de requête illustrant ce comportement :
```bash
curl -X POST https://api.stripe.com/v1/crypto/onramp_sessions \
-u <>: \
-d "customer_ip_address"="8.8.8.8" \
```
Exemple de réponse (400) :
```json
{
"error": {
"type": "invalid_request_error",
"code": "crypto_onramp_unsupportable_customer",
"message": "Based on the information provided about the customer, we’re currently unable to support them."
}
}
```
### Gérer les attaques frauduleuses
Stripe agit en tant que commerçant officiel et assume la responsabilité en cas de litiges et de fraudes. Nous pouvons décider de limiter temporairement la création de sessions de rampes d’accès si nous détectons une situation à haut risque (par exemple, si nous constatons des attaques et des exploits actifs).Stripe agit en tant que commerçant officiel et assume la responsabilité en cas de litiges et de fraudes. Nous pouvons décider de restreindre temporairement la création de sessions de rampes d’accès si nous détectons une situation à haut risque (par exemple, si nous constatons des attaques et des exploits actifs).
Si nous devons fermer l’API en raison d’une fraude illimitée, nous renverrons le message suivant lorsqu’une personne tentera de créer une nouvelle session :
```bash
curl -X POST https://api.stripe.com/v1/crypto/onramp_sessions \
-u <>: \
```
Vous recevez une réponse semblable à ce qui suit :
```json
{
"error": {
"type": "api_error",
"code": "crypto_onramp_disabled",
"message": "The v1/crypto/onramp_sessions endpoint has been disabled temporarily. Stripe will get in contact with you about details of the outage.",
"updated": 1652025690
}
}
```
### Validations et erreurs supplémentaires
| Condition | État HTTP | Code d’erreur |
| ---------------------------------------------------------------------------------------------------------------------------------------------------------------------------------------------------------------------- | --------- | ----------------------------------------------------------------------------- |
| Nous ne sommes pas en mesure de créer de nouvelles sessions en raison d’un incident. | 400 | `crypto_onramp_disabled` |
| D’après le paramètre `customer_ip_address`, nous ne pouvons pas prendre en charge le client indiqué. | 400 | `crypto_onramp_unsupported_country` ou `crypto_onramp_unsupportable_customer` |
| Une `customer_ip_address` mal formée est transmise au endpoint `/v1/crypto/onramp_session`. | 400 | `customer_ip_address` |
| Les paramètres `source_amount` et `destination_amount` s’excluent mutuellement, mais ils sont tous les deux définis par la plateforme. | 400 | `crypto_onramp_invalid_source_destination_pair` |
| L’un des paramètres `destination_currency` et `destination_network` est défini, mais pas l’autre | 400 | `crypto_onramp_incomplete_destination_currency_and_network_pair` |
| La combinaison de `destination_currency` et `destination_network` n’est pas valide | 400 | `crypto_onramp_invalid_destination_currency_and_network_pair` |
| Le paramètre `source_amount` est défini, mais pas `source_currency` | 400 | `crypto_onramp_missing_source_currency` |
| La valeur de `source_amount` n’est pas un nombre positif | 400 | `crypto_onramp_invalid_source_amount` |
| Le paramètre `destination_amount` est défini, mais pas `destination_currency` | 400 | `crypto_onramp_missing_destination_currency` |
| La valeur de `destination_amount` n’est pas un nombre positif | 400 | `crypto_onramp_invalid_destination_amount` |
| La combinaison de `destination_currencies` et `destination_networks` ne comporte aucune devise prise en charge | 400 | `crypto_onramp_invalid_destination_currencies_and_networks` |
| `destination_currency` ne figure pas dans `destination_currencies` | 400 | `crypto_onramp_conflicting_destination_currency` |
| `destination_network` ne figure pas `destination_networks` | 400 | `crypto_onramp_conflicting_destination_network` |
| Au moins une des adresses de portefeuille figurant dans `wallet_addresses` est associée à un réseau qui n’apparaît pas dans `destination_networks` | 400 | `crypto_onramp_wallet_addresses_not_all_networks_supported` |
| Aucune adresse de portefeuille n’a été fournie dans `wallet_addresses`, alors que la valeur de `lock_wallet_address` est définie sur « true » | 400 | `crypto_onramp_no_wallet_address_to_lock` |
| L’entreprise n’a pas défini les champs `business_name` ou `business_url`. Ceux-ci sont renseignés dans le [Dashboard](https://dashboard.stripe.com/settings/public/) sous `Public business name` et `Business website` | 400 | `crypto_onramp_merchant_not_properly_setup` |
## Optional: Utiliser la persistance de session
Vous pouvez utiliser la persistance de session pour vous aider à fournir des notifications et à maintenir l’engagement des clients avec la rampe d’accès après avoir effectué leur achat.
#### Avantages de la persistance de session
Dans certains cas, vous pouvez souhaiter conserver une session de la rampe d’accès d’une visite à l’autre. Par exemple, lorsque la session de la rampe d’accès d’un client est interrompue ou abandonnée, vous pouvez l’inviter à la reprendre ultérieurement et lui proposer des moyens pour ce faire. Ou si un client actualise la page après avoir effectué le paiement, vous pouvez conserver la possibilité de l’informer lorsque l’achat via la rampe d’accès précédent a été effectué.
Pour cette raison, l’objet OnrampSession est avec état et sauvegardé en tant que ressource côté serveur. En initialisant l’interface utilisateur de la rampe d’accès à l’aide d’une clé secrète du client OnrampSession précédemment utilisée, les clients reviennent là où ils s’étaient arrêtés.
#### Configuration de la persistance de session
Une clé secrète du client est un identificateur unique de la session de rampe d’accès qui sauvegarde le cycle de vie d’une session sans divulguer d’informations de paiement sensibles. Cependant, elle expose des informations privées telles que les adresses de wallet. Ne l’enregistrez pas, ne l’intégrez pas dans des URL et ne l’exposez à personne d’autre que le client. Assurez-vous d’avoir configuré le protocole TLS sur toute page qui inclut la clé secrète du client.
Si vous disposez d’une structure de compte de type Web2, vous pouvez associer OnrampSession à votre objet client et le récupérer lors de l’authentification. Pour une application Web3 sans compte, l’obligation d’utiliser la signature de messages pour l’authentification ajouterait une friction pour le client. La sauvegarde locale préservant la confidentialité offre une expérience client acceptable.
## Optional: Configurer la rampe d’accès par cas d’usage
Vous pouvez configurer les paramètres de session de rampe d’accès en fonction du cas d’usage :
- Wallets
- Paiement Dapp ou NFT
- Intégration de l’échange décentralisé (DEX)
Pour que la rampe d’accès semble faire partie de l’interface utilisateur de votre produit, encadrez-la en tant que composant natif de votre application.
## Portefeuille
Les clients utilisant un wallet disposent de deux principales rampes d’accès : l’approvisionnement du wallet et les recharges de transactions.
### Financement par portefeuille
Vous pouvez inciter de manière proactive les clients à approvisionner leur wallet après avoir créé un nouveau wallet ou lorsque leurs fonds sont extrêmement bas.
Dans ce cas, envisagez de spécifier les paramètres suivants :
- `wallet_addresses` : utilisez l’adresse du portefeuille déjà utilisée.
- `destination_networks` : paramètre défini sur le réseau par défaut ou sélectionné pour éviter la confusion du client.
- `destination_currencies` :vous pouvez laisser ce champ vide, mais vous pouvez aussi le limiter au token gas natif ou à toute cryptomonnaie de votre choix. Par exemple, si vous proposez un service DeFi en USDC, envisagez que l’utilisateur a probablement besoin à la fois d’USDC et du token gas.
- `destination_network` : laissez ce champ vide pour hériter de la première valeur du réseau pris en charge.
- `destination_currency` : laissez ce champ vide pour hériter de la première valeur de cryptomonnaie prise en charge.
L’exemple de code suivant illustre comment créer une session de rampe d’accès à l’aide de plusieurs de ces paramètres :
```bash
curl -X POST https://api.stripe.com/v1/crypto/onramp_sessions \
-u <>: \
-d "customer_ip_address"="8.8.8.8" \
-d "wallet_addresses[ethereum]"="0xB00F0759DbeeF5E543Cc3E3B07A6442F5f3928a2" \
-d "wallet_addresses[solana]"="bufoH37MTiMTNAfBS4VEZ94dCEwMsmeSijD2vZRShuV" \
-d "destination_networks[]"="ethereum" \
-d "destination_networks[]"="solana"
```
### Recharges de transactions
Lorsqu’une Dapp ou un client propose une transaction, vous pouvez détecter que celle-ci échoue en raison d’un solde insuffisant. Dans ce cas, vous pouvez calculer le delta nécessaire pour que la transaction soit effectuée. Cependant, il est souvent difficile de détecter le montant demandé ou la cryptomonnaie pour les tokens ERC ou SPL.
Dans ce cas, envisagez de spécifier les éléments suivants :
- `wallet_addresses` : utilisez l’adresse du portefeuille utilisée.
- `destination_networks` : définissez ce paramètre sur le réseau sélectionné.
- `destination_currencies` : limitez-vous aux devises manquantes lorsque cela est possible.
- `destination_network` : définissez ce paramètre sur le réseau sélectionné (obligatoire si vous souhaitez définir le montant).
- `destination_currency` : définissez ce paramètre sur la devise de destination (une valeur obligatoire si vous souhaitez définir le montant).
- `destination_amount` : définissez ce paramètre sur les différences de solde, en laissant suffisamment de marge pour les frais de transaction, le cas échéant.
L’exemple de code suivant illustre comment créer une session de rampe d’accès à l’aide de plusieurs de ces paramètres :
```bash
curl -X POST https://api.stripe.com/v1/crypto/onramp_sessions \
-u <>: \
-d "customer_ip_address"="8.8.8.8" \
-d "wallet_addresses[ethereum]"="0xB00F0759DbeeF5E543Cc3E3B07A6442F5f3928a2" \
-d "destination_networks[]"="ethereum" \
-d "destination_currencies[]"="usdc" \
-d "destination_network"="ethereum" \
-d "destination_currency"="usdc" \
-d "destination_amount"="10"
```
## Paiement Dapp ou NFT
Vous pouvez utiliser la rampe d’accès lors du paiement lorsque vous connaissez le montant de destination. Par exemple, une Dapp peut vendre des abonnements à un prix fixe, ou un client peut vouloir acheter un NFT spécifique sur une marketplace.
Dans ce cas, envisagez de spécifier les éléments suivants :
- `wallet_addresses` : utilisez l’adresse du portefeuille connecté.
- `destination_networks` : utilisez le réseau connecté.
- `destination_currencies` : utilisez la devise de présentation (le prix dans la devise dans laquelle les biens sont indiqués).
- `destination_network` : définissez ce paramètre sur le réseau sélectionné ci-dessus (obligatoire si vous souhaitez définir le montant).
- `destination_currency` : définissez ce paramètre sur la devise de destination ci-dessus (obligatoire si vous souhaitez définir le montant).
- `destination_amount` : réglez-le soit sur la différence de solde, soit sur le montant total de l’achat. Certains clients adoptent les deux méthodes, en utilisant des analyses en chaîne avec une répartition presque égale. Un client peut choisir le montant total afin de simplifier sa base fiscale ou d’éviter de dépenser ses actifs accumulés. Dans les deux cas, prévoyez une marge pour le gaz.
L’exemple de code suivant illustre comment créer une session de rampe d’accès à l’aide de plusieurs de ces paramètres :
```bash
curl -X POST https://api.stripe.com/v1/crypto/onramp_sessions \
-u <>: \
-d "customer_ip_address"="8.8.8.8" \
-d "wallet_addresses[ethereum]"="0xB00F0759DbeeF5E543Cc3E3B07A6442F5f3928a2" \
-d "destination_networks[]"="ethereum" \
-d "destination_currencies[]"="eth" \
-d "destination_network"="ethereum" \
-d "destination_currency"="eth" \
-d "destination_amount"="0.2343"
```
## DEX
Une plateforme DEX offre une opportunité unique de permettre aux clients d’acheter n’importe quelle cryptomonnaie avec des monnaies fiduciaires. Bien qu’une DEX puisse inciter les clients à recharger leur wallet en cryptomonnaies lorsqu’ils échangent des paires de cryptomonnaies arbitraires à l’aide d’une interface existante, il est préférable de disposer d’un flux client dédié qui se concentre uniquement sur les échanges de monnaies fiduciaires vers des cryptomonnaies.
Étant donné que la rampe d’accès vous permet de contrôler votre marque et votre interface utilisateur, un DEX peut créer un widget de rampe d’accès qui utilise la capacité de Stripe à convertir les monnaies fiduciaires en cryptomonnaies sélectionnées. Le DEX peut ensuite effectuer le dernière échange dans des devises arbitraires. Un DEX peut également créer un widget de rampe d’accès pour un token spécifique. Par exemple, un DAO peut approuver un pool de liquidités spécifique et utiliser un DEX pour distribuer ses tokens et intégrer de nouveaux utilisateurs avec les monnaies fiduciaires.
Dans ce cas, envisagez de spécifier les éléments suivants :
- `wallet_addresses` : utilisez l’adresse du portefeuille déjà utilisée.
- `destination_networks` : définissez ce paramètre sur le réseau sélectionné.
- `destination_currencies` : limitez-vous à la cryptomonnaie sélectionnée.
- `destination_network` : définissez ce paramètre sur le réseau sélectionné (obligatoire si vous souhaitez définir le montant).
- `destination_currency` : définissez ce paramètre sur la devise de destination (obligatoire si vous souhaitez définir le montant).
- `destination_amount` : ne définissez ce paramètre que si vous pouvez collecter l’intention du client à l’avance - laissez vide pour que Stripe puisse suggérer des valeurs par défaut intelligentes.
L’exemple de code suivant illustre comment créer une session de rampe d’accès à l’aide de plusieurs de ces paramètres :
```bash
curl -X POST https://api.stripe.com/v1/crypto/onramp_sessions \
-u <>: \
-d "customer_ip_address"="8.8.8.8" \
-d "wallet_addresses[ethereum]"="0xB00F0759DbeeF5E543Cc3E3B07A6442F5f3928a2" \
-d "destination_networks[]"="ethereum" \
-d "destination_currencies[]"="eth" \
-d "destination_network"="ethereum" \
-d "destination_currency"="eth"
```