# Build a SaaS platform with Accounts v1
Create connected accounts using Accounts v1, then facilitate direct payments to them on your SaaS platform.
> #### Accounts v2 API integrations
>
> This guide only applies to existing Connect platforms that use the Accounts v1 API. If you’re a new Connect user, or if you use the Accounts v2 API, see the [v2 SaaS platform guide](https://docs.stripe.com/connect/saas.md).
This guide covers letting your users accept payments, moving a portion of your users’ earnings into your balance, and paying out the remainder to your users’ bank accounts. To illustrate these concepts, we’ll use an example platform that lets businesses build their own online stores.
# React Native
This integration combines all of the steps required to pay, including collecting payment details and confirming the payment, into a single sheet that displays on top of your app.
> #### Accounts v2 API support
>
> The Payment Sheet doesn’t support *customer-configured Accounts* (Account configurations represent role-based functionality that you can enable for accounts, such as merchant, customer, or recipient). It only supports `Customer` objects.
## Prerequisites
1. [Register your platform](https://dashboard.stripe.com/connect).
1. [Verify and add business details in Dashboard](https://dashboard.stripe.com/account/onboarding).
1. [Complete your platform profile](https://dashboard.stripe.com/connect/settings/profile).
1. [Customise your brand settings](https://dashboard.stripe.com/settings/connect/stripe-dashboard/branding). Add a business name, icon, and brand colour.
## Set up Stripe [Server-side] [Client-side]
First, you need a Stripe account. [Register now](https://dashboard.stripe.com/register).
### Server-side
This integration requires endpoints on your server that talk to the Stripe API. Use the official libraries for access to the Stripe API from your server:
#### Ruby
```bash
# Available as a gem
sudo gem install stripe
```
```ruby
# If you use bundler, you can add this line to your Gemfile
gem 'stripe'
```
### Client-side
The [React Native SDK](https://github.com/stripe/stripe-react-native) is open source and fully documented. Internally, it uses the [native iOS](https://github.com/stripe/stripe-ios) and [Android](https://github.com/stripe/stripe-android) SDKs. To install Stripe’s React Native SDK, run one of the following commands in your project’s directory (depending on which package manager you use):
#### yarn
```bash
yarn add @stripe/stripe-react-native
```
#### npm
```bash
npm install @stripe/stripe-react-native
```
Next, install some other necessary dependencies:
- For iOS, go to the **ios** directory and run `pod install` to ensure that you also install the required native dependencies.
- For Android, there are no more dependencies to install.
> We recommend following the [official TypeScript guide](https://reactnative.dev/docs/typescript#adding-typescript-to-an-existing-project) to add TypeScript support.
### Stripe initialisation
To initialise Stripe in your React Native app, either wrap your payment screen with the `StripeProvider` component, or use the `initStripe` initialisation method. Only the API [publishable key](https://docs.stripe.com/keys.md#obtain-api-keys) in `publishableKey` is required. The following example shows how to initialise Stripe using the `StripeProvider` component.
```jsx
import { useState, useEffect } from 'react';
import { StripeProvider } from '@stripe/stripe-react-native';
function App() {
const [publishableKey, setPublishableKey] = useState('');
const fetchPublishableKey = async () => {
const key = await fetchKey(); // fetch key from your server here
setPublishableKey(key);
};
useEffect(() => {
fetchPublishableKey();
}, []);
return (
{/* Your app code here */}
);
}
```
> Use your API [test keys](https://docs.stripe.com/keys.md#obtain-api-keys) while you test and develop, and your [live mode](https://docs.stripe.com/keys.md#test-live-modes) keys when you publish your app.
## Create a connected account
When a user (seller or service provider) signs up on your platform, create a user [Account](https://docs.stripe.com/api/accounts.md) (referred to as a *connected account*) so you can accept payments and move funds to their bank account. Connected accounts represent your user in Stripe’s API and help facilitate the collection of onboarding requirements so Stripe can verify the user’s identity. In our store builder example, the connected account represents the business setting up their online store.
### Step 2.1: Create a connected account and prefill information (Server-side)
Use the `/v1/accounts` API to [create](https://docs.stripe.com/api/accounts/create.md) a connected account. You can create the connected account by using the [default connected account parameters](https://docs.stripe.com/connect/migrate-to-controller-properties.md), or by specifying the account type.
#### With default properties
```curl
curl -X POST https://api.stripe.com/v1/accounts \
-u "<>:"
```
#### With account type
```curl
curl https://api.stripe.com/v1/accounts \
-u "<>:" \
-d type=standard
```
If you’ve already collected information for your connected accounts, you can pre-fill that information on the `Account` object. You can pre-fill any account information, including personal and business information, external account information, and so on.
After creating the `Account`, create a [Person](https://docs.stripe.com/api/persons/create.md) to represent the person responsible for opening the account, with `relationship.representative` set to true and any account information you want to prefill (for example, their first and last name).
```curl
curl https://api.stripe.com/v1/accounts/{{ACCOUNT_ID}}/persons \
-u "<>:" \
-d first_name=Jenny \
-d last_name=Rosen \
-d "relationship[representative]=true"
```
Connect Onboarding doesn’t ask for the prefilled information. However, it does ask the account holder to confirm the prefilled information before accepting the [Connect service agreement](https://docs.stripe.com/connect/service-agreement-types.md).
When testing your integration, prefill account information using [test data](https://docs.stripe.com/connect/testing.md).
### Step 2.2: Create an account link (Server-side)
You can create an account link by calling the [Account Links](https://docs.stripe.com/api/account_links.md) API with the following parameters:
- `account`
- `refresh_url`
- `return_url`
- `type` = `account_onboarding`
```curl
curl https://api.stripe.com/v1/account_links \
-u "<>:" \
-d "account={{CONNECTEDACCOUNT_ID}}" \
--data-urlencode "refresh_url=https://example.com/reauth" \
--data-urlencode "return_url=https://example.com/return" \
-d type=account_onboarding
```
### Step 2.3: Redirect your user to the account link URL (Client-side)
The response to your [Account Links](https://docs.stripe.com/api/account_links.md) request includes a value for the key `url`. Account Links are temporary and are single-use only because they grant access to the connected account user’s personal information. If you want to prefill information, you must do so before generating the account link. After you create the account link for a Standard account, you won’t be able to read or write information for the account. Send this URL to your app and open it in the browser for the user to complete the Connect Onboarding flow.
> Don’t email, text, or otherwise send account link URLs outside your platform application. Instead, provide them to the authenticated account holder within your application.
### Step 2.4: Handle the user returning to your platform (Client-side)
*Connect* (Connect is Stripe's solution for multi-party businesses, such as marketplace or software platforms, to route payments between sellers, customers, and other recipients) Onboarding requires you to pass both a `return_url` and `refresh_url` to handle all cases where the user is redirected to your platform. It’s important that you implement these correctly to provide the best experience for your user. You can set up a [deep link](https://reactnavigation.org/docs/deep-linking/) to enable the Stripe webpage to redirect to your app automatically.
#### return_url
Stripe issues a redirect to this URL when the user completes the Connect Onboarding flow. This doesn’t mean that all information has been collected or that there are no outstanding requirements on the account. This only means the flow was entered and exited properly.
No state is passed through this URL. After a user is redirected to your `return_url`, check the state of the `details_submitted` parameter on their account by doing either of the following:
- Listening to `account.updated` *webhooks* (A webhook is a real-time push notification sent to your application as a JSON payload through HTTPS requests)
- Calling the [Accounts](https://docs.stripe.com/api/accounts.md) API and inspecting the returned object
#### refresh_url
Your user is redirected to the `refresh_url` in these cases:
- The link is expired (a few minutes went by since the link was created)
- The user already visited the link (the user refreshed the page or clicked back or forward in the browser)
- Your platform is no longer able to access the account
- The account has been rejected
Your `refresh_url` should trigger a method on your server to call [Account Links](https://docs.stripe.com/api/account_links.md) again with the same parameters, and redirect the user to the Connect Onboarding flow to create a seamless experience.
### Step 2.5: Handle users that haven’t completed onboarding
A user that is redirected to your `return_url` might not have completed the onboarding process. Use the `/v1/accounts` endpoint to retrieve the user’s account and check for `charges_enabled`. If the account isn’t fully onboarded, provide UI prompts to allow the user to continue onboarding later. The user can complete their account activation through a new account link (generated by your integration). You can check the state of the `details_submitted` parameter on their account to see if they’ve completed the onboarding process.
## Enable payment methods
View your [payment methods settings](https://dashboard.stripe.com/settings/connect/payment_methods) and enable the payment methods you want to support. Card payments are enabled by default but you can enable and disable payment methods as needed.
## Add an endpoint [Server-side]
> #### Note
>
> To display the PaymentSheet before you create a PaymentIntent, see [Collect payment details before creating an Intent](https://docs.stripe.com/payments/accept-a-payment-deferred.md?type=payment).
This integration uses three Stripe API objects:
1. [PaymentIntent](https://docs.stripe.com/api/payment_intents.md): Stripe uses this to represent your intent to collect payment from a customer, tracking your charge attempts and payment state changes throughout the process.
1. (Optional) A [customer-configured Account](https://docs.stripe.com/api/v2/core/accounts/object.md#v2_account_object-applied_configurations) or a [Customer](https://docs.stripe.com/api/customers.md) object: To set up a payment method for future payments, you must attach it to a customer. Create an object to represent your customer when they create an account with your business. If your customer makes a payment as a guest, you can create an `Account` or `Customer` object before payment and associate it with your own internal representation of the customer’s account later.
1. (Optional) [CustomerSession](https://docs.stripe.com/api/customer_sessions.md): Information on the object that represents your customer is sensitive, and can’t be retrieved directly from an app. A `CustomerSession` grants the SDK temporary scoped access to the `Account` or `Customer` and provides additional configuration options. See a complete list of [configuration options](https://docs.stripe.com/api/customer_sessions/create.md#create_customer_session-components).
> If you never save cards for customers and don’t allow returning customers to reuse saved cards, you can omit the `Account` or `Customer` object and the `CustomerSession` object from your integration.
For security reasons, your app can’t create these objects. Instead, add an endpoint on your server that:
1. Retrieves the `Account` or `Customer`, or creates a new one.
1. Creates a [CustomerSession](https://docs.stripe.com/api/customer_sessions.md) for the `Account` or `Customer`.
1. Creates a `PaymentIntent` with the [amount](https://docs.stripe.com/api/payment_intents/create.md#create_payment_intent-amount), [currency](https://docs.stripe.com/api/payment_intents/create.md#create_payment_intent-currency), and either the [customer_account](https://docs.stripe.com/api/payment_intents/create.md#create_payment_intent-customer_account) or the [customer](https://docs.stripe.com/api/payment_intents/create.md#create_payment_intent-customer).
1. Returns the `PaymentIntent`’s *client secret* (The client secret is a unique key returned from Stripe as part of a PaymentIntent. This key lets the client access important fields from the PaymentIntent (status, amount, currency) while hiding sensitive ones (metadata, customer)), the `CustomerSession`’s `client_secret`, the ID of the `Account` or `Customer`, and your [publishable key](https://dashboard.stripe.com/apikeys) to your app.
The payment methods shown to customers during the checkout process are also included on the PaymentIntent. You can let Stripe pull payment methods from your Dashboard settings or you can list them manually. Regardless of the option you choose, note that the currency passed in the PaymentIntent filters the payment methods shown to the customer. For example, if you pass `eur` on the PaymentIntent and have OXXO enabled in the Dashboard, OXXO won’t be shown to the customer because OXXO doesn’t support `eur` payments.
Unless your integration requires a code-based option for offering payment methods, Stripe recommends the automated option. This is because Stripe evaluates the currency, payment method restrictions, and other parameters to determine the list of supported payment methods. Payment methods that increase conversion and that are most relevant to the currency and customer’s location are prioritised.
#### Manage payment methods from the Dashboard
You can manage payment methods from the [Dashboard](https://dashboard.stripe.com/settings/payment_methods). Stripe handles the return of eligible payment methods based on factors such as the transaction’s amount, currency, and payment flow. The PaymentIntent is created using the payment methods you configured in the Dashboard. If you don’t want to use the Dashboard or if you want to specify payment methods manually, you can list them using the `payment_method_types` attribute.
#### curl
```bash
# Create a Customer (use an existing Customer ID if this is a returning customer)
curl https://api.stripe.com/v1/customers \
-u <>: \
-X "POST" \
-H "Stripe-Account: {{CONNECTED_ACCOUNT_ID}}"
# Create an CustomerSession for the Customer
curl https://api.stripe.com/v1/customer_sessions \
-u <>: \
-X "POST" \
-d "customer"="{{CUSTOMER_ID}}" \
-d "components[mobile_payment_element][enabled]"=true \
-d "components[mobile_payment_element][features][payment_method_save]"=enabled \
-d "components[mobile_payment_element][features][payment_method_redisplay]"=enabled \
-d "components[mobile_payment_element][features][payment_method_remove]"=enabled
# Create a PaymentIntent
curl https://api.stripe.com/v1/payment_intents \
-u <>: \
-H "Stripe-Account: {{CONNECTED_ACCOUNT_ID}}"
-X "POST" \
-d "customer"="{{CUSTOMER_ID}}" \
-d "amount"=1099 \
-d "currency"="eur" \
-d "automatic_payment_methods[enabled]"=true \
-d application_fee_amount="123" \
```
#### Listing payment methods manually
#### curl
```bash
# Create a Customer (use an existing Customer ID if this is a returning customer)
curl https://api.stripe.com/v1/customers \
-u <>: \
-X "POST" \
-H "Stripe-Account: {{CONNECTED_ACCOUNT_ID}}"
# Create an CustomerSession for the Customer
curl https://api.stripe.com/v1/customer_sessions \
-u <>: \
-X "POST" \
-d "customer"="{{CUSTOMER_ID}}" \
-d "components[mobile_payment_element][enabled]"=true \
-d "components[mobile_payment_element][features][payment_method_save]"=enabled \
-d "components[mobile_payment_element][features][payment_method_redisplay]"=enabled \
-d "components[mobile_payment_element][features][payment_method_remove]"=enabled
# Create a PaymentIntent
curl https://api.stripe.com/v1/payment_intents \
-u <>: \
-H "Stripe-Account: {{CONNECTED_ACCOUNT_ID}}"
-X "POST" \
-d "customer"="{{CUSTOMER_ID}}" \
-d "amount"=1099 \
-d "currency"="eur" \
-d "payment_method_types[]"="bancontact" \
-d "payment_method_types[]"="card" \
-d "payment_method_types[]"="ideal" \
-d "payment_method_types[]"="klarna" \
-d "payment_method_types[]"="sepa_debit" \
-d application_fee_amount="123" \
```
> Each payment method needs to support the currency passed in the PaymentIntent and your business needs to be based in one of the countries each payment method supports. See the [Payment method integration options](https://docs.stripe.com/payments/payment-methods/integration-options.md) page for more details about what’s supported.
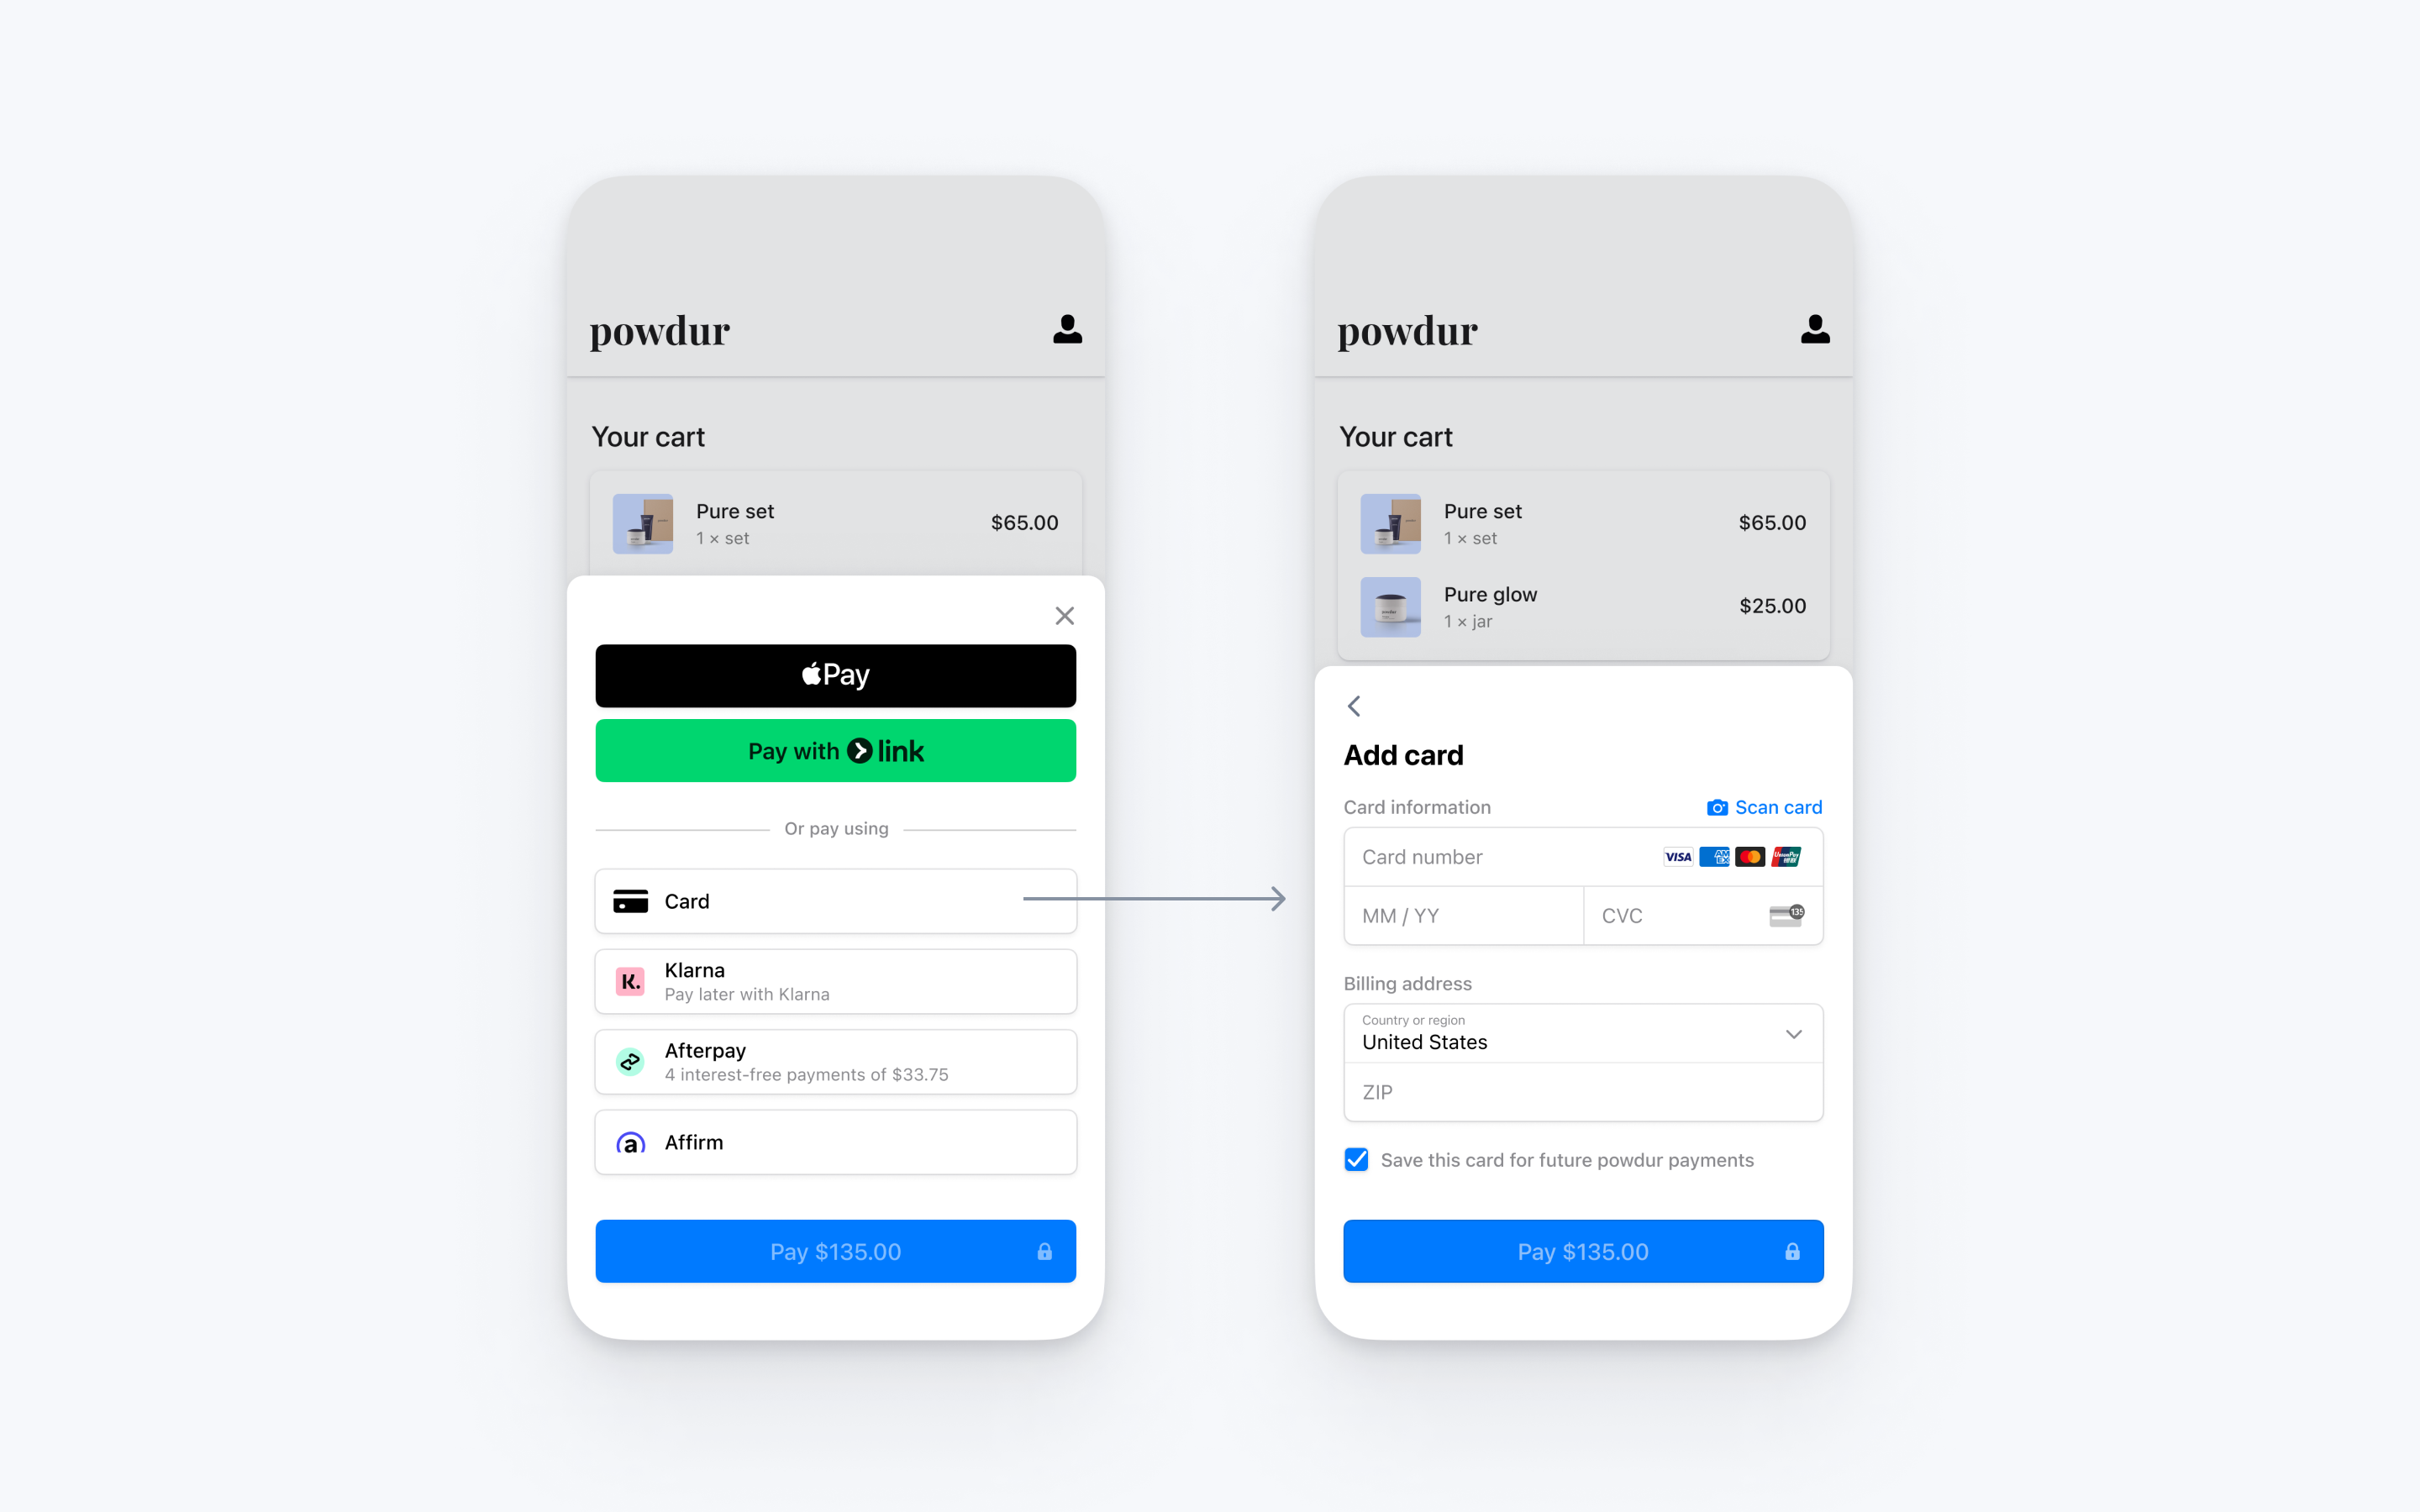
## Integrate the payment sheet [Client-side]
Before displaying the mobile Payment Element, your checkout page should:
- Show the products being purchased and the total amount
- Collect any required shipping information
- Include a checkout button to present Stripe’s UI
In the checkout of your app, make a network request to the backend endpoint you created in the previous step and call `initPaymentSheet` from the `useStripe` hook.
#### Accounts v2
```javascript
export default function CheckoutScreen() {
const { initPaymentSheet, presentPaymentSheet } = useStripe();
const [loading, setLoading] = useState(false);
const fetchPaymentSheetParams = async () => {
const response = await fetch(`${API_URL}/payment-sheet`, {
method: 'POST',
headers: {
'Content-Type': 'application/json',
},
});
const { paymentIntent, ephemeralKey, customer_account } = await response.json();
return {
paymentIntent,
ephemeralKey,
customer_account,
};
};
const initializePaymentSheet = async () => {
const {
paymentIntent,
ephemeralKey,
customer_account,
} = await fetchPaymentSheetParams();
const { error } = await initPaymentSheet({
merchantDisplayName: "Example, Inc.",
customerAccountId: customer_account,
customerEphemeralKeySecret: ephemeralKey,
paymentIntentClientSecret: paymentIntent,
// Set `allowsDelayedPaymentMethods` to true if your business accepts payment
// methods that complete payment after a delay, like SEPA Debit and Sofort.
allowsDelayedPaymentMethods: true,
defaultBillingDetails: {
name: 'Jane Doe',
}
});
if (!error) {
setLoading(true);
}
};
const openPaymentSheet = async () => {
// see below
};
useEffect(() => {
initializePaymentSheet();
}, []);
return (
);
}
```
#### Customers v1
```javascript
export default function CheckoutScreen() {
const { initPaymentSheet, presentPaymentSheet } = useStripe();
const [loading, setLoading] = useState(false);
const fetchPaymentSheetParams = async () => {
const response = await fetch(`${API_URL}/payment-sheet`, {
method: 'POST',
headers: {
'Content-Type': 'application/json',
},
});
const { paymentIntent, ephemeralKey, customer } = await response.json();
return {
paymentIntent,
ephemeralKey,
customer,
};
};
const initializePaymentSheet = async () => {
const {
paymentIntent,
ephemeralKey,
customer,
} = await fetchPaymentSheetParams();
const { error } = await initPaymentSheet({
merchantDisplayName: "Example, Inc.",
customerId: customer,
customerEphemeralKeySecret: ephemeralKey,
paymentIntentClientSecret: paymentIntent,
// Set `allowsDelayedPaymentMethods` to true if your business can handle payment
//methods that complete payment after a delay, like SEPA Debit and Sofort.
allowsDelayedPaymentMethods: true,
defaultBillingDetails: {
name: 'Jane Doe',
}
});
if (!error) {
setLoading(true);
}
};
const openPaymentSheet = async () => {
// see below
};
useEffect(() => {
initializePaymentSheet();
}, []);
return (
);
}
```
When your customer taps the **Checkout** button, call `presentPaymentSheet()` to open the sheet. After the customer completes the payment, the sheet is dismissed and the promise resolves with an optional `StripeError`.
```javascript
export default function CheckoutScreen() {
// continued from above
const openPaymentSheet = async () => {
const { error } = await presentPaymentSheet();
if (error) {
Alert.alert(`Error code: ${error.code}`, error.message);
} else {
Alert.alert('Success', 'Your order is confirmed!');
}
};
return (
);
}
```
If there is no error, inform the customer they’re done (for example, by displaying an order confirmation screen).
Setting `allowsDelayedPaymentMethods` to true allows [delayed notification](https://docs.stripe.com/payments/payment-methods.md#payment-notification) payment methods like US bank accounts. For these payment methods, the final payment status isn’t known when the `PaymentSheet` completes, and instead succeeds or fails later. If you support these types of payment methods, inform the customer their order is confirmed and only fulfil their order (for example, ship their product) when the payment is successful.
## Set up a return URL (iOS only) [Client-side]
The customer might navigate away from your app to authenticate (for example, in Safari or their banking app). To allow them to automatically return to your app after authenticating, [configure a custom URL scheme](https://developer.apple.com/documentation/xcode/defining-a-custom-url-scheme-for-your-app) and set up your app delegate to forward the URL to the SDK. Stripe doesn’t support [universal links](https://developer.apple.com/documentation/xcode/allowing-apps-and-websites-to-link-to-your-content).
#### SceneDelegate
#### Swift
```swift
// This method handles opening custom URL schemes (for example, "your-app://stripe-redirect")
func scene(_ scene: UIScene, openURLContexts URLContexts: Set) {
guard let url = URLContexts.first?.url else {
return
}
let stripeHandled = StripeAPI.handleURLCallback(with: url)
if (!stripeHandled) {
// This was not a Stripe url – handle the URL normally as you would
}
}
```
#### AppDelegate
#### Swift
```swift
// This method handles opening custom URL schemes (for example, "your-app://stripe-redirect")
func application(_ app: UIApplication, open url: URL, options: [UIApplication.OpenURLOptionsKey: Any] = [:]) -> Bool {
let stripeHandled = StripeAPI.handleURLCallback(with: url)
if (stripeHandled) {
return true
} else {
// This was not a Stripe url – handle the URL normally as you would
}
return false
}
```
#### SwiftUI
#### Swift
```swift
@main
struct MyApp: App {
var body: some Scene {
WindowGroup {
Text("Hello, world!").onOpenURL { incomingURL in
let stripeHandled = StripeAPI.handleURLCallback(with: incomingURL)
if (!stripeHandled) {
// This was not a Stripe url – handle the URL normally as you would
}
}
}
}
}
```
Additionally, set the [returnURL](https://stripe.dev/stripe-ios/stripe-paymentsheet/Classes/PaymentSheet/Configuration.html#/s:6Stripe12PaymentSheetC13ConfigurationV9returnURLSSSgvp) on your [PaymentSheet.Configuration](https://stripe.dev/stripe-ios/stripe-paymentsheet/Classes/PaymentSheet/Configuration.html) object to the URL for your app.
```swift
var configuration = PaymentSheet.Configuration()
configuration.returnURL = "your-app://stripe-redirect"
```
## Handle post-payment events
Stripe sends a [payment_intent.succeeded](https://docs.stripe.com/api/events/types.md#event_types-payment_intent.succeeded) event when the payment completes. Use the [Dashboard webhook tool](https://dashboard.stripe.com/webhooks) or follow the [webhook guide](https://docs.stripe.com/webhooks/quickstart.md) to receive these events and run actions, such as sending an order confirmation email to your customer, logging the sale in a database, or starting a shipping workflow.
Listen for these events rather than waiting on a callback from the client. On the client, the customer could close the browser window or quit the app before the callback executes, and malicious clients could manipulate the response. Setting up your integration to listen for asynchronous events is what enables you to accept [different types of payment methods](https://stripe.com/payments/payment-methods-guide) with a single integration.
In addition to handling the `payment_intent.succeeded` event, we recommend handling these other events when collecting payments with the Payment Element:
| Event | Description | Action |
| ------------------------------------------------------------------------------------------------------------------------------- | ----------------------------------------------------------------------------------------------------------------------------------------------------------------------------------------------------------------------------------------------------------------------------------- | ------------------------------------------------------------------------------------------------------------------------------------------------------------------------------------------------ |
| [payment_intent.succeeded](https://docs.stripe.com/api/events/types.md?lang=php#event_types-payment_intent.succeeded) | Sent when a customer successfully completes a payment. | Send the customer an order confirmation and *fulfill* (Fulfillment is the process of providing the goods or services purchased by a customer, typically after payment is collected) their order. |
| [payment_intent.processing](https://docs.stripe.com/api/events/types.md?lang=php#event_types-payment_intent.processing) | Sent when a customer successfully initiates a payment, but the payment has yet to complete. This event is most commonly sent when the customer initiates a bank debit. It’s followed by either a `payment_intent.succeeded` or `payment_intent.payment_failed` event in the future. | Send the customer an order confirmation that indicates their payment is pending. For digital goods, you might want to fulfill the order before waiting for payment to complete. |
| [payment_intent.payment_failed](https://docs.stripe.com/api/events/types.md?lang=php#event_types-payment_intent.payment_failed) | Sent when a customer attempts a payment, but the payment fails. | If a payment transitions from `processing` to `payment_failed`, offer the customer another attempt to pay. |
## Test the integration
#### Cards
| Card number | Scenario | How to test |
| ------------------- | --------------------------------------------------------------------------------------------------------------------------------------------------------------------------------------------------------------------------------------------------------------------------------------------- | ----------------------------------------------------------------------------------------------------- |
| 4242424242424242 | The card payment succeeds and doesn’t require authentication. | Fill in the credit card form using the credit card number with any expiry date, CVC, and postal code. |
| 4000002500003155 | The card payment requires *authentication* (Strong Customer Authentication (SCA) is a regulatory requirement in effect as of September 14, 2019, that impacts many European online payments. It requires customers to use two-factor authentication like 3D Secure to verify their purchase). | Fill in the credit card form using the credit card number with any expiry date, CVC, and postal code. |
| 4000000000009995 | The card is declined with a decline code like `insufficient_funds`. | Fill in the credit card form using the credit card number with any expiry date, CVC, and postal code. |
| 6205500000000000004 | The UnionPay card has a variable length of 13-19 digits. | Fill in the credit card form using the credit card number with any expiry date, CVC, and postal code. |
#### Bank redirects
| Payment method | Scenario | How to test |
| ----------------- | ----------------------------------------------------------------------------------------------------------------------------------------------------------------------------------------------------- | -------------------------------------------------------------------------------------------------------------------------------------------------------- |
| Bancontact, iDEAL | Your customer fails to authenticate on the redirect page for a redirect-based and immediate notification payment method. | Choose any redirect-based payment method, fill out the required details, and confirm the payment. Then click **Fail test payment** on the redirect page. |
| Pay by Bank | Your customer successfully pays with a redirect-based and [delayed notification](https://docs.stripe.com/payments/payment-methods.md#payment-notification) payment method. | Choose the payment method, fill out the required details, and confirm the payment. Then click **Complete test payment** on the redirect page. |
| Pay by Bank | Your customer fails to authenticate on the redirect page for a redirect-based and delayed notification payment method. | Choose the payment method, fill out the required details, and confirm the payment. Then click **Fail test payment** on the redirect page. |
| BLIK | BLIK payments fail in a variety of ways – immediate failures (for example, the code has expired or is invalid), delayed errors (the bank declines) or timeouts (the customer didn’t respond in time). | Use email patterns to [simulate the different failures.](https://docs.stripe.com/payments/blik/accept-a-payment.md#simulate-failures) |
#### Bank debits
| Payment method | Scenario | How to test |
| ----------------- | ------------------------------------------------------------------------------------------------- | ------------------------------------------------------------------------------------------------------------------------------------------------------------------------------------------------- |
| SEPA Direct Debit | Your customer successfully pays with SEPA Direct Debit. | Fill out the form using the account number `AT321904300235473204`. The confirmed PaymentIntent initially transitions to processing, then transitions to the succeeded status three minutes later. |
| SEPA Direct Debit | Your customer’s payment intent status transitions from `processing` to `requires_payment_method`. | Fill out the form using the account number `AT861904300235473202`. |
See [Testing](https://docs.stripe.com/testing.md) for additional information to test your integration.
## Optional: Enable Apple Pay
### Register for an Apple Merchant ID
Obtain an Apple Merchant ID by [registering for a new identifier](https://developer.apple.com/account/resources/identifiers/add/merchant) on the Apple Developer website.
Fill out the form with a description and identifier. Your description is for your own records and you can modify it in the future. Stripe recommends using the name of your app as the identifier (for example, `merchant.com.{{YOUR_APP_NAME}}`).
### Create a new Apple Pay certificate
Create a certificate for your app to encrypt payment data.
Go to the [iOS Certificate Settings](https://dashboard.stripe.com/settings/ios_certificates) in the Dashboard, click **Add new application**, and follow the guide.
Download a Certificate Signing Request (CSR) file to get a secure certificate from Apple that allows you to use Apple Pay.
One CSR file must be used to issue exactly one certificate. If you switch your Apple Merchant ID, you must go to the [iOS Certificate Settings](https://dashboard.stripe.com/settings/ios_certificates) in the Dashboard to obtain a new CSR and certificate.
### Integrate with Xcode
Add the Apple Pay capability to your app. In Xcode, open your project settings, click the **Signing & Capabilities** tab, and add the **Apple Pay** capability. You might be prompted to log in to your developer account at this point. Select the merchant ID you created earlier, and your app is ready to accept Apple Pay.
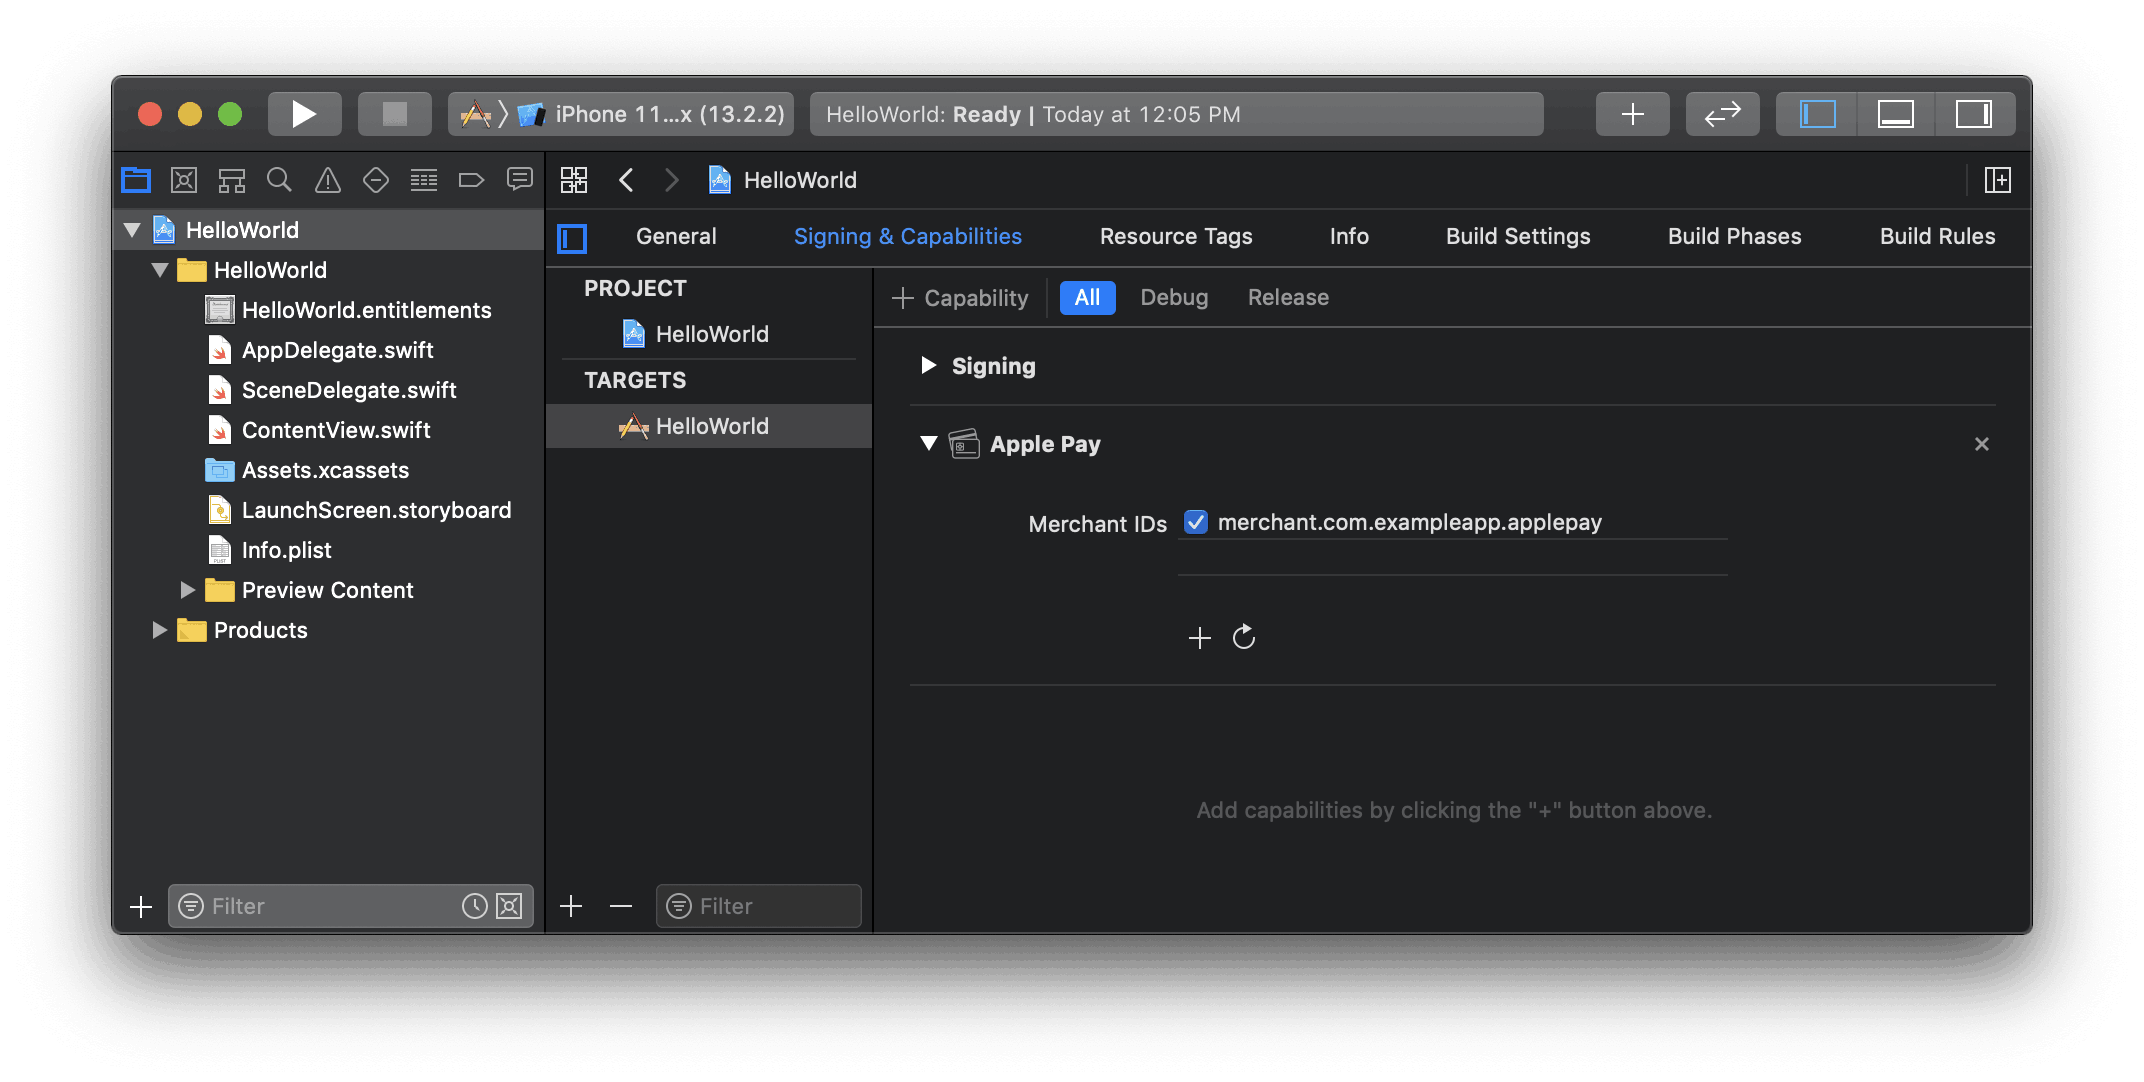
Enable the Apple Pay capability in Xcode
### Add Apple Pay
#### One-time payment
Pass your merchant ID when you create `StripeProvider`:
```javascript
import { StripeProvider } from '@stripe/stripe-react-native';
function App() {
return (
{/* Your app code here */}
);
}
```
When you call `initPaymentSheet`, pass in your [ApplePayParams](https://stripe.dev/stripe-react-native/api-reference/modules/PaymentSheet.html#ApplePayParams):
```javascript
await initPaymentSheet({
// ...
applePay: {
merchantCountryCode: 'US',
},
});
```
#### Recurring payments
When you call `initPaymentSheet`, pass in an [ApplePayParams](https://stripe.dev/stripe-react-native/api-reference/modules/PaymentSheet.html#ApplePayParams) with `merchantCountryCode` set to the country code of your business.
In accordance with [Apple’s guidelines](https://developer.apple.com/design/human-interface-guidelines/apple-pay#Supporting-subscriptions) for recurring payments, you must also set a `cardItems` that includes a [RecurringCartSummaryItem](https://stripe.dev/stripe-react-native/api-reference/modules/ApplePay.html#RecurringCartSummaryItem) with the amount you intend to charge (for example, “US$59.95 a month”).
You can also adopt [merchant tokens](https://developer.apple.com/apple-pay/merchant-tokens/) by setting the `request` with its `type` set to `PaymentRequestType.Recurring`
To learn more about how to use recurring payments with Apple Pay, see [Apple’s PassKit documentation](https://developer.apple.com/documentation/passkit/pkpaymentrequest).
#### iOS (React Native)
```javascript
const initializePaymentSheet = async () => {
const recurringSummaryItem = {
label: 'My Subscription',
amount: '59.99',
paymentType: 'Recurring',
intervalCount: 1,
intervalUnit: 'month',
// Payment starts today
startDate: new Date().getTime() / 1000,
// Payment ends in one year
endDate: new Date().getTime() / 1000 + 60 * 60 * 24 * 365,
};
const {error} = await initPaymentSheet({
// ...
applePay: {
merchantCountryCode: 'US',
cartItems: [recurringSummaryItem],
request: {
type: PaymentRequestType.Recurring,
description: 'Recurring',
managementUrl: 'https://my-backend.example.com/customer-portal',
billing: recurringSummaryItem,
billingAgreement:
"You'll be billed $59.99 every month for the next 12 months. To cancel at any time, go to Account and click 'Cancel Membership.'",
},
},
});
};
```
### Order tracking
To add [order tracking](https://developer.apple.com/design/human-interface-guidelines/technologies/wallet/designing-order-tracking) information in iOS 16 or later, configure a `setOrderTracking` callback function. Stripe calls your implementation after the payment is complete, but before iOS dismisses the Apple Pay sheet.
In your implementation of `setOrderTracking` callback function, fetch the order details from your server for the completed order, and pass the details to the provided `completion` function.
To learn more about order tracking, see [Apple’s Wallet Orders documentation](https://developer.apple.com/documentation/walletorders).
#### iOS (React Native)
```javascript
await initPaymentSheet({
// ...
applePay: {
// ...
setOrderTracking: async complete => {
const apiEndpoint =
Platform.OS === 'ios'
? 'http://localhost:4242'
: 'http://10.0.2.2:4567';
const response = await fetch(
`${apiEndpoint}/retrieve-order?orderId=${orderId}`,
{
method: 'GET',
headers: {
'Content-Type': 'application/json',
},
},
);
if (response.status === 200) {
const orderDetails = await response.json();
// orderDetails should include orderIdentifier, orderTypeIdentifier,
// authenticationToken and webServiceUrl
complete(orderDetails);
}
},
},
});
```
## Optional: Enable Google Pay
### Set up your integration
To use Google Pay, first enable the Google Pay API by adding the following to the `` tag of your **AndroidManifest.xml**:
```xml
...
```
For more details, see Google Pay’s [Set up Google Pay API](https://developers.google.com/pay/api/android/guides/setup) for Android.
### Add Google Pay
When you initialise `PaymentSheet`, set `merchantCountryCode` to the country code of your business and set `googlePay` to true.
You can also use the test environment by passing the `testEnv` parameter. You can only test Google Pay on a physical Android device. Follow the [React Native docs](https://reactnative.dev/docs/running-on-device) to test your application on a physical device.
```javascript
const { error, paymentOption } = await initPaymentSheet({
// ...
googlePay: {
merchantCountryCode: 'US',
testEnv: true, // use test environment
},
});
```
## Enable card scanning [Client-side]
> Enabling card scanning is required for Apple’s iOS app review process. Card scanning is not required for Android’s app review process, but we recommend enabling it.
### iOS
To enable card scanning support for iOS, set the `NSCameraUsageDescription` (**Privacy - Camera Usage Description**) in the `Info.plist` of your application, and provide a reason for accessing the camera (for example, “To scan cards”).
### (Optional) Android
To enable card scanning support, [request production access](https://developers.google.com/pay/api/android/guides/test-and-deploy/request-prod-access) to the Google Pay API from the [Google Pay and Wallet Console](https://pay.google.com/business/console?utm_source=devsite&utm_medium=devsite&utm_campaign=devsite).
- If you’ve enabled Google Pay, the card scanning feature is automatically available in our UI on eligible devices. To learn more about eligible devices, see the [Google Pay API constraints](https://developers.google.com/pay/payment-card-recognition/debit-credit-card-recognition)
- **Important:** The card scanning feature only appears in builds signed with the same signing key registered in the [Google Pay & Wallet Console](https://pay.google.com/business/console). Test or debug builds using different signing keys (for example, builds distributed through Firebase App Tester) won’t show the **Scan card** option. To test card scanning in pre-release builds, you must either:
- Sign your test builds with your production signing key
- Add your test signing key fingerprint to the Google Pay and Wallet Console
If your app doesn’t support Google Pay, you can use the Stripe card scanner.
> The Stripe card scanner is in public preview.
To enable card scanning support, add `stripecardscan` to the `dependencies` block of your [app/build.gradle](https://developer.android.com/studio/build/dependencies) file:
#### Groovy
```groovy
implementation 'com.stripe:stripecardscan:23.10.0'
```
## Optional: Customize the sheet
All customization is configured using `initPaymentSheet`.
### Appearance
Customise colours, fonts and so on to match the look and feel of your app by using the [appearance API](https://docs.stripe.com/elements/appearance-api/mobile.md?platform=react-native).
### Merchant display name
Specify a customer-facing business name by setting `merchantDisplayName`. By default, this is your app’s name.
```javascript
await initPaymentSheet({
// ...
merchantDisplayName: 'Example Inc.',
});
```
### Dark mode
By default, `PaymentSheet` automatically adapts to the user’s system-wide appearance settings (light and dark mode). You can change this by setting the `style` property to `alwaysLight` or `alwaysDark` mode on iOS.
```javascript
await initPaymentSheet({
// ...
style: 'alwaysDark',
});
```
On Android, set light or dark mode on your app:
```
// force dark
AppCompatDelegate.setDefaultNightMode(AppCompatDelegate.MODE_NIGHT_YES)
// force light
AppCompatDelegate.setDefaultNightMode(AppCompatDelegate.MODE_NIGHT_NO)
```
## Optional: Complete payment in your UI
You can present Payment Sheet to only collect payment method details and then later call a `confirm` method to complete payment in your app’s UI. This is useful if you have a custom buy button or require additional steps after payment details are collected.

> A sample integration is [available on our GitHub](https://github.com/stripe/stripe-react-native/blob/master/example/src/screens/PaymentsUICustomScreen.tsx).
1. First, call `initPaymentSheet` and pass `customFlow: true`. `initPaymentSheet` resolves with an initial payment option containing an image and label representing the customer’s payment method. Update your UI with these details.
```javascript
const {
initPaymentSheet,
presentPaymentSheet,
confirmPaymentSheetPayment,
} = useStripe()
const { error, paymentOption } = await initPaymentSheet({
customerId: customer,
customerEphemeralKeySecret: ephemeralKey,
paymentIntentClientSecret: paymentIntent,
customFlow: true,
merchantDisplayName: 'Example Inc.',
});
// Update your UI with paymentOption
```
1. Use `presentPaymentSheet` to collect payment details. When the customer finishes, the sheet dismisses itself and resolves the promise. Update your UI with the selected payment method details.
```javascript
const { error, paymentOption } = await presentPaymentSheet();
```
1. Use `confirmPaymentSheetPayment` to confirm the payment. This resolves with the result of the payment.
```javascript
const { error } = await confirmPaymentSheetPayment();
if (error) {
Alert.alert(`Error code: ${error.code}`, error.message);
} else {
Alert.alert(
'Success',
'Your order is confirmed!'
);
}
```
Setting `allowsDelayedPaymentMethods` to true allows [delayed notification](https://docs.stripe.com/payments/payment-methods.md#payment-notification) payment methods like US bank accounts. For these payment methods, the final payment status isn’t known when the `PaymentSheet` completes, and instead succeeds or fails later. If you support these types of payment methods, inform the customer their order is confirmed and only fulfil their order (for example, ship their product) when the payment is successful.
## Payouts
By default, any charge that you create for a connected account accumulates in the connected account’s [Stripe balance](https://docs.stripe.com/connect/account-balances.md) and is paid out on a daily rolling basis. Connected accounts can manage their own payout schedules in the [Stripe Dashboard](https://dashboard.stripe.com/settings/payouts).
## See also
- [Manage connected accounts in the Dashboard](https://docs.stripe.com/connect/dashboard.md)
- [Issue refunds](https://docs.stripe.com/connect/direct-charges.md#issue-refunds)
- [Customise statement descriptors](https://docs.stripe.com/connect/statement-descriptors.md)
- [Work with multiple currencies](https://docs.stripe.com/connect/currencies.md)